CLEANING AND INSPECTION
1. Thoroughly clean and inspect each part. If inspection
shows that any parts are bent, broken or damaged, those
parts should be repaired or replaced.
2. See Figure 2-85. Inspect fork tube bushing (24) and
bushing guide (14) and replace as required.
3. Always replace oil seals (12) and o-rings (6).
4. Check dust cover (9) where it rubs on fork tube.The dust
cover should present a good continuous seal and not show
excessive wear.
5. Check the slider tube (1) where it rubs on dust cover.The
tube should show a bright, shining surface, free of scoring
or abrasions.
6. If springs (4) are broken, replace springs.
7. If a fork tube or slider (16, 17) is bent or damaged, replace
it.
8. Replace all other worn or damaged components as
necessary.
ASSEMBLY
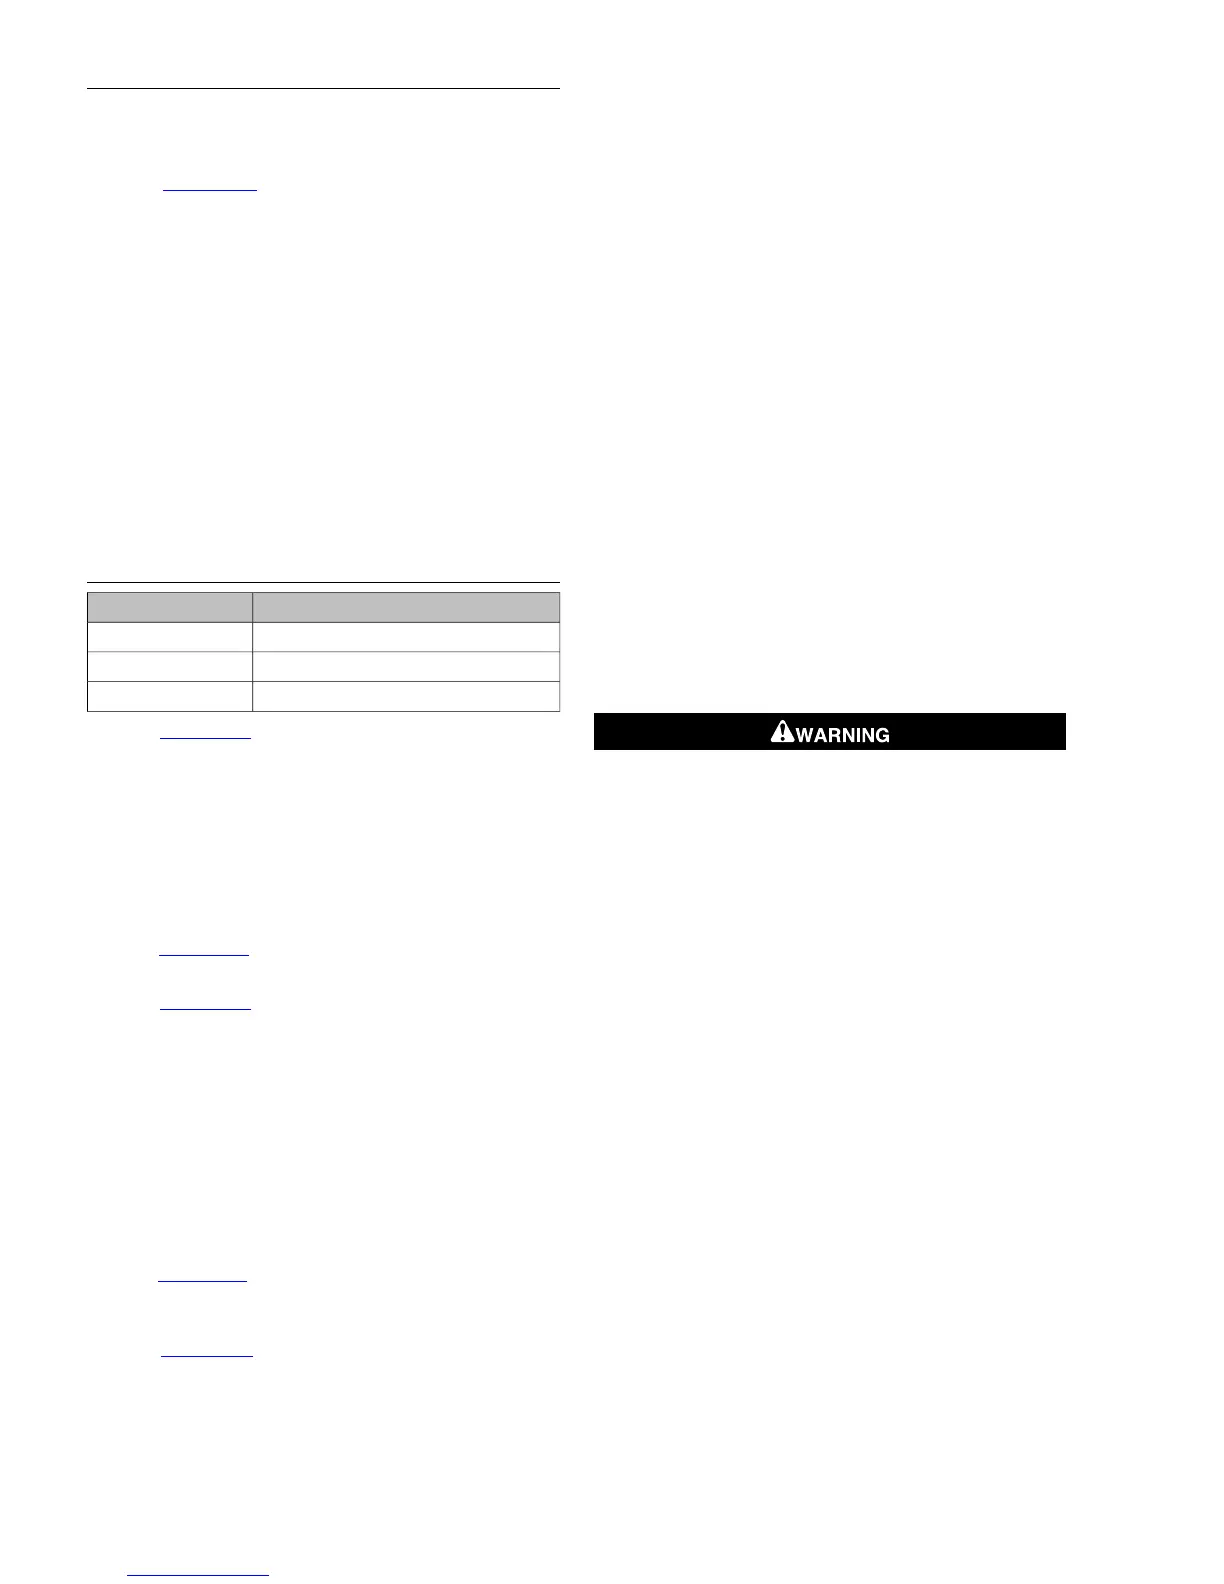
TOOL NAMEPART NUMBER
FORK SEAL DRIVERB-45305
PRO-LEVEL OIL GAUGEHD-59000A
TYPE E FORK OILHD-99884-80
1. See Figure 2-85. Insert seat pipe assembly (3) with the
spring (2) into slider tube (1).
2. Slide bushing guide (14) down to bushing (24) on fork tube
(1). Follow with spacer (13), oil seal (12), retaining ring
(11), dust shield (10) and slider cover (9).
3. Install fork tube into FORK HOLDING TOOL (Part No. HD-
41177) mounted horizontally in a vise.
4. Fit lower stop (15) onto seat pipe.
5. See Figure 2-86. Side seat pipe back into fork tube until
seat pipe is centered in tube.
6. See Figure 2-85. Gently install slider assembly (16, 17)
onto slider tube and bushing (24).
7. Thread seat pipe screw (20) and washer (19) into seat
pipe through bottom of slider assembly. Draw fastener
into seat pipe but do not tighten.
8. Verify action of fork by sliding slider up and down fork tube.
9. Assemble the FORK SEAL DRIVER (Part No. B-45305)
over fork tube in front of oil seal.
NOTE
Chamfered lips on oil seal MUST face towards oil in fork.
10. See Figure 2-87. Holding fork seal driver (4) together, tap
oil seal (3), spacer (2) and bushing guide (1) into slider
bore.
11. See Figure 2-85. Install oil seal retaining ring (11) into
groove in top of oil seal.
12. Push dust seal (10) against oil seal and stopper ring.
13. Rotate slider cover (9) to match any removal burrs to notch
in slider and snap slider cover into place.
14. Move slider through its full range of travel several times
to verify alignment. Then, pulling down on slide to apply
downward force on rebound spring, tighten seat pipe screw
to 106-159 in-lbs (12-18 Nm).
15. Re-position fork tube vertically in fork holding tool. With
slider tube compressed, fill the fork with Harley-Davidson
TYPE E FORK OIL (Part No. HD-99884-80) until it is
approximately the applicable following distance from top
of fork tube:
a. FXDWG- 4.4 in. (112 mm), approximately 29.6
oz (875 cc).
b. All other Dyna models- 4.3 in. (110 mm), approxim-
ately 26.6 oz (787 cc).
16. Slowly pump slider 8 to 10 times to exhaust air from
assembly. Fully compress slider to determine oil level.
NOTE
Fork oil level is measured from top of fork tube, with spacer
and spring removed and fork fully compressed.
17. Using the PRO-LEVEL OIL GAUGE (Part No. HD-
59000A), adjust the oil level to specification.
18. Pull out the slider and install the spring (4) in the fork tube
with the tightly wound end at the bottom.
19. Install the washer (5) and spring collar (8).
Wear safety glasses or goggles when servicing fork
assembly. Do not remove slider tube caps without relieving
spring preload or caps and springs can fly out, which could
result in death or serious injury. (00297a)
20. With a new O-ring, install and tighten fork tube caps to
16-43 ft-lbs (22-58 Nm).
NOTE
To prevent cross threading fork tube caps, use caution when
threading in the caps with the spring compressed.
21. Repeat for opposite fork tube and slider assembly.
2-56 2008 Dyna Service: Chassis


 To Next Page
 Loading...
