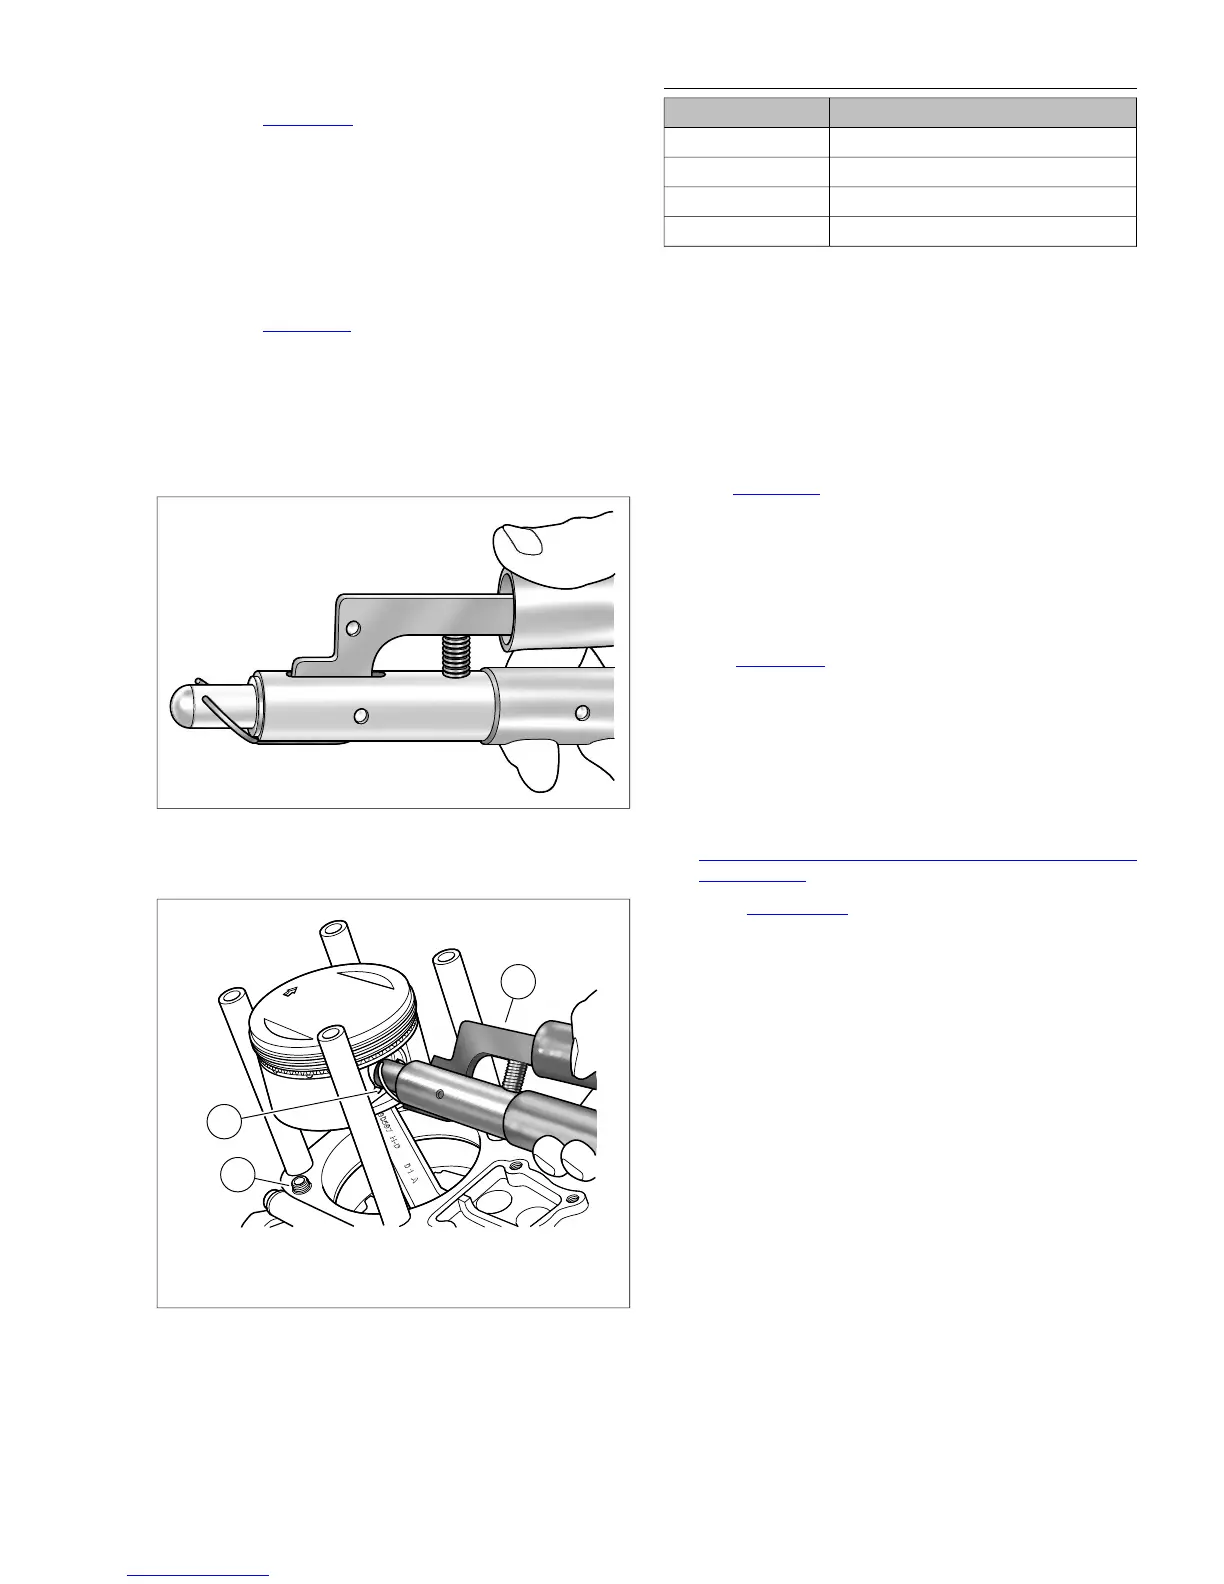
7. Install new piston pin circlip with the PISTON PIN CIRCLIP
REMOVER/INSTALLER (Part No. HD-42317-A).
a. See Figure 3-32. Slide circlip down nose of tool until
it contacts claw. Lightly squeeze handles of tool to
capture circlip in claw.
b. Releasing pressure on handles, rotate circlip so that
the end gap is centered at top of tool and then
recapture in claw.
c. Tilt the circlip forward until the end gap contacts nose
of tool.
d. See Figure 3-33. Insert the tool (1) into the piston pin
bore until claw is aligned with slot (2) in piston.
e. Firmly push the tool into the piston pin bore until it
bottoms. Release handles and remove tool.
f. Inspect the circlip to verify that it is fully seated in the
groove.
1. Piston pin circlip remover/installer
2. Slot
3. Cylinder deck dowel (O-ring not shown)
Figure 3-33. Pin Circlip Remover/Installer (Part No.
HD-42317)
CYLINDER
TOOL NAMEPART NUMBER
PISTON SUPPORT PLATEHD-42322
THREADED CYLINDERSHD-95952-1
CONNECTING ROD CLAMPING TOOLHD-95952-33C
PISTON RING COMPRESSORHD-96333-51E
NOTE
O-rings that are missing, distorted, pinched or otherwise dam-
aged will result in either oil leakage or low oil pressure. Use of
the wrong o-ring will have the same results. Since many o-rings
are similar in size and appearance, always use new o-rings,
keeping them packaged until use to avoid confusion.
1. Apply a very thin film of clean H-D 20W50 engine oil to
new o-rings for both cylinder deck ring dowels. Install and
verify that o-ring is properly seated in groove.
2. See Figure 3-34. Apply a very thin film of clean H-D 20W50
engine oil to new o-ring seal for the bottom of the cylinder
liner. Install new o-ring seal.
NOTE
Excessive lubrication of cylinder sleeve o-ring seal will result
in oil weepage between cylinder and crankcase as engine is
run.This condition may be incorrectly diagnosed as an oil leak.
3. See Figure 3-35. Verify that the piston ring end gaps are
staggered. Rotate each ring to position the gap 90 to 180
degrees from the gap in the ring above it. Locate the top
piston ring (5) gap towards the intake port.
4. Apply clean H-D 20W50 engine oil to piston, piston rings
and cylinder bore.
5. Remove protective covers from cylinder studs. Rotate
engine until piston is at top dead center. If necessary, see
3.15 TOP END OVERHAUL: DISASSEMBLY, Rocker Arm
Support Plate for three methods of engine rotation.
6. See Figure 3-36. Install the PISTON SUPPORT
PLATE (Part No. HD-42322).
a. Slide both adjustable knobs (2) on support plate (1)
down away from forked end. Tighten knobs when
contact is made with flats at end of slots.
b. With the forked end of the tool pointing towards the
center of the engine and the adjustable knobs facing
downward, capture shank of connecting rod in fork.
Lay tool on cylinder deck so that adjustable knobs
contact wall of cylinder bore.
c. Rotate engine until piston skirt is centered and firmly
seated on top of support plate.
2008 Dyna Service: Engine 3-33



 To Next Page