5
3-90-70745R16_08/13
2. Positive connect method;Similarly,thismethodemploys
the use of a stainless steel liner, however the liner is
runtheentirelengthofthechimney.Itisnotnecessary
tosealaroundtheventingatthedamper,howeverthe
properashingmustbeusedatthetopofthechimneyto
ensurethatrainand
otherelementsdonot
enterthechimney.
Anovaltoroundtransition
suchasSimpsonDura-
Vent® Item #6DLO-
36FR works well for
passing through the
narrowdamperarea.In
somecases,this piece
whichis36incheslong
will reach the rst ue
tile.Ifmoreconnectoris
needed,orforafullliner
installation, it provides
theanchorpointfor6inch
dura-liner®tobeused.
Seemoreonchimneyrequirementslaterinthismanual.
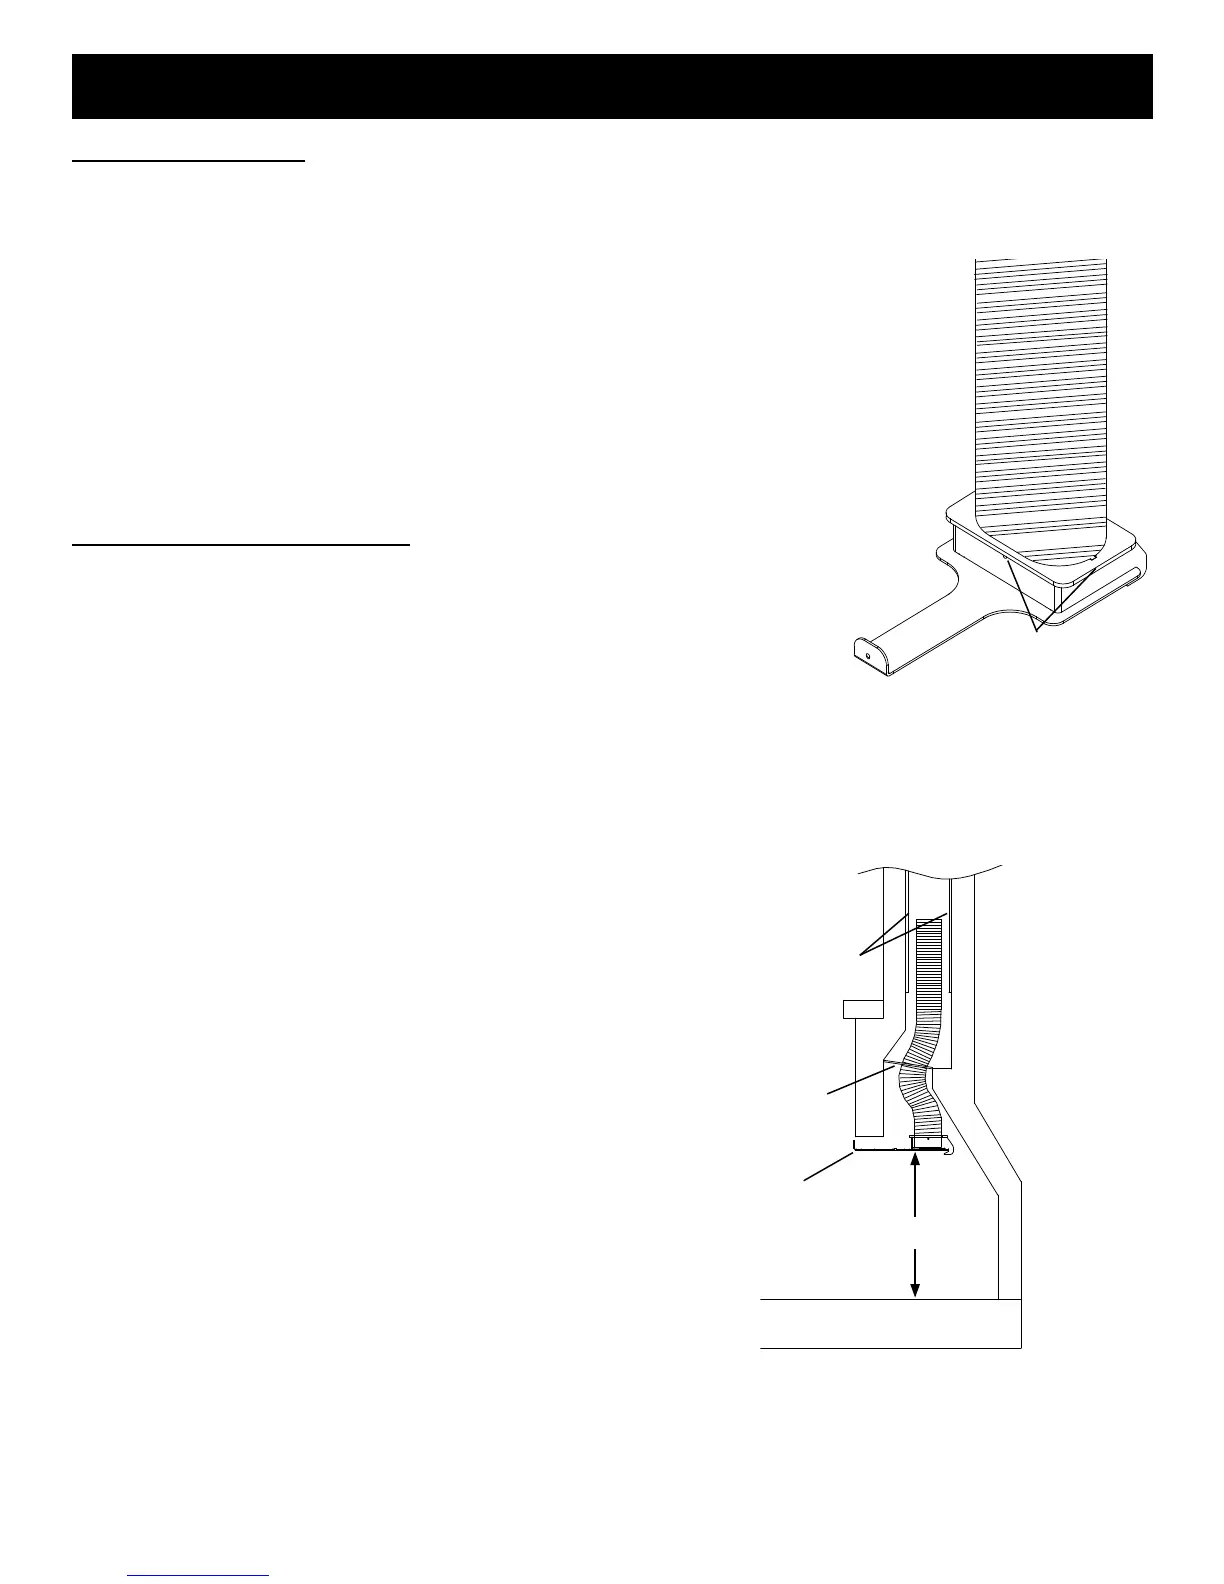
Withthelinerorconnectorinsertedintothechimney,install
theueadaptertothepipeusingaminimumofthreescrews.
Positiontheadapterataheightofjustunder24inchesfrom
theoorofthereplace.(SeeFig.B).
2.1 PARTS INSPECTION
UponreceiptofyourHarman®Insert,pleasebesureyou
haveallofthepieces.Youshouldndthefollowing:
1. AshPan
2. ShakerHandle
3. ManualandWarranty
4. SteelFluePlate(seeillustrationinsection2.2)
5. DoorKit-Separatecarton
a.GlassFrame
b. Glass, Door Top Trim, Draft Control, (3) Spring
handles,AndHardwarePack.
6. WingKit-2separatecartons
a.TopWingandBrassTrim
b.SideWingswithBlowers,PowerCord,andapackage
containingtheblowerboxcoversandhardware.
2.2 INSTALLATION INSTRUCTIONS
TheminimumreplacesizethatyourHarman®Insertwill
tintois24"highby31"wide.Acriticaldimensionfortin
thereplaceisthatyoumusthave161/8"depthminimum
at24"heightminimum.
The rst step in installing your newinsert is tolocate the
damperinthetopofthereplace.Ataminimum,thedamper
mustbesecuredintheopenpositionwithwireorothernon-
combustiblematerial.Ifpossible,itisbesttototallyremove
thedampertopreventaccidentalclosing.
Beforeproceedingwithinstallation,itisrecommendedthatyou
haveyourchimneycleanedandinspectedbyaprofessional
todeterminethatyourchimneyisinsafecondition.
IT IS YOUR RESPONSIBILITY TO MAKE CERTAIN YOUR
CHIMNEY IS IN THE PROPER CONDITION TO SAFELY
FUNCTION WITH A SOLID FUEL BURNING APPLIANCE.
IT IS ALSO YOUR RESPONSIBILITY TO COMPLY WITH
ALL STATE AND LOCAL CODES PERTAINING TO
INSTALLATION AND BURNING OF SOLID FUELS.
Therearetwoacceptablemeansforconnectingtheexhaust
oftheinserttothechimney.
1. Direct connect method;Thismethodemploysashort
sectionofstainlesssteelexpipewhichattachestothe
insertandrunsthroughthedamperandintothechimney
base.Thismustberunatleastashighastherstue
tile.Thechimneymustbesealedaroundtheexpipe.
thisisusuallybestaccomplishedwithasteelplateornon-
combustiblepackingmaterialaroundtheoriginaldamper
location.
ASSEMBLY & INSTALLATION
Stainless Steel
Flex Pipe
Flue Adapter
Attach With At
Least 3 Screws
Figure A
Flue Adapter
Guide Handle
Block-Off Plate
Tile Flue Liner
Figure B
Approximately 24"
Height From Floor

 Loading...