EasyManua.ls Logo

Harmar Mobility AL100-DE - User Manual

Harmar Mobility AL100-DE
20 pages
Print Icon
To Next Page IconTo Next Page
Loading...
18MAR2022 | 630-00105 B
OUTSIDE
LIFTS
OWNER’S
MANUAL
Question and Answer IconNeed help?

Do you have a question about the Harmar Mobility AL100-DE and is the answer not in the manual?

Summary

Section 1 Introduction

Device Name and Indication of Use

Specifies the device name and its intended use for lifting mobility devices for mobility-impaired persons.

Read and Understand Manual

Emphasizes the importance of reading and understanding the manual for proper use and maintenance.

Purchasing and Dealer Contact Information

Provides information on contacting the dealer for questions regarding operation and maintenance.

Technical Specifications

Directs users to the manufacturer's website for detailed technical specifications of the lift model.

General Information and Usage Guidelines

Details the lift's purpose for transporting mobility devices and warns against outside-intended use.

Section 2 Safety

Safety Definitions and Alert Symbols

Explains safety alert symbols (Warning, Caution, Notice) and their meanings for user safety.

Section 3 Operation

Special Cautions During Operation

Highlights specific safety precautions to be observed while operating the lift.

Lowering the Lift

Step-by-step instructions for safely lowering the lift platform to the ground.

Positioning the Mobility Device onto the Platform

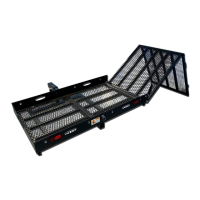
Guide to correctly positioning the mobility device on the platform for secure transport.

Securing the Mobility Device

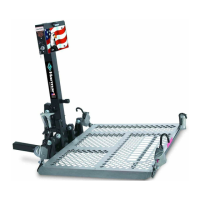
Details on how to properly secure the mobility device using the lift's securement system.

Raising the Lift

Instructions for safely raising the lift platform with the secured mobility device.

Unloading the Mobility Device

Procedure for safely unloading the mobility device from the lift platform.

Stowing the Platform

Instructions on how to fold and secure the lift platform when not in use.

Swing-Away Feature Operation

Information about the Swing-Away feature and its function for vehicle access.

Opening the Swing-Away

Step-by-step guide on how to safely open the Swing-Away mechanism.

Closing the Swing-Away

Instructions for safely closing the Swing-Away mechanism.

Section 4 Maintenance

Routine Maintenance Tasks

Details on essential maintenance like oiling, greasing, and checking for paint damage to ensure lift longevity.

Section 5 Troubleshooting

Troubleshooting Common Issues

Addresses common lift problems such as lack of power or unusual noises, offering solutions.

Manual Override Procedure

Instructions on how to manually operate the lift in case of power failure.

Section 6 Motor Cover Wiring Schematic

Section 7 Warranty

3-Year Transferable Warranty Details

Outlines the terms, conditions, coverage, and limitations of the 3-year transferable warranty.

Overview

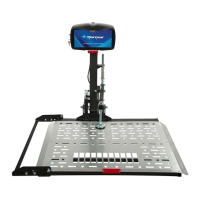
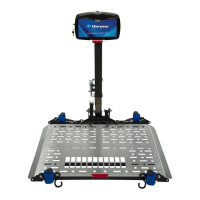
This document is the Owner's Manual for Harmar Outside Vehicle Lifts, providing instructions for proper use and maintenance.

Function Description

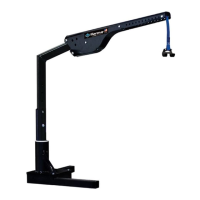
Harmar Outside Vehicle Lifts are designed to transport mobility devices such as wheelchairs, power chairs, or scooters for mobility-impaired individuals. The lift facilitates the loading and unloading of these devices onto and off a vehicle. The intended use is strictly for transporting mobility devices, and any operation outside this intended use will void the warranty. The lifts are not meant for human transportation, and the mobility device must be unoccupied before operating the lift. Each lift is designed to transport a specific mobility device only, and users should not attempt to move any other objects, people, animals, or materials.

Important Technical Specifications

Specific technical specifications for each lift model can be found on harmar.com. The manual emphasizes that specifics may vary based on the chair model and lift combination.

Usage Features

The manual outlines several key usage features and operational procedures:

Lowering the Lift:

  1. Insert the key and turn the switch to the ON position.
  2. Press DOWN on the toggle switch. The platform will unfold automatically (AL010 & AL050 models require manual unfolding and assistance).
  3. Continue lowering until the platform reaches the ground and becomes level.
    • NOTICE: Do not over-lower the platform to the point where the vehicle begins to rise, as this will damage the lift.

Positioning the Mobility Device onto the Platform:

  1. Slowly walk the mobility device onto the platform.
  2. Maneuver the device to the center of the platform, or ensure drive wheels rest within the wheel cradles, depending on the lift and chair model.
    • IMPORTANT: Proper positioning is critical for securing the device. Verify drive wheels are captured within the cradles.
    • NOTICE: Always walk mobility devices onto the platform manually.

Securing the Mobility Device: Depending on the lift model and securement device (hold-down arm, hold-down foot, or straps), the platform may be raised halfway using the UP toggle switch to facilitate attachment of straps or positioning of the hold-down arm.

  • NOTICE: For scooters with pneumatic tires, ensure tires are properly inflated. Improper inflation can change deck height and clamping force, potentially causing the scooter to fall off if not properly secured. On some scooters, the steering tiller may need to be temporarily moved forward to clear the hold-down foot.
  • Ensure the securement system has enough tension to secure the device.

Raising the Lift:

  1. Once the mobility device is secure, use the UP toggle switch to continue raising the lift.
  2. Stop raising when the lift reaches the top of travel and a clicking or ratcheting sound is heard.
  3. Remove the key.

Unloading the Mobility Device:

  1. Insert the key and turn the switch to the ON position.
  2. Press DOWN on the toggle switch to lower the lift.
  3. Release/move non-automatic hold-down devices.
  4. Carefully guide the chair off the platform.
    • NOTE: Always walk the mobility device off the platform. Once clear, press UP to raise the platform.

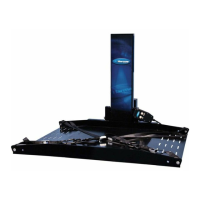
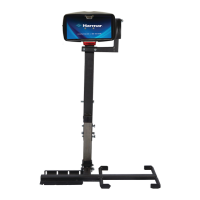
Stowing the Platform: After unloading, press UP on the toggle switch. The platform will automatically fold (except AL010 and AL050, which require manual lifting until locked).

  • NOTICE: Do not leave the lift's platform on the ground. Keep it upright and stowed when not in use or when leaving the vehicle.

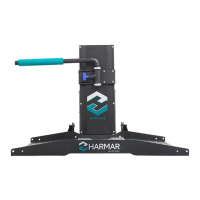
Swing-Away Feature: The Swing-Away allows the lift to be swung away from the vehicle's back for trunk/cargo access. It can be purchased and installed by an authorized dealer if not present.

  • NOTICE: NEVER open the Swing-Away with the mobility device on the lift, as this will cause damage to the Swing-Away, the lift, the vehicle, and the mobility device, and will void the warranty.

Opening the Swing-Away:

  1. Remove the safety pin.
  2. Pull the T-handle, grasp the lift firmly, and swing it out away from the vehicle.
    • NOTE: On AL105L models, the platform must be pushed down and away from the vehicle to release the latching mechanism.
  • WARNING: Only open the Swing-Away on level ground to avoid losing control, personal injury, or property damage.

Closing the Swing-Away:

  1. Close the Swing-Away by returning it to the stowed position.
  2. When fully closed, the T-handle will be fully retracted.
  3. Install the safety pin.
  • WARNING: Stay clear of the latching mechanism to avoid personal injury. The safety pin must be installed before transit to avoid damage and injury.

Special Cautions:

  • This lift is NOT for human transportation.
  • The mobility device MUST be unoccupied.
  • Each lift is designed for a specific mobility device; do not attempt to move other objects or people.
  • Exercise extreme care when transporting the mobility device to avoid damage or injury.
  • Drive slowly over rough terrain (potholes, unpaved roads, railroad tracks, speed bumps) to prevent damage to the lift, vehicle, and mobility device.
  • Return the hold-down arm to a side or down position before folding the platform (specific models listed) to prevent damage.
  • Beware of pinch points; keep hands, feet, objects, clothing, or jewelry away from moving parts.
  • Keep hands, feet, and objects away from the platform as it lowers.
  • Walk the mobility device onto the platform; driving may present complications.
  • Keep chair tires properly inflated.
  • Secure the chair firmly before driving.
  • Inspect the lift often; if damaged, DO NOT USE and contact a dealer for repairs.
  • Do not enter steep driveways straight on; enter at an angle.
  • Do not move the vehicle with the platform down, as this will cause damage.
  • Check with a dealer for compatibility before replacing a mobility device.
  • Hand-wash or use touch-less automatic car washes only; DO NOT use automatic car wash systems.

Maintenance Features

The lift is designed to be trouble-free, but basic maintenance ensures reliable use:

  • Lubrication: Oil pivot points on all moving parts every six months.
  • Greasing: Grease the inside vertical square tube once a year (every six months under hard conditions or extreme weather). Lower the platform, clean the tube with mineral spirits, WD-40®, or a good solvent, then grease with high-grade water-resistant grease (e.g., boat trailer wheel-bearing grease).
  • Paint/Rust: Check for paint chips and touch up bare metal with black enamel or lacquer to inhibit rust, especially if exposed to salt air or road salt.

Troubleshooting:

  • No Power:
    • Ensure lift and vehicle harnesses are connected.
    • Check the self-resettable circuit breaker on the red wire by the battery.
    • Try starting the car if the battery is weak.
  • Ratcheting Noise (when raising):
    • Unplug the lift, remove the round black plug from the motor cover, and use a 3/8" socket to manually lower the lift (see manual override instructions).
    • If the actuator spins without moving, take the lift to a dealer.

Manual Override (in case of power failure):

  • WARNING: Always disconnect power by unplugging the lift harness from the vehicle harness before attempting manual override to avoid electrical shock or accidental activation.
  1. Unplug power to the lift.
  2. Using a coin or key, remove the cap on the top of the motor cover.
  3. Insert a 3/8" socket wrench into the actuator and rotate the hex shaft:
    • Counterclockwise to lower the platform.
    • Clockwise to raise the platform.

Warranty

Harmar Mobility offers a 3-year transferable warranty against defects in material, mechanical, and electrical components (parts), excluding labor costs, batteries, paint, and covers. The warranty is valid if products are installed, maintained, and operated properly. It does not cover defects in vehicles, maintenance, adjustments, or damage from accident, misuse, neglect, or modification. Defective parts must be returned prepaid to Harmar for inspection. The warranty is limited to credit, repair, or replacement at Harmar's option. This express warranty is in lieu of all other warranties or conditions, including implied warranties of merchantability or fitness for a particular purpose. Customers must fill out and return the separate warranty form within ten days of installation to register the lift.

Harmar Mobility AL100-DE Specifications

General IconGeneral
BrandHarmar Mobility
ModelAL100-DE
CategoryLifting Systems
LanguageEnglish

Related product manuals