Quick Guide
MM19557
Rev. D, Jun/09
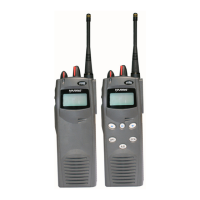
P5100 Series
Portable
Radios
P5100 Radio Keypad Functions
(P5150 Model Only)
Locking/Unlocking Keypad
1. Press the
button.
2. Within 1 second, press the Option button on the side of
the radio.
P5100 Radio Keypad Key Functions
Selects system, groups, or channels.
Secondary Function
: Changes the selection for an
item within a list.
Accesses the pre-stored menu.
Secondary Function
: Activates a selected item within
a list, similar to an “Enter” key.
Adds/Deletes selected groups or channels from the
Scan list of the currently selected system.
Toggles the Scan operation ON and OFF.
Activates one of a number of programmable
software options, selected during the PC
programming. Programmable options include
high/low transmitter power and talkaround.
P5100 Radio Controls
Top View
Side View
Power On-Off/
Volume Knob
Applies power to the radio and adjusts
the receiver’s volume.
System/Group/
Channel Control
Knob
A 16 position rotary knob for selecting
systems or groups/channels (set in
programming).
Emergency/ Home
Button
Pre-programmed to select a pre-set
group/ system (Home) or declare an
emergency (only one can be assigned to
this button).
PTT Button
The Push-to-Talk (PTT) button is
pressed to transmit.
Option Button
Pre-programmed to activate one
software option.
Clear/Monitor
Button
In Trunked mode, the Clear/Monitor
button is used to: 1) exit the current
operation and 2) terminate special calls.
In conventional mode the Clear/Monitor
button is used to: 1) monitor channels
and 2) momentarily remove Channel
Guard decoding from a channel.
P5100 Display & Status Icons
Indicates radio is transmitting.
In trunked mode:
Steady - radio is transmitting/receiving a call.
Flashing - call has been queued.
In conventional mode:
Steady - a call is being received.
T99 Mode enabled.
Steady - Channel Guard (CG) enabled.
OFF - CG temporarily disabled.
Steady – EDACS
®
trunked system in Failsoft™
mode.
Steady - selected group/channel set at low power.
OFF selected group/channel is set at high power.
Selected talk group/channel is operating in
Analog, Digital, or Project 25 (P25) mode.
ON (Animated, rotating) – Scan mode is enabled.
ON (Steady) – Scan temporarily disabled
(priority scan status icon is present).
OFF – Scan temporarily disabled (priority scan
status icon is not present).
P5100 Display & Status Icons (continued)
Selected talk group/channel is a Priority 1, 2, or
“in the scan list” (lowest priority). The talk group
or channel isn’t in the scan list if a priority icon
isn’t associated with it. Icon is displayed in the
third character block from the right.
Steady – special call select/entry mode
(Individual or Telephone Interconnect).
Steady – gauges approximate remaining battery
charge.
Flashing – low battery.
Battery Packs
Attach Battery Pack
1. Align the tab at top of the
battery pack with the slot
at the top of the radio.
2. Press down on the
bottom of the battery until
it clicks into place.
Remove Battery Pack
1. Press latch.
2. Lift from bottom.
3. Slide back.
Quick Guide
MM19557
Rev. D, Jun/09
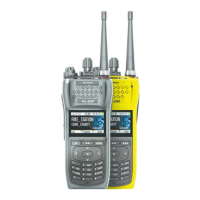
P5100 Series
Portable
Radios
P5100 Radio Keypad Functions
(P5150 Model Only)
Locking/Unlocking Keypad
1. Press the
button.
2. Within 1 second, press the Option button on the side of
the radio.
P5100 Radio Keypad Key Functions
Selects system, groups, or channels.
Secondary Function
: Changes the selection for an
item within a list.
Accesses the pre-stored menu.
Secondary Function
: Activates a selected item within
a list, similar to an “Enter” key.
Adds/Deletes selected groups or channels from the
Scan list of the currently selected system.
Toggles the Scan operation ON and OFF.
Activates one of a number of programmable
software options, selected during the PC
programming. Programmable options include
high/low transmitter power and talkaround.
P5100 Radio Controls
Top View Side View
Power On-Off/
Volume Knob
Applies power to the radio and adjusts
the receiver’s volume.
System/Group/
Channel Control
Knob
A 16 position rotary knob for selecting
systems or groups/channels (set in
programming).
Emergency/ Home
Button
Pre-programmed to select a pre-set
group/ system (Home) or declare an
emergency (only one can be assigned to
this button).
PTT Button
The Push-to-Talk (PTT) button is
pressed to transmit.
Option Button
Pre-programmed to activate one
software option.
Clear/Monitor
Button
In Trunked mode the Clear/Monitor
button is used to: 1) exit the current
operation and 2) terminate special calls.
In conventional mode the Clear/Monitor
button is used to: 1) monitor channels
and 2) momentarily remove Channel
Guard decoding from a channel.
P5100 Display & Status Icons
Indicates radio is transmitting.
In trunked mode:
Steady - radio is transmitting/receiving a call.
Flashing - call has been queued.
In conventional mode:
Steady - a call is being received.
T99 Mode enabled.
Steady – Channel Guard (CG) enabled.
OFF - CG temporarily disabled.
Steady - EDACS
®
trunked system in Failsoft™
mode.
Steady - selected group/channel set at low power.
OFF selected group/channel is set at high power.
Selected talk group/channel is operating in
Analog, Digital, or Project 25 (P25) mode.
ON (Animated, rotating) – Scan mode is enabled.
ON (Steady) – Scan is temporarily disabled
(priority scan status icon is present).
OFF – Scan temporarily disabled (priority scan
status icon is not present).
P5100 Display & Status Icons (continued)
Selected talk group/channel is a Priority 1, 2, or
“in the scan list” (lowest priority). The talk group
or channel isn’t in the scan list if a priority icon
isn’t associated with it. Icon is displayed in the
third character block from the right.
Steady – special call select/entry mode
(Individual or Telephone Interconnect).
Steady – gauges approximate remaining battery
charge.
Flashing – low battery.
Battery Packs
Attach Battery Pack
1. Align the tab at top of the
battery pack with the slot
at the top of the radio.
2. Press down on the bottom
of the battery until it clicks
into place.
Remove Battery Pack
1. Press latch.
2. Lift from bottom.
3. Slide back.
Copyright© 2004, 2006, 2007, 2009 Harris Corporation. All rights
Copyright© 2004, 2006, 2007, 2009 Harris Corporation. All rights reserved.