KIPW HEATER INSTALLATION MANUAL
|
PAGE 5
POSITIONING THE HEATER COMPONENTS
Indoor Saunas
For indoor sauna applications, mount the power unit on or near the sauna. It can be mounted on the exterior of the sauna, or on
anadjacentwall.Themainpowerforyourheaterwillconnecthererst,andthenrelayontoyourheater.Next,considerwhere
you’d like to mount your touchpad. You can mount the touchpad wherever it’s most convenient for you. We do not recommend
mounting the touchpad in the sauna itself.
Outdoor Saunas
Neitherofthesecomponentsarewaterproof,soproperprecautionsshouldbetakenforoutdoorsaunaapplications.Please
consider the following:
Power Unit
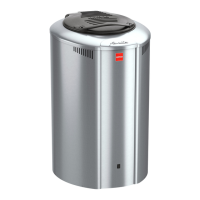
• Thepowerunitshouldbemountedinadrylocation.Ifitcannotbemountedinadry
location, then it should be mounted in a ventilated weatherproof enclosure.
• Pleasenotethatthetemperaturesensorthatcomeswiththesaunakithasa15’reach-the
sensor is mounted in the sauna and connects to the power unit. If the sauna is located
greater than this distance away from where the power unit is installed, then the power
unit should be mounted nearer to the sauna in a weatherproof enclosure with proper
ventilation. The image on the right is an example of an enclosure. Alternatively, you can
purchase a longer temperature sensor wire directly from Almost Heaven Saunas.
Touchpad
• Thetouchpadshouldbemountedindoorsinadryarea.
• Thetouchpadconnectstothepowerunitwiththeprovided20’datacable.Ifyouneedalongerdatacableforyour
application, you may purchase one directly from Almost Heaven Saunas.
 Loading...