16
EN
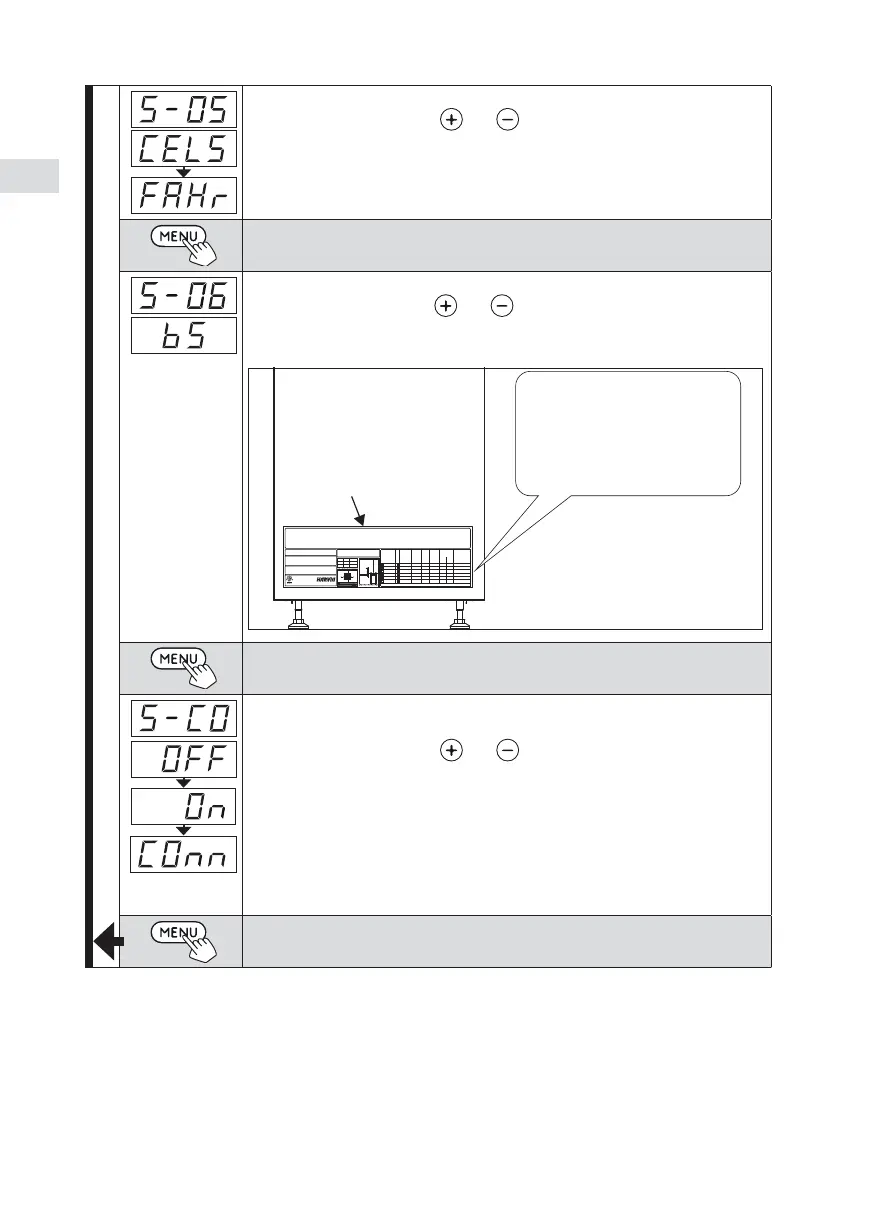
Temperature unit
Change the setting with the and buttons.
CEL (Celsius)
FAHr (Fahrenheit)
Press the MENU button to access the next setting.
Heater grade
Change the setting with the and buttons.
See the right grade from the heater’s type label, under “control
unit grade settings”.
Look for the important additional instructions
in the manual! / Consultez les instructions
supplémentaires importantes dans le manuel!
B
A
A
A
A
A
A
inch mm
A 2 50
B 42 1060
*Q = includes built-in contactor / contient le contacteur integré
AN INADEQUATELY FILLED ROCK SPACE CAUSES FIRE RISK.
IL Y A UN RISQUE D'INCENDIE SI LE RÉCIPIENT À PIERRES N’EST PAS CORRECTEMENT REMPLI.
DO NOT PLACE ANY OBJECTS ON HEATER. COVERING CAUSES FIRE RISK.
NE PAS PLACER DES OBJETS AU-DESSUS DU POÊLE. IL Y A UN RISQUE D'INCENDIE SI LE POÊLE EST RECOUVERT.
WARNING! AVERTISSEMENT!
FOR SUPPLY CONNECTIONS USE COPPER
WIRE ONLY SUITABLE FOR AT LEAST 90 ºC
POUR LES CONNEXIONS ELECTRIQUES PREVOIR
UN CABLAGE RESISTANT AU MOINS A 90° C
For AC only /
Pour courant alternatif seulement (AC)
Control units / Centres de contrôle:
CX30-U1-U3 / CX45-U1-U3 / CX-170-U1 /
CX-170-U1-15 / CX-170-U3 / CX-170-U3-15
HARVIA OY, FINLAND
3159549
ETL LISTED
CONFORMS TO
UL STD 875
CERTIFIED TO
CAN/CSA STD
E60335-2-53-05
MODEL
MODÈLE
*Q POWER
PUISSANCE
VOLTAGE
TENSION
PHASE SUPPLY
WIRES
TENSION
DE
SERVICE
FLOOR AREA
SURFACE DE
PLANCHER
CONTROL UNIT
GRADE SETTINGS
PARAMÈTRES
DE CONTRÔLE
DE QUALITÉ DE
L’UNITÉ
MIN.
SQ.FT
MAX.
SQ.FT
HL(S)7U1(Q)
6,8 kW 240 1 10 28 57
HL(S)9U1(Q)
9,0 kW 240 1 8 45 79
HL(S)11U1(Q)
10,5 kW 240 1 6 22 98
HL(S)7U3(Q)
6,8 kW 208 3 12 28 57
HL(S)9U3(Q)
9,0 kW 208 3 10 45 79
HL(S)11U3(Q)
10,5 kW 208 3 8 22 98
C2
C2
C1
C2
C2
C1
All heater grades:
A1, A2, A3, A4, A5
B1 (default), B2, B3, B4, B5
C1, C2, C3, C4, C5
D1, D2, D3, D4, D5
E1, E2, E3, E4, E5, E6
TYPE LABEL
CONTROL UNIT GRADE
SETTINGS
C2
(FOR EXAMPLE)
Press the MENU button to access the next setting.
WIFI connection
Connect control panel to WiFi network by using the MyHarvia application.
Change the setting with the and buttons. See MyHarvia application
for more detailed instructions.
OFF >The WiFi connection is off
(WiFi indicator light on the control panel is off ).
On > The WiFi connections is on
(WiFi indicator light glows on the control panel).
COnn > Connect mode is active.
Press the MENU button. The control unit switches to standby mode.
* Factory setting
Figure 3b. Settings menu structure, additional settings.
 Loading...