This document is a user manual for the HY-5200 HDMI Industrial Camera, providing detailed information on its functions, specifications, usage, and maintenance.
Function Description
The HY-5200 is a multifunctional electronic microscope camera designed for industrial maintenance, teaching demonstrations, and other fields. It integrates high-definition picture quality, high object distance, multi-functionality, multi-output modes, and convenient operation. When combined with its matching measurement analysis software, it offers a comprehensive solution for various applications. The camera supports both HDMI and USB output, allowing for flexible connectivity to displays or computers. It can capture still images and record videos, and its accompanying PC software (HAYEAR User Manual) provides advanced features such as dynamic image processing, GPU rendering for live image display, and dynamic image measurement.
Important Technical Specifications
- Sensor: SONY CMOS 1/2.9 Sensor
- Video Output: 1080P FHD (HDMI Output); 720P (USB Output)
- Sensor Size: 1/2.9 inch
- Pixel Size: 2.85 × 2.85μm
- Image Resolution: 4608 x 3456 (1600MP)
- Video Recording: Supports 1080P recording
- Image Snapshot: Supports 1080P still photos
- Image Format: JPEG
- Lens Type: Standard C/Cs Mount
- Resolution: 1920x1080@30FPS; 720P 160@FPS;
- Video Output Interface: HDMI/USB
- Storage: TF SD Card, Maximum capacity 128G
- PC Support: Windows XP/7/8/10 System, PC software with measurement function
- Image Zoom: 8.0X times Zoom in and zoom out, digital zoom
- Image Measurement: Supports HAYEAR software measurement
- Language Settings: Chinese, English, Japanese, French, German, Russian, Italian, Korean, Turkish
- Camera Size: 50×43×50mm
- Packing Data: 16×10×8cm/0.3kg
- Power Voltage: AC100V—240V@50-60Hz (camera power supply is 12V 1A)
- Operating Temperature: 0°C to 50°C
- Operating Humidity: Under 90%
Usage Features
The HY-5200 camera offers a range of features for ease of use and versatility:
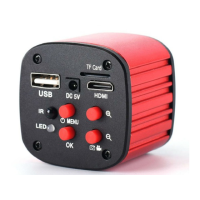
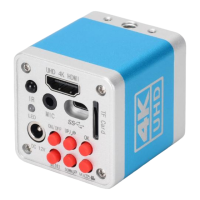
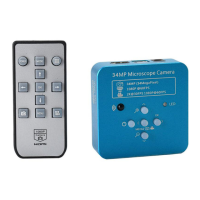
Remote Control and Key Operation:
The camera can be controlled via a remote, which includes buttons for:
- MENU: Power on/off (long press), access/exit menu.
- Line: Adjust crosshair lines.
- Image Preview: View captured images.
- Zoom+/Up: Zoom in, navigate up in menus.
- OK: Confirm selections.
- Left/Right: Navigate left/right in menus.
- Photograph: Take a picture.
- Enlarge: Enlarge image.
- Video Record: Start/stop video recording.
- Zoom-/down: Zoom out, navigate down in menus.
- AWB (White Balance): Adjust white balance.
- Mirror: Mirror image.
- Freeze: Freeze/unfreeze image.
- Play: Playback.
- Black & White: Switch to black and white mode.
Preparatory Work:
- Lens Installation: Twist off the cover and install the lens. It is crucial to tear off the dust protection in front of the sensitive film before installation to avoid vague images.
- Connectivity: Plug in the HDMI cable and DC power. A blue LED light indicates the camera is on.
- Output Modes: For USB output, white balance, exposure, and color adjustments are automatic. For HDMI output, these functions can be adjusted only when connected to a display, not a computer.
- USB Power: When connecting to a computer via USB, external power supply is not needed as the USB line powers the camera.
Menu Settings:
- Language: Supports multiple languages including Chinese, English, Japanese, French, German, Russian, Italian, Korean, and Turkish. Users can select their preferred language from the main menu.
- Line Setting: Allows users to enable/disable crosshairs, adjust the number of lines (1-10), direction (horizontal, vertical, off), position (0-959), color (GREEN-RED-WHITE-BLACK-TRANS-ORANGE-BLUE), and weight (1-5).
- Exposure: Offers various exposure options from +2.0 to -2.0, adjustable via UP/DOWN buttons.
- White Balance: Provides options like Auto, Daylight, Cloudy, Tungsten, and Fluorescent.
- Color Setting: Allows switching between Color and Black & White modes.
- Frequency: Users can select between 50Hz and 60Hz.
- Format TF Card: Enables formatting of the TF card. A warning is provided that all data will be deleted, emphasizing the need for a backup.
- Date and Time Setting: Allows setting year, month, day, hour, minute, and second.
- System Setting: Provides an option to return all menu settings to default.
Image and Video Capture:
- Photo Mode: Default mode. Press "OK" to take a photo.
- Video Mode: Switch to video mode using the "MODEL" button. Press "OK" to start/stop recording.
- Electronic Amplification/Reduction: Press "UP" for amplification (up to 8 times, though image may become vague) and "Q" for reduction.
USB Output (HAYEAR User Manual):
The HAYEAR software is an application for dynamic image processing with the following characteristics:
- Camera Support: Supports a variety of cameras and allows switching between them.
- GPU Rendering: Utilizes GPU rendering for high-resolution, high frame rate live image display.
- Measurement Function: Supports dynamic image measurement.
- User-Friendly Interface: Easy to operate.
Software Interface Components:
- Toolbar: For taking pictures, recording videos, and browsing files.
- Sidebar Tab: Switches between camera control and measurement functions.
- Control Panel: Specific camera control and measurement operations.
- Status Bar: Displays camera information, allows changing UI view, and toggles the measure result panel.
- Main Menu: Opens setting dialogs and shows software information.
Capture Images (Software):
- Snap: Click to take a picture. File format and resolution can be set.
- Record: Click to start/stop video recording. An animation indicator appears during recording.
- Browse: Opens the folder where pictures and videos are stored.
Camera Control (Software):
- Device Control: Supports different cameras, preview resolution, and output format (highest resolution 1920x1080).
- Exposure & Gain: Parameters can be set if the connected camera supports brightness target value.
- White Balance: Parameters can be set if the connected camera supports brightness target value.
- Red, Green, Blue Gain: Parameters can be set if the connected camera supports brightness target value.
- Color Adjustment: Adjusts Hue, Saturation, Brightness, Contrast, and Gamma.
- Reset Camera Parameters: Returns camera settings to default.
- Open Camera Property Dialog: Generally supported by DirectShow cameras.
Measurement (Software):
The software provides various measurement tools:
- Move: Adjust measurement tools.
- Point: Setup > Video Overlay > Marker.
- Line: Measure length of a line.
- Vertical: Vertical line tool.
- Rectangle: Measure perimeter and acreage.
- Polygon: Measure perimeter and acreage.
- Circle: Measure a circle by center point and radius, two points, or three points.
- Arc: Measure length of arc.
- Angle: Measure angle.
- Calibrate: Calibrate measurements.
- Scale Bar: Display a scale bar.
- Text: Add text annotations.
- Stitch: Stitch images.
Calibration Process:
- Select Pixel: In the software, select "Pixel," "100%," and "Max Resolution."
- Select Calibration: Go to "Option" and select "Calibration."
- Magnification, Actual Length, Meter: Input the magnification, actual length, and choose the unit (Micrometer, Meter, Centimeter, Millimeter, Inch, Mil).
- Unit Selection: After selecting "calibration," choose the required unit and multiplying power to calibrate.
Cross Hair on Measure Software:
- Select Setup: In the software, go to "Setup."
- Select Video Overlay: Choose "Video Overlay."
- Select Cross: In the "Type" dropdown, select "Cross."
Software Installation:
- Download: Available at http://www.hayear.com.
- Operating Systems: Supports Windows 7, 8, 10, and Linux.
- Environment: Requires Microsoft.Net Framework 4.0 and Microsoft Visual C++ 2010. If these runtime libraries are missing, installation errors may occur.
- Support: Contact customer service if unable to download or access files. Install from zipped files after successful download.
Maintenance Features
- Manual Retention: Keep the manual for future reference as non-compliance may invalidate the warranty.
- Disposal: Electronic equipment should be disposed of according to relevant laws and regulations, not as domestic waste.
- Disassembly: Do not attempt to disassemble the camera; it contains no user-serviceable parts.
- Cleaning:
- Shell: Use a dry soft cloth. For serious dirt, use a neutral detergent gently.
- Optical Filter: If a gray shadow appears on the image, use a dust blower to clean the optical filter. Do not use detergent.
- Storage: Store the camera between 0°C and 50°C, with humidity under 90%.
- Protection: Prevent foreign objects from entering the machine, avoid spilling liquid, and protect against knocks, violent vibrations, and water during transportation, storage, and installation.
Troubleshooting (FAQ):
- "Missing files" during installation: Ensure Microsoft.Net Framework 4.0 and Microsoft Visual C++ 2010 Runtimes are installed.
- Software not recognizing microscope:
- Ensure camera and PC are properly connected.
- Select "PC camera" on the 5-inch monitor.
- If no image, check "Device Manager" on PC, delete "USB Camera" under "Imaging devices," and rescan. The system should identify it as "HY-5200." Restart the software.
- Measurement error:
- Use a more precise calibration.
- Maintain the same magnification and object distance as during calibration, especially since the camera continuously magnifies.