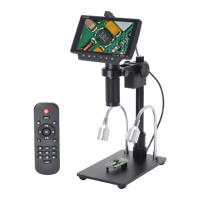
This document describes the HAYEAR HY-6210 Industrial Camera Microscope, a multifunctional digital microscope designed for industrial overhaul, teaching demonstrations, and various other applications. It offers Full HD resolution, high object distance, and multi-output capabilities, including HDMI and USB. The device also integrates with HAYEAR measuring software for advanced image processing and measurement functions.
Function Description
The HY-6210 is a versatile industrial camera microscope that provides high-quality imaging and measurement capabilities. Its primary functions include:
- High-Resolution Imaging: Captures still images and records video in various resolutions, including 4K.
- Multi-Output: Supports simultaneous HDMI and USB output for display on monitors and connection to computers.
- Digital Zoom: Features a 7X digital zoom for detailed observation.
- Measurement Software Integration: Compatible with HAYEAR measurement software for dynamic image processing, real-time observation, and precise measurements.
- Image Comparison: Offers a "same screen comparison" function to observe and compare two products or different states of the same product.
- Loop Recording: Supports continuous video recording with customizable durations.
- Date Stamp: Allows for date and time stamping on captured images and videos.
- HDR Functionality: Enhances image quality by supporting HDR, multiple exposure HDR, and digital overlap HDR.
- White Balance Control: Provides options for one-click, auto, and manual white balance.
- Anti-reflective: Features HDR for anti-reflective properties.
Important Technical Specifications
- Model: HY-6210
- Brand: HAYEAR
- Sensor: SONY CMOS 1/1.8 IMX334 4K Sensor
- Sensor Size: 1/1.8" inch
- Pixel Size: 2.0 × 2.0μm
- Video Output:
- HDMI: 4K/2K/1080P Full HD @30FPS
- USB: 4K (3840×2160 @30FPS); 1920×1080P @30FPS
- Still Image Resolution: 8528×4808 (41MP), 6160 X 3472 (21MP), 5440 X 3056 (16MP)
- Video Record: Supports 4K record
- USB Interface: Type-C USB
- USB Output Resolution: 3840x2160 30FPS; 2592x1944 40FPS; 2084X1536 60FPS; 1920x1080P 60FPS
- Spectral Response (Wavelength): 400nm~1000nm
- Timed Photo/Video: Supported
- Dual-output: Supports HDMI/USB output simultaneously
- Same Screen Comparison: Real-time observation and comparison of two products
- White Balance: One-click, Auto, and Manual white balance
- HDR: Anti-reflective
- Storage: TF Card, Maximum support 512GB
- PC Support: Windows/Mac/Linux systems, Software with measurement function (gift)
- Image Zoom: 7X digital zoom
- Language Setting: Chinese, English, Japanese, French, German, Russian, Italian, Korean, Turkish
- Working Voltage: Type-C 5V / DC 12V 1A
- HDR Function: Supports HDR, Multiple exposure HDR, Digital overlap HDR
Usage Features
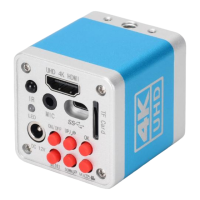
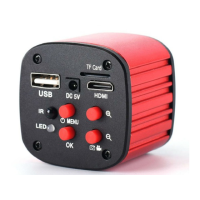
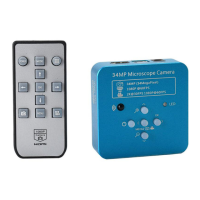
The HY-6210 is designed for user-friendly operation through both on-camera buttons and a remote control.
Quick Start (HDMI Mode):
- Power On: Ensure power supply is connected. Press the "ON/OFF" button on the camera. The blue LED light indicates the camera is on.
- Zoom: Use "UP/DOWN" buttons for digital zoom. Manual lens adjustment is also available.
Photo Mode:
- Take Photo: Short press "OK" to capture an image.
Video Mode:
- Start Recording: Press "AE" to enter video mode, then press "OK" to start recording. Press "OK" again to stop.
- Preview/Playback: Press "AE" again to enter preview mode. Use "OK" to play videos or view images. Press "AE" to return to the menu.
Language Setting:
- Access the main menu via the "MENU" button. Navigate to "Language Setting" using the "DOWN" button, then press "OK". Select the desired language and confirm with "OK".
Grid Line Setting:
- In photo mode, press "MENU", select "Grid Line Setting", and press "OK". Adjust "Cross Hair", "Line", "Direction", "Position", "Color", and "Weight". Changes are saved automatically upon exiting the menu.
Image Resolution Setting:
- From the main menu, navigate to "Image Resolution" using the "DOWN" button, press "OK", select the desired resolution (e.g., 41MP, 21MP, 16MP) with "UP/DOWN", and confirm with "OK".
Image Ratio Setting:
- From the main menu, navigate to "Image Ratio", press "OK", select the desired ratio (e.g., 16:9, 16:10, 4:3) with "UP/DOWN", and confirm with "OK".
Mirror Comparison Setting:
- From the main menu, navigate to "Mirror Comparison", press "OK", select the comparison mode (Off, Horizontal, Vertical) with "UP/DOWN", and confirm with "OK".
Same Screen Comparison:
- Press the "ON/OFF" button:
- First press: Freezes the left half of the screen.
- Second press: Freezes the right half of the screen.
- Third press: Freezes the whole screen.
- Press again: Exits the same screen comparison function.
One-Click Exposure Setting:
- From the main menu, navigate to "One-Click Exposure", press "OK", select "On" or "Off" with "UP/DOWN", and confirm with "OK". When "On", adjust light source brightness to control exposure.
Image Quality Setting:
- From the main menu, navigate to "Image Quality", press "OK", select "Fine", "Normal", or "Economy" with "UP/DOWN", and confirm with "OK".
Sharpness Setting:
- From the main menu, navigate to "Sharpness", press "OK", select "Strong", "Normal", or "Soft" with "UP/DOWN", and confirm with "OK".
HDR Setting:
- From the main menu, navigate to "HDR", press "OK", select "Off" or "On" with "UP/DOWN", and confirm with "OK".
ISO Setting:
- From the main menu, navigate to "ISO", press "OK", select "Auto", "100", "200", or "400" with "UP/DOWN", and confirm with "OK".
White Balance Setting:
- From the main menu, navigate to "White Balance", press "OK", select "Auto", "Daylight", "Cloudy", "Tungsten", "Fluorescent", or "Manual" with "UP/DOWN", and confirm with "OK".
Color Setting:
- From the main menu, navigate to "Color", press "OK", select "Normal", "Black & White", "Sepia", or "Inverse Color" with "UP/DOWN", and confirm with "OK".
Exposure Compensation:
- From the main menu, navigate to "Exposure Compensation", press "OK", select the desired exposure value (e.g., +0.0, -1/3, -2/3, -1.0, -4/3, -5/3, -2.0, +2.0, +5/3, +4/3) with "UP/DOWN", and confirm with "OK".
Date/Time Setting:
- From the main menu, navigate to "Date/Time", press "OK", adjust the date and time using "UP/DOWN" and "OK" to move between options. Settings are saved upon exiting the menu.
Optical Frequency Settings:
- From the main menu, navigate to "Optical Frequency", press "OK", select "50Hz" or "60Hz" with "UP/DOWN", and confirm with "OK".
TF Card Format Setting:
- From the main menu, navigate to "Format", press "OK", select "Cancel" or "OK" with "UP/DOWN". Selecting "OK" and confirming will format the TF card, clearing all data. Warning: Back up data before formatting.
Systems Setting (Default Settings):
- From the main menu, navigate to "Default Setting", press "OK", select "Cancel" or "OK" with "UP/DOWN". Selecting "OK" and confirming will reset the camera to default settings.
Video Resolution Setting (Video Mode):
- In video mode, press "MENU", navigate to "Video Resolution", press "OK", select the desired resolution (e.g., 4K 30FPS, 2.7K 30FPS 4:3, 2K 30FPS, 1080P 60FPS, 1080P 30FPS, 720P 30FPS) with "UP/DOWN", and confirm with "OK".
Loop Recording Setting (Video Mode):
- In video mode, press "MENU", navigate to "Loop Recording", press "OK", select the duration (e.g., Off, 1 Minute, 3 Minutes, 5 Minutes, 10 Minutes) with "UP/DOWN", and confirm with "OK".
Date Stamp Setting (Video Mode):
- In video mode, press "MENU", navigate to "Date Stamp", press "OK", select "Off" or "On" with "UP/DOWN", and confirm with "OK".
Taking Pictures:
- Press "OK" button on the camera.
- Press "Capture" button on the remote control.
HAYEAR Image Software Instruction:
The HAYEAR measurement software offers dynamic image processing and measurement features:
- Multi-Camera Support: Switch between multiple connected cameras.
- High-Resolution Preview: GPU-rendered image preview with high frame rate and resolution.
- Dynamic Image Measurement: Perform measurements directly on live or captured images.
- Frame Rate Display: Interface shows image frame rate.
Software Functions:
- Snap: Capture photos. Options for file format and photo size.
- Record: Start/stop video recording (MP4 in H.264 format).
- Browser: Open the storage location of image files in Windows Explorer.
Camera Control (Software):
- Camera List: Select connected cameras.
- Capture & Resolution: Set preview and output resolutions, and image formats.
- Image Flip: Flip images horizontally and vertically.
- Exposure & Gain: Control exposure and gain (functionality depends on camera support).
- White Balance: One-click white balance (functionality depends on camera support).
- Color Adjustment: Adjust Hue, Saturation, Brightness, Contrast, Gamma (functionality depends on camera support).
- Power Frequency (Anti-flicker): Set light source frequency.
- Color/Gray: Color mode settings.
- Dark Field Correction: Perform dark field correction.
- Defaults: Restore parameters to default values.
- Properties & Format: Access camera property page (for DirectShow type cameras).
Measurement Icon (Software):
- Track: Move/adjust measurement tools, delete.
- Point: Mark points on the image.
- Line: Draw and measure line length.
- Object Select: Move/delete selected measurement objects.
- Rectangle: Draw and measure rectangle area.
- Irregular Polygon: Draw and measure irregular polygon area.
- Circle: Determine and measure circle area (center and radius).
- Ring: Determine and measure ring area (same center, different diameters).
- Scale Bar: Display a scale bar.
- Text: Enter text, mark.
- Angle: Measure angles.
- Calibrate: Calibrate measurements.
- Arc: Measure arcs.
- Two Parallels: Measure between two parallel lines.
- Export: Export measurement data to CSV (compatible with WORD and EXCEL). Customize font size, color, length unit, angle unit, measurement table, and object parameters.
Calibration (Software):
- Select "Pixel", "100%", and maximum resolution in the software.
- Go to "Option" -> "Calibrate".
- Enter actual data in the calibrate window.
- After calibration, adjust the unit (e.g., Millimeter) and magnification (e.g., 4X).
Maintenance Features
- Cleaning: Use a dry soft cloth to wipe the camera case. For serious dirt, use a neutral detergent gently.
- Dust Removal: If grey dots appear on the image, use a dust blower to clean dust off the filter. Do not use detergent.
- Storage: Avoid violent vibration and soaking during transportation and storage to prevent damage.
- Disassembly: Do not disassemble the camera without authorization. There are no user-repairable or replaceable parts.
- Software Updates: The product may have minor changes during perfecting to provide a better customer experience. Descriptions in the manual are for reference.
- GPU Driver: If the preview image is partially blank or black, ensure the latest graphics card driver is installed.
Safety Guidelines:
- Read the safety guide carefully and operate according to instructions.
- Confirm power supply voltage (AC100V-240V@50-60Hz) is within range.
- Use the standard DC 12V 1A power adapter provided.
- Use in an indoor environment (0°C to 50°C, humidity < 90%).
- Prevent foreign objects and liquids from entering the camera.
- Failure to comply with instructions may result in electric shock, fire, serious injury, or permanent device damage.