4
Automatic System Operation
The ECOMMAND 4 controls most of your pool equipment automatically in order to minimize the time
spent working on your pool. Most of the pool equipment can be programmed to operate on a timeclock
basis. In addition, the desired pool and spa temperatures can be programmed. This section will guide you
on how to program the automatic operation for each function.
The programming of automatic functions can be performed at either the main display/keypad located at the
pool equipment pad or the in-home remote display/keypad.
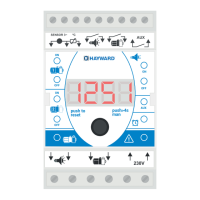
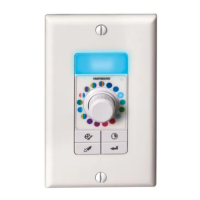
Using the programming buttons
There are 5 buttons on each keypad that are used for programming (refer to diagram).
There are 4 steps to programming any function:
1.
Menu
Press the “MENU” button to get to the desired menu. Multiple pushes of the
button will rotate through all 6 menus and return to the starting point.
2.
Press either key to scroll through the various items in the selected menu. Multiple
pushes of the button will rotate through all menu items and return to the starting
point. Only menu items that are applicable to your pool will appear. (Example: if
you don’t have a spa, then no spa related menu items will appear).
3. Once a menu item has been selected above, the current setting/selection will ap-
pear (flashing) on the display. Use the “+” and/or “-” keys to change this selec-
tion. Sometimes “+” and “-“ will adjust a value up or down (example: heater
temperature setting or timeclock on/off time). In this case, pushing the “+” or “-”
will change the value by one increment and holding the “+” or “-” button in for
more than one second will make the values auto scroll. In other cases, the “+” and
“-“ may toggle between 2 options (example: turning superchlorination ON or
OFF).
4.
Menu
After you have adjusted the item to the desired value, simply move on to the next
menu item to “lock in” your new setting. The ECOMMAND 4 memory will
maintain the setting, even if power is removed for an extended period.
+
Settings
Display
“+” and “-” Buttons
Menu Button
Adust
Select Desired Menu
Select Items from
a Menu
“<” and “>” Buttons
+
>
Menu
23
Start/Stop Superchlorination (for external chlorinator)
1. Press the “MENU” button repeatedly until “Settings Menu” is displayed.
2. Press the “>” button repeatedly until “Super Chlorinate” is displayed.
3. The display will show whether superchlorination is “on” or “off”.
4. Press “+” or “-“ to toggle between “on” and “off”.
Note: Once started, superchlorination will run for the programmed number of hours
(Timers Menu/Super Chlorinate Hours) or until you manually turn it off.
Superchlorination may be temporarily interrupted for a programmed spa operation.
Program a Timeclock
1. Press the “MENU” button repeatedly until “Timers Menu” is displayed.
2. Press the “>” button repeatedly until “xxx—all” or “xxx—wkend” (where xxx is the parameter
that you want to program) is displayed.
3. Use the “+” and “-“ buttons to set the desired start time, then press “>” to switch to the off
time. Use the “+” and “-“ buttons to adjust the off time. If you are setting the “weekend”
timeclock, press “>” to go to the “weekday” settings.
Note: During the programmed time, there may be other automatic or manual opera-
tions that prevent the relay/valve from operating—see a more detailed discussion under
Automatic System Operation/Timers Menu/Aux Timeclock or in Troubleshooting/Diag-
nostic Information.
Program a Countdown Timer
1. Press the “MENU” button repeatedly until “Timers Menu” is displayed.
2. Press the “>” button repeatedly until the “xxx—Timer” (where xxx is the parameter that you
want to program) is displayed.
3. Use the “+” and “-“ buttons to set the desired timer period.
Note: A setting of 0:00 will display as “manual on/off”. The countdown automatic
turn off function is disabled but manual operation is still permitted. There may be other
automatic or manual operations that prevent the relay/valve from operating—see a
more detailed discussion under Automatic System Operation/Timers Menu/Aux Timeclock
or in Troubleshooting/Diagnostic Information.
Enter/Exit Service (or Service—Timed) Mode
1. Go to ECOMMAND 4 main unit (normally mounted near the pool equipment).
2. Pressing the “Service” button rotates through normal operation (red LED off), service mode
(red LED on continuously) and service-timed mode (red LED flashing).
Note: This operation can only be performed at the main ECOMMAND 4 unit. Both
“Service” and “Service-Timed” disable all automatic programmed operations and al-
low manual operation from the main unit only. The buttons on the remote display/
keypads will still be able to turn equipment off in case of an emergency, but will not turn
any equipment on. If the system is in “Serviced-Timed” it will automatically switch
back to normal operation at the end of the 3 hour time period.