- 8 -
3/ UNPACKING / ASSEMBLY
STEP 1:
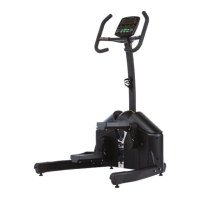
Put the product on the floor and remove the top box cover to reveal the Helix as show above. Where the box
corners are printed “OPEN”, cut or tear the box and separate these corners. Lay the sides flat to the floor.
STEP 2:
Remove all parts from the box leaving just the main body of the machine on the bottom of the box.
remove all parts from their plastic bags and organize the floor beside the Helix.
STEP 3:
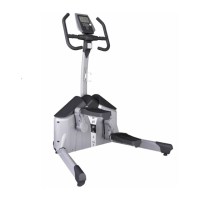
Each Left and Right Frame Legs are marked “L” and “R” with a sticker. While facing the Helix, place the left
leg on the left side of the machine and the right leg on the right side of the machine.
Insert the Frame Leg assembly bolts into the lefts and secure using the “T” wrench as shown. Tighten these
bolts firmly.
IMPORTANT:
Do not remove the
Helix from the box
bottom until further
instructed later in
this assembly
manual.
1
2
If the Helix is not stable on the
floor, the level can be adjusted
with any of the leveling feet at
each corner of the Helix
3
 Loading...