Service Instructions HERAsafe HS/12/18
Valid: 05.2001 / 50060091 / A • 5 •
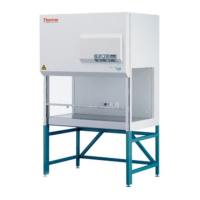
Fig. 1, Front view of the unit ...................................................................................................................... 11
Fig. 2, Rear view of the unit....................................................................................................................... 12
Fig. 3, Electronic components ................................................................................................................... 13
Fig. 4, Opening the hood........................................................................................................................... 15
Fig. 5, Opening the control box.................................................................................................................. 15
Fig. 6, Opening the inspection chamber..................................................................................................... 16
Fig. 7, Removal and installation of the exhaust filter guard .......................................................................... 19
Fig. 8, Removal and installation of the cover plate ...................................................................................... 20
Fig. 9, Removal and installation of the working plate modules ..................................................................... 21
Fig. 10, Replacement of the prefilter panel ................................................................................................. 22
Fig. 11, Replacement of the perforated plate.............................................................................................. 23
Fig. 12, Replacement of the hood brackets ................................................................................................ 24
Fig. 13, Installation of the support stand..................................................................................................... 25
Fig. 14, Removal and installation of the drain valve..................................................................................... 26
Fig. 15, Removal and installation of the glass plate..................................................................................... 27
Fig. 16, Removal and installation of the twist stopper .................................................................................. 28
Fig. 17, Removal and installation of the front window .................................................................................. 29
Fig. 18, Removal and installation of the tube drive ...................................................................................... 30
Fig. 19, Adjustment of the stop positions .................................................................................................... 31
Fig. 20, Replacement of the exhaust filter................................................................................................... 32
Fig. 21, Replacement of the downflow filter ................................................................................................ 33
Fig. 22, Removal and installation of the blower........................................................................................... 34
Fig. 23, Replacement of the one-way diaphragm filter................................................................................. 35
Fig. 24, Replacement of the Power/Function Key switch ............................................................................. 36
Fig. 25, Clamping connection at the control panel....................................................................................... 37
A1, Disinfection ........................................................................................................................................ 39
Figures
 Loading...