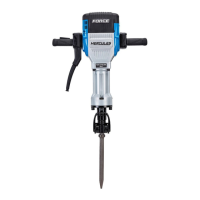
The HERCULES HE32 1-1/8" Hex Breaker Hammer is a robust power tool designed for heavy-duty demolition tasks. This owner's manual and safety instructions provide comprehensive guidance for its safe operation, maintenance, and troubleshooting.
Function Description
The HERCULES HE32 is a percussion hammer primarily used for breaking concrete, asphalt, and other hard materials. It operates by delivering powerful impacts to a chisel or tile bit, effectively fracturing the material. The tool is designed for applications requiring significant force and durability, making it suitable for construction, renovation, and demolition projects. Its 1-1/8" hex bit chuck ensures compatibility with standard heavy-duty bits.
Important Technical Specifications
- Model: HE32
- Bit Type: 1-1/8" Hex Breaker Hammer
- Electrical Rating: 120VAC / 60Hz / 15A
- No Load Revolutions per Minute (RPM): xxxx/min (specific value not provided, indicated as "xxxx/min")
- Included Bits: 1 Bull Nose Bit, 1 Narrow Tile Bit
- Grounding: Double Insulated (does not require grounding, uses a two-prong plug)
- Extension Cord Requirements (120/240 Volt):
- 0-2.0 Amperes: 18 gauge for 25'-100', 16 gauge for 150'
- 2.1-3.4 Amperes: 18 gauge for 25'-75', 16 gauge for 100', 14 gauge for 150'
- 3.5-5.0 Amperes: 18 gauge for 25'-50', 16 gauge for 75', 14 gauge for 100', 12 gauge for 150'
- 5.1-7.0 Amperes: 18 gauge for 25', 16 gauge for 50', 14 gauge for 75', 12 gauge for 100'-150'
- 7.1-12.0 Amperes: 18 gauge for 25', 14 gauge for 50', 12 gauge for 75', 10 gauge for 100' (no recommendation for 150')
- 12.1-16.0 Amperes: 14 gauge for 25', 12 gauge for 50', 10 gauge for 75' (no recommendation for 100'-150')
- 16.1-20.0 Amperes: 12 gauge for 25', 10 gauge for 50' (no recommendation for 75'-150')
- Note: Based on limiting line voltage drop to five volts at 150% of the rated amperes.
Usage Features
The HE32 is designed for user-friendly operation with a focus on safety and control.
- Bit Installation: The tool supports both collared and collarless bits.
- Collarless Bit Installation: Pull the Lock Lever to the side, insert the bit with the flat notch facing the Lock Lever, slide it in as far as possible, then pull the Lock Lever back to lock it. The bit will have approximately 1-3/4" of play along the shank.
- Collared Bit Installation: Pull the Lock Lever open about 70-80° to the second engaging position, insert the collared bit, slide it in as far as possible, and return the Lock Lever to its original position. The bit will have approximately 1-3/4" of play but should not slide out.
- Operation:
- Ensure the work area is clean, well-lit, and clear of children and bystanders.
- Always wear personal protective equipment, including ANSI-approved safety goggles with side shields, ear protection, steel-toe boots, and a dust mask.
- Check the bit for dullness, cracks, or damage before use. Only use sharp-tipped bits.
- Plug the tool into a 20-amp rated circuit.
- Hold the tool firmly with both hands (one on the Side Handle, one on the Main Handle).
- Press the Trigger to start. The Trigger is spring-loaded and requires continuous pressure to keep the tool running.
- Begin striking material by pushing the tip forcibly down.
- Avoid forcing the tool; allow its own weight to supply the needed force. Running the tool with no load ("empty blows") can damage the Breaker Hammer.
- For cold temperatures or after long periods of disuse, allow 3-5 minutes for the tool to warm up.
- When finished, release the Trigger, unplug the tool, clean it, and store it out of reach of children.
- Vibration Safety: The tool vibrates during use, which can cause physical injury over time. Users are advised to:
- Consult a doctor if using regularly or for extended periods, especially if pregnant or with circulatory/nervous system disorders.
- Seek medical advice for vibration-related symptoms (tingling, numbness, white/blue fingers).
- Avoid smoking during use as nicotine reduces blood supply to hands.
- Use tools with the lowest vibration when possible.
- Include vibration-free periods in the workday.
- Let the tool do the work, rather than forcing it.
- Maintain the tool as instructed and stop use immediately if abnormal vibration occurs.
Maintenance Features
Regular maintenance is crucial for the longevity and safe operation of the HERCULES HE32.
- Pre-Use Inspection: Before each use, inspect the tool for loose hardware, misalignment or binding of moving parts, cracked or broken parts, damaged electrical wiring, or any other condition affecting safe operation.
- Post-Use Cleaning: Wipe external surfaces with a clean cloth after each use.
- Lubrication:
- Periodically remove and re-lubricate the loading end of the bit with grease during extended operation.
- The Breaker Hammer has an airtight construction, allowing for approximately six months of regular use before internal lubrication is needed. Internal gearbox greasing should only be performed by a qualified technician to prevent damage or contamination.
- Carbon Brush Replacement: Carbon brushes wear out over time, causing the tool to stop working. They must be replaced by a qualified technician using the included replacement brushes.
- Remove the Fan Cover (70) by unscrewing the four Bolts (71) and Flat Washers (99).
- Slide the Fan Cover off the Housing (31).
- Remove the Carbon Brush Bracket (61).
- Remove the old Carbon Brushes from the Bracket.
- Insert new Carbon Brushes into the Bracket.
- Replace the Carbon Brush Bracket and slide the Fan Cover back over the Housing.
- Securely fasten the Bolts and Flat Washers.
- Storage: Store the tool indoors in temperatures no lower than 50-60°F.
- Damaged Equipment: Do not use damaged equipment. If abnormal noise or vibration occurs, have the problem corrected before further use. Repairs and parts replacements should only be undertaken by certified and licensed technicians.
- Labels and Nameplates: Maintain all labels and nameplates on the tool, as they carry important safety information. Contact Harbor Freight Tools for replacements if unreadable or missing.
Troubleshooting
The manual provides a troubleshooting guide for common issues:
- Tool will not start: Check cord connection, power at outlet (circuit breaker), thermal reset breaker, or internal damage (carbon brushes, trigger).
- Tool operates slowly: Check extension cord length/wire size, bit dullness/damage, cold internal lubrication, or worn/damaged carbon brushes.
- Performance decreases over time: Usually due to bit dullness/damage, cold internal lubrication, or worn/damaged carbon brushes.
- Excessive noise or rattling: Indicates internal damage or wear (carbon brushes, bearings).
- Overheating: Caused by forcing the tool, dull/damaged bit, blocked motor housing vents, or a strained motor due to a long/small diameter extension cord.
For all troubleshooting and servicing, always disconnect the power supply before beginning work. For technical questions, contact 1-888-866-5797.