Home
HiLook
Security Camera
IPC-T220H-U
Page 17
HiLook IPC-T220H-U - Page 17
42 pages
Manual
Save Page as PDF
To Next Page
To Next Page
To Previous Page
To Previous Page
Loading...
Network T
urret Camera
·
Quick Start Guide
16
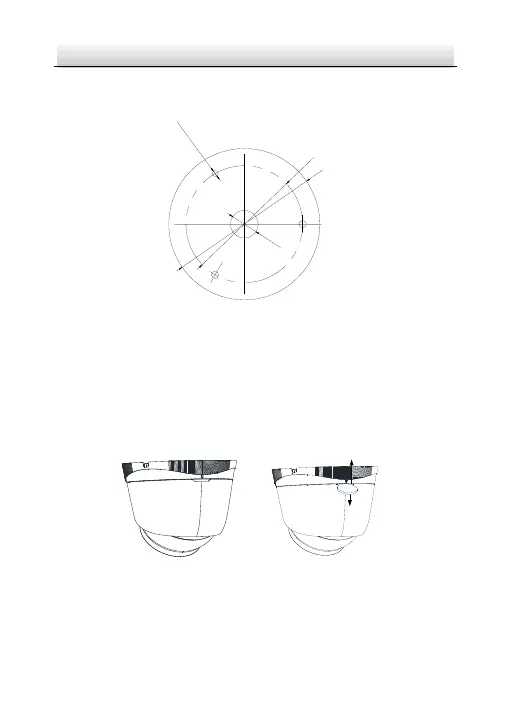
Note:
Drill the cable hole, when a
dopting ceiling outlet to route the cable.
Φ
85
mm
(
3
.
35
"
)
Φ
110
mm
(
4
.
33
"
)
3
-
Φ
4
.
2
mm
(
0
.
17
"
)
Screw Hole
Φ
20
mm
(
0
.79
"
)
Figure 2-2
The Drill T
emplate
3.
Disassemble the ca
mera.
1).
Rota
te the camera to align the notch to one of the marks.
2).
Pry t
he mounting base to remove the mounting base
with the
camera body with a flat object, e.
g., a coin.
Mark
Notch
Figure 2-3
Disas
semble the Camera
4.
Fix the mount
ing base to the ce
iling with s
upplied screws.
Notes:
16
18
Table of Contents
Main Page
Table of Contents
10
Appearance Description
11
Installation
15
Memory Card Installation
15
Ceiling Mounting
16
Mounting with Junction Box
19
Mounting with Inclined Base
21
Wall Mounting
23
Waterproof Measures
24
Install Network Cable Waterproof Jacket
25
Waterproof Other Cables
25
Set the Network Camera over the LAN
27
Wiring
27
Activate the Camera
28
Activation Via Web Browser
28
Activation Via SADP Software
30
Modify the IP Address
31
Access Via Web Browser
34
Operate Via Hilookvision App
36
Enable Hilookvision Service on Camera
36
Enable Hilookvision Service Via SADP Software
36
Enable Hilookvision Service Via Web Browser
37
Hilookvision Setup
39
Add Camera to Hilookvision
39
Initialize the Memory Card
41
Related product manuals
HiLook IPC-D640H-Z
42 pages
HiLook THC-T150-P
15 pages
HiLook THC-T140-P
16 pages