2.5 Connecting the console board/cpu
Once finished the connections on the board Easy-Connect, it is possible to reconnect the console
board/CPU. Use the multipolar flexible cable and verify to insert it in the board on the bottom of the
container on the central connector JX1. The other end of the cable must be inserted in the connector J3
on the console tab edge. The two connectors are endowed with an index of insertion and allow to mount
the flexible cable in one position only. Position the panel on special supports and fit it under the two lateral
hooks. Tighten the two sealing screws to the lower corners of the panel. Before powering the unit, insert
the SIM CARD inside the SIM module turning the contacts down and put the beveled corner inside as
shown in figure. The SIM Card must be free of lock code; if needed, use a phone to delete the lock code
of the SIM Card. Fully insert the antenna connector until you hear it click. Once completed the wiring ,
insert the two spade connectors from the feeder on the battery respecting the polarity: red connector on
the positive (+) of the battery and the black on the negative (-) and give the power supply voltage by
activating the selector prepared for the system.
WARNING!
In order to use the system correctly, the battery must be always connected.
1 Jack of the antenna GSM
2 Connector of the SIM CARD
3 Central Connector
4 Setup button
5 Anti-opening tamper
JX3JX3JX3
JX3x1 JX3x2
JX3x3 JX3x4
JX3x5 JX3x6
JX3x7 JX3x8
JX3x9
JX3x10
JX3x11 JX3x12
JX3x13 JX3x14
JX3x15 JX3x16
JX3x17 JX3x18
JX3x19 JX3x20
JX3x21 JX3x22
JX3x23 JX3x24
JX3x25 JX3x26
JX3x27 JX3x28
JX3x29 JX3x30
SETUP
1
2
3
4
5
Insert the micro sim card inside the
module considering the beveled corner.
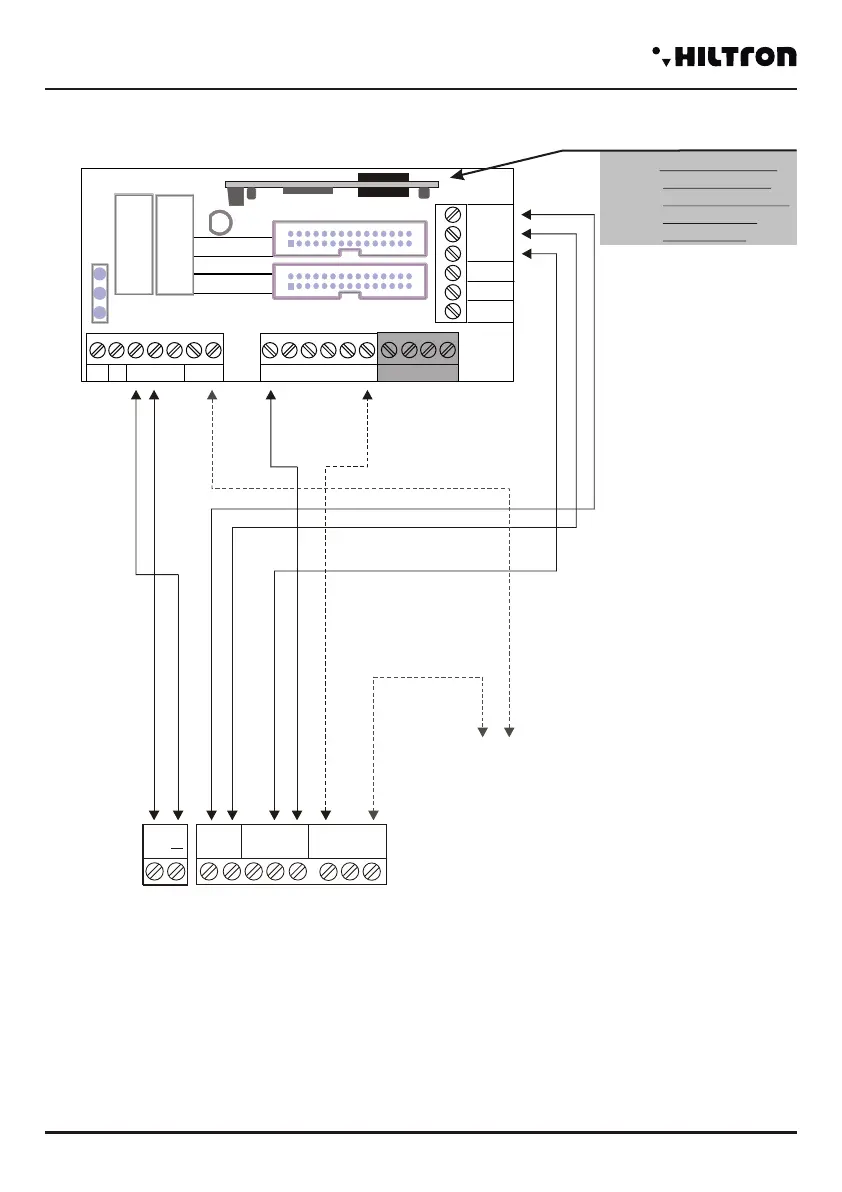
2.4.7 Connections with the traditional electronic key
* *This connection provides for the activation of the tamper alarm 24h when used a false key.
NOTE: In case of installation of PX100/SK100, place the bridge JP1 so that you can set
the OUT in monostable modality. (generates a control pulse).
NOTE: Have a look at the SK100 manual.
In series to the 24h line
JX1
JX2
JX1
JX2
JX1
JX2
-
JX1x1 JX1x2
JX1x3 JX1x4
JX1x5 JX1x6
JX1x7 JX1x8
JX1x9
JX1x10
JX1x11 JX1x12
JX1x13 JX1x14
JX1x15 JX1x16
JX1x17 JX1x18
JX1x19 JX1x20
JX1x21 JX1x22
JX1x23 JX1x24
JX1x25 JX1x26
JX1x27 JX1x28
JX1x29 JX1x30
JX2x1 JX2x2
JX2x3 JX2x4
JX2x5 JX2x6
JX2x7 JX2x8
JX2x9
JX2x10
JX2x11 JX2x12
JX2x13 JX2x14
JX2x15 JX2x16
JX2x17 JX2x18
JX2x19 JX2x20
JX2x21 JX2x22
JX2x23 JX2x24
JX2x25 JX2x26
JX2x27 JX2x28
JX2x29 JX2x30
SIR +12v
Manutenzione
Centrale
A
B
-12V+
+INT GND 24H GND Z1 Z2 Z3 Z4 GND
ELECTRONIC KEY
R
+
12VLEDUscita
Chiave Falsa
NC NA C V
C NA NC
CX1
NOTE: The transceiver
DXR2 must be
inserted with the
components
face-down.
DXR2
SIR
GND
S.A
V
R
KEY
(optional connection *)
Z8
Z5 Z6 Z7
Installation
security
PROTEC4GSM - PROTEC8GSM - Installation guide and use
security
1514
 Loading...