■
Explanations of functions
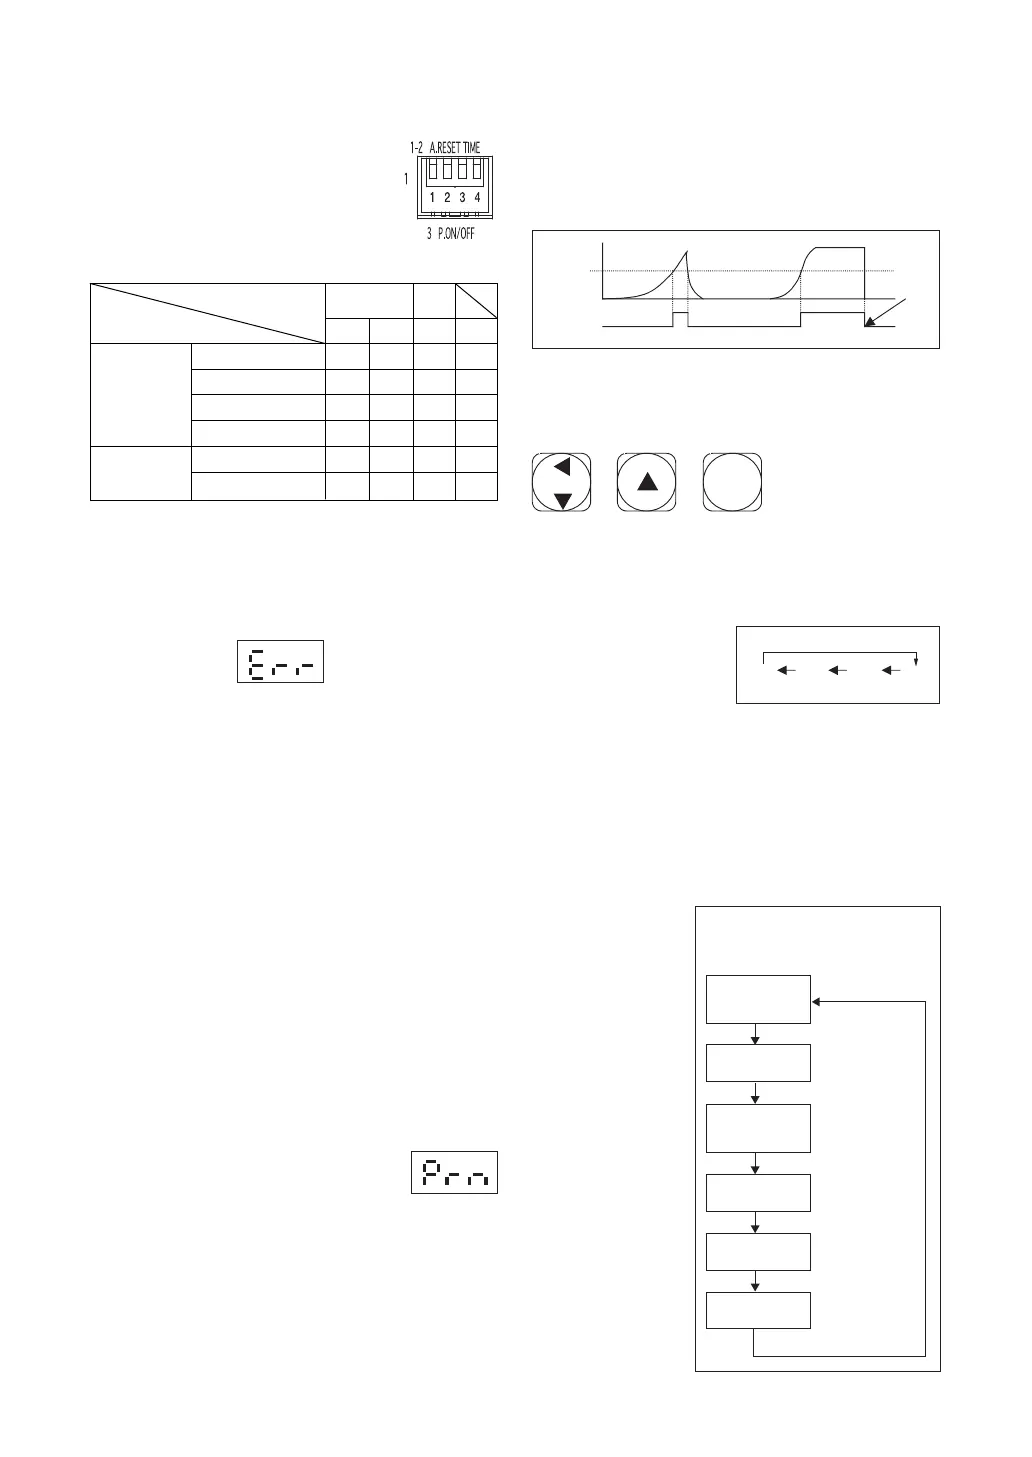
DIP switch
Always turn off the power before
changing DIP switch settings.
Auto-reset
DIP switch settings
Notes
1
The reset switch does not function when auto-reset is on.
2
The error display (see below) appears when a printer
or the Mitutoyo Input Tool is connected for data out-
put and the LED lights.
A.RESET TIME
P.ON/OFF
1 2 3 4
1 sec ON ON
−−
2 sec ON OFF
− −
5 sec OFF ON
−−
OFF OFF OFF
− −
Printer ON
2
−−
ON
−
Printer OFF
−
−
OFF
−
Time to auto-
reset
1
Data output
Switch number
Error display
Data output
1. Set the mode switch to "PEAK" or "F.PEAK".
2. Set data output DIP switch number 3 to the on
position.
3. Connect a printer or the Mitutoyo Input Tool to
the Digital data output port. (Pressing the reset
switch in this state will result in the error dis-
play. An error will also result if you try to print
out data with a printer that cannot print out nu-
merical data containing decimal points.
4. Conduct measurement, then press the reset switch
to output the data. Average
【
AV E
】
values can-
not be output.
Output of data from the memory (memory func-
tion on)
Note: Please cancel auto-reset.
1. Press the reset button for 2 seconds.
2. When the display shows the let-
ters "Prn," press reset.
3. All the torque data, from memory number
0001, will be output. The display fl ickers dur-
ing data transfer.
Setting torque
The digital torque meter is shipped with the warn-
ing tone set to sound when maximum torque load is
reached. This tone also sounds when the torque set-
ON ON
Reset
Setting
Warning
tone
Track Peak
Switch functions for setting torque
Switches used
① ② ③
①
【
SET
】
switch
1. Press for 2 seconds to enter torque setting mode.
Press for 2 seconds once again to exit torque set-
ting mode.
2. When the meter is in
torque setting mode,
the 4-digit display
can be adjusted, one
digit at a time. Use the SET switch to select the
digit for adjustment. The selected digit blinks
on and off. Each time the SET switch is pressed,
the next digit to the left is selected (or, if pressed
while the leftmost digit is selected, the rightmost
digit will be selected.)
②
【▲】
switch
When the meter is in torque setting mode, this
switch increases
the selected
number by one
each time it is
pressed. Note
that the leftmost
digit can only be
0 or 1.
③
【
RESET
】
switch
Pressing this
switch readies
the meter to
begin measure-
ment. Pressing it
while in torque
setting mode
cancels the pro-
cess and takes
the meter out of
torque setting
mode.
SET
RESET
0 - 90 or 1 0 - 9 0 - 9
Setting torque
Setting torque
(Example: Changing a torque
setting from "0000" to "0100")
Ready for
measurement
①【SET】switch
①【SET】switch
①【SET】switch
The last 0 flickers
②【▲】switch
Press for 2 seconds
to enter torque
setting mode.
Press twice to
select the third 0.
Press for 2 seconds
to exit torque
setting mode.
The last 0 is now
selected.
Press once to
increase the selected
digit from to 1.
ting has been changed. The torque setting can be
changed as desired. The warning tone signals that
the set torque value has been measured.
Example (torque set at 100)
Data is output only for measurements up 100.
-8-