7
Suction lift (ระยะดูด) 12-18 m (12~18 เมตร)
Well diameter (ขนาดผนังบอ)
2 inches (50 mm) (2 นิ้ว (50 มิลลิเมตร))
Suction pipe’s size (ขนาดทอดูด) 1 1/4 inches (35 mm) (1 1/4 นิ้ว (35 มิลลิเมตร))
Pressure pipe’s size (ขนาดทอความดัน)
1 inch (25 mm) (
1 นิ้ว (25 มิลลิเมตร))
Discharge pipe’s size (ขนาดทอจาย)
1 inch (25 mm) (
1 นิ้ว (25 มิลลิเมตร))
How to install วิธีการติดตั้ง
1. Prepare all parts to install such as 1-inch PVC pipes, and joints (refer to the specifi ed depth in the manual). เตรียมอุปกรณในการติดตั้ง
ทอพีวีซีขนาด 1 นิ้ว และขอตอตางๆใหครบ (ระดับความลึกที่ระบุไวตามคูมือ)
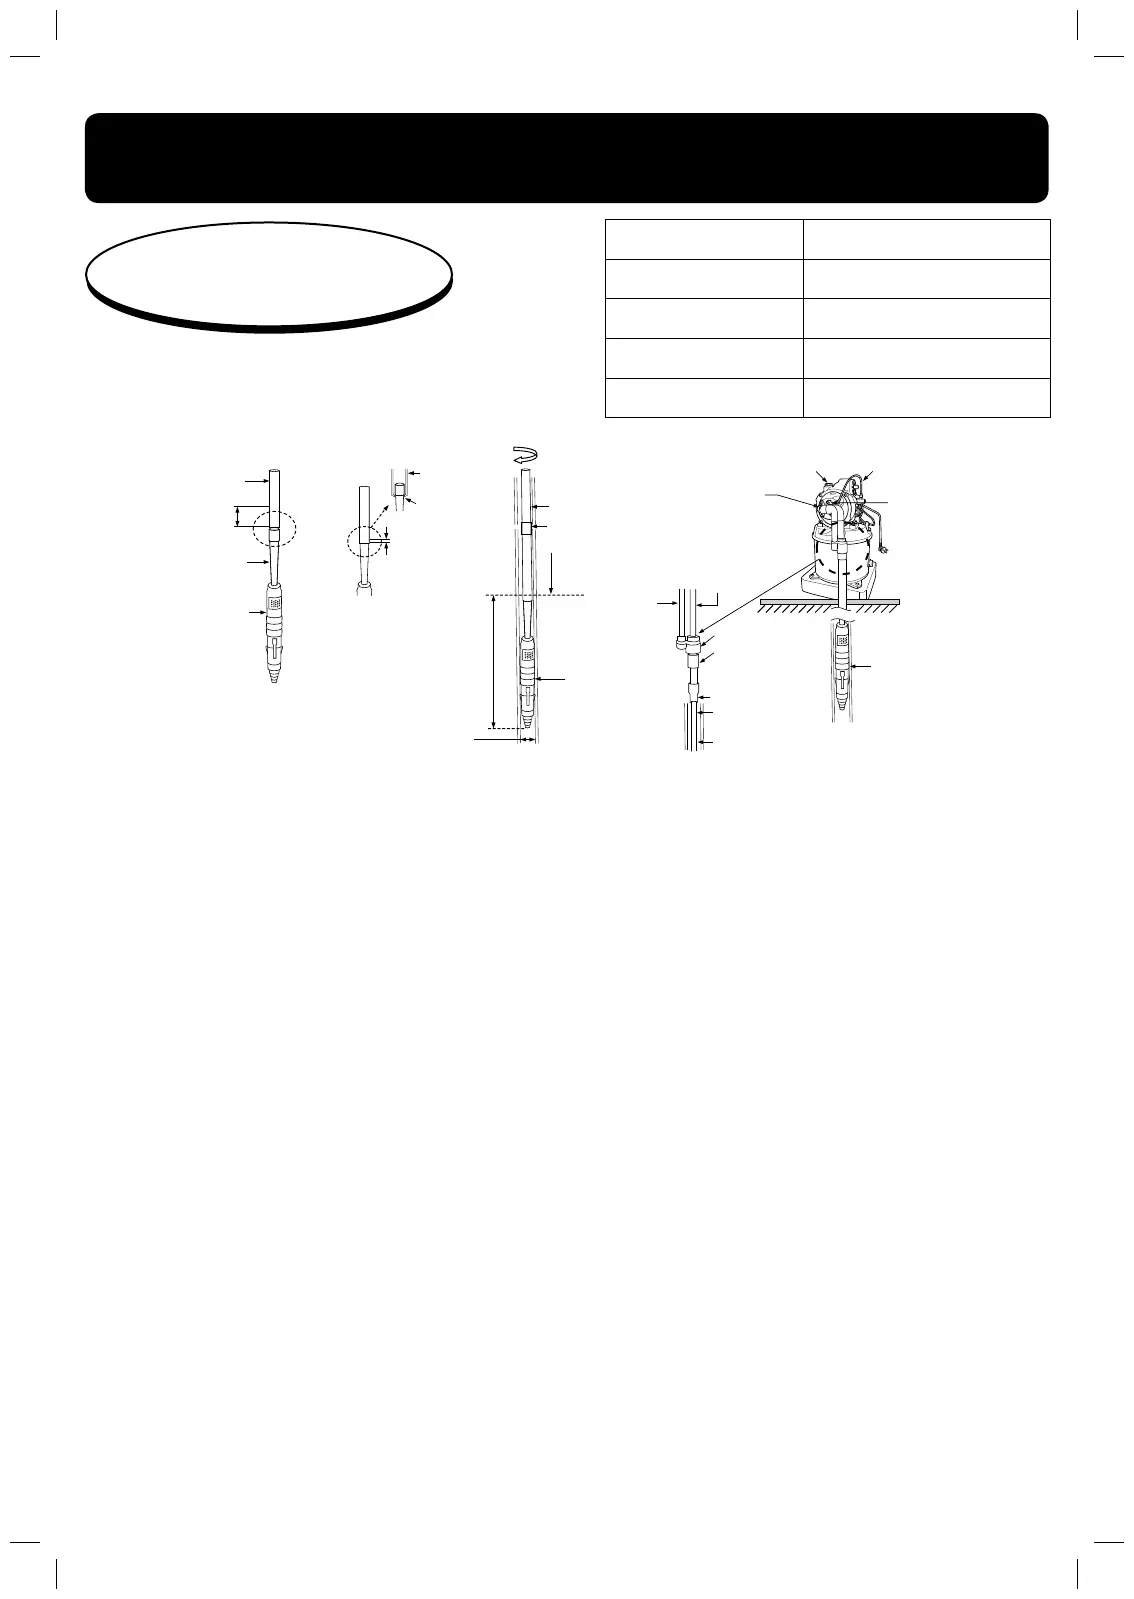
2. Expand the end of the provided 1-inch PVC pipe (suction pipe) about 50 mm by holding it over the fi re as shown in the fi gure of step 1.
นําทอพีวีซีขนาด 1 นิ้ว (Suction pipe) นําไปลนไฟดานปลายทอใหขยายตัว ความยาวโดยประมาณ 50 มิลลิเมตร ภาพขั้นตอนที่ 1
3.
Install the expanded end of the PVC pipe to the venturi of the single jet. Install the end of PVC pipe so that it is over the venturi about 10 mm
as shown in the figure of step 2. Then, cover the connection point with a damp cloth and bend the pipe’s end onto the venturi as shown in the
figure of step 3. นําปลายทอพีวีซีที่ลนไฟ สวมเขากับตัวสง (Venturi) ของชุดหัวเจ็ตทันที ใหสวมปลายทอพีวีซียาวเกินออกมาประมาณ 10 มิลลิเมตร ของ
ตัวสงนํ้า (Venturi) ภาพขั้นตอนที่ 2 หลังจากนั้นใชผาชุบนํ้าเย็น ซับจุดท
ี่สวมแลวบีบใหกระชับใหปลายทอพีวีซีงอเขารัดกับตัวสง (Venturi) ภาพขั้นตอนที่ 3
4. Apply the silicone to protect the water leakage. Then, check for leakage at the silicone-applied point by pouring the water into the
pipe. ใหอัดซิลิโคลนปองกันนํ้ารั่วอีกครั้งและทําการตรวจสอบรอยรั่ว โดยการเติมนํ้าลงในทอ เช็คดูวามีนํ้ารั่วซึมในบริเวณที่อัดซิลิโคลนหรือไม
5.
Connect the 1-inch PVC pipe to the single jet as shown in the fi gure of step 3. Securely attach them with adhesive to avoid leakage. Then,
insert the completed single jet into the well in depth steps as specifi ed in the manual. นําทอพีวีซีขนาด 1 นิ้วตอเขากับชุดเจ็ตของ ภาพขั้นตอน
ที่ 3 (ทากาวใหแนน) อยาใหรั่วซึม หลังจากนั้นนําปลายหัวเจ็ตที่ประกอบสมบูรณแลวปลอยลงผนังบอ, ทีละชวงตามความลึกที่ระบุไวตามคูมือ
6.
Turn the pipe’s end of the single jet (clockwise) until the sealing is against with the wall of the 2-inche well as shown in the fi gure of step 4.
ใหทําการหมุนปลายทอชุดเจ็ต (ตามเข็มนาิกา) ใหซีลยาง (Sealing) กระชับติดกับผนังบอทอพีวีซีขนาด 2 นิ้ว ภาพขั้นตอนที่ 4 จนแนนพอประมาณ
7.
Connect the 1 1/4-inch PVC pipe to the adapter. นําทอพีวีซีขนาด 1 1/4 นิ้วสวมผานชุด หัวยึด (Adapter)
8. Connect the 1 1/4-inch reducer to the pipe’s end of the single jet as shown in the fi gure of step 5. นําขอลดขนาด 1 1/4 นิ้วตอเขากับ
ปลายทอของชุดหัวเจ็ต ภาพขั้นตอนที่ 5
9. Install the fl ange set to the pump and connect them to the adapter (indicated in the circle) as shown in the fi gure of step 6. ติดตั้งชุด
หนาแปลนเขากับตัวปมพรอมกับสวมเขากับชุด Adapter (ตามที่วงกลมไว) ภาพขั้นตอนที่ 6
10. After finishing installation, refer to How to Prime it (page 5). เมื่อจบขั้นตอนการติดตั้งเรียบรอยแลว ใหดูคูมือวิธีการลอนํ้าที่ระบุไว (หนาที่ 5)
** If you cannot install it yourself, please consult the authorized personnel or your dealer. หากไมสามารถดําเนินการไดเอง
ใหปรึกษาชางผูชํานาญงานโดยเฉพาะหรือตัวแทนจําหนาย
** All joints must be glued to avoid water leakage; otherwise, the pump is unable to suck up the water. ขอตอแตละจุดควรทากาว
ใหแนนอยาใหมีรอยรั่วซึมจะทําใหปมดูดนํ้าไมขึ้น
การติดตั้ง
เจ็ดเดี่ยว
How to
install the single jet
วิธีการติดตั้งเจ็ตเดี่ยว
**
For the single jet installation, install it to the well with diameter of 2 inches
(50 mm). Perform the installation as follows: สําหรับการติดตั้งเจ็ตเดี่ยว ( Single jet )
ใชกับผนังบอภายในขนาด 2 นิ้ว หรือ 50 มิลลิเมตร ใหดําเนินการติดตั้งตามรายละเอียดดังนี้
PVC pipe at the
pressure side: 1 inch
(ทอพีวีซีดานความดัน
1 นิ้ว)
PVC pipe at the
suction side: 1 1/4
inches (ทอพีวีซี
ดานดูด 1 1/4 นิ้ว)
Adapter (หัวยึด)
2-inch socket
(ทอตอ 2 นิ้ว)
1 1/4-inch reducer
(ขอลด 1 1/4 - 1 นิ้ว)
1-inch PVC pipe
(ทอพีวีซี 1 นิ้ว)
Well diameter: 2 inches
(ผนังบอขนาด 2 นิ้ว)
Hopper cap (ฝาจุกเติมนํ้า)
1-inch PVC pipe
(ทอพีวีซี 1นิ้ว)
Expanded point 50 mm.
(จุดลนไฟ 50 มม.)
Venturi (ตัวสงนํ้า)
Single Jet (ชุดเจ็ต)
Well diameter (2-inch PVC pipe)
(ผนังบอ (ทอพีวีซีขนาด 2 นิ้ว))
Below the water level
about 2-3 m.
(ลึกจากระดับผิวนํ้าลง
มาประมาณ 2-3 เมตร)
Water level
(ระดับผิวนํ้า)
1-inch joint
(ขอตอ 1 นิ้ว)
1-inch PVC
pipe (ทอพีวีซี
ขนาด 1 นิ้ว)
1-inch PVC pipe
(ทอพีวีซี 1 นิ้ว)
Turn clockwise
(หมุนตามเข็มนาิกา)
Apply silicone
(อัดซิลิโคลนซํ้า)
10 mm. (10 มม.)
~
~
Sealing (ซีลยาง)
2-inch well
(ผนังบอขนาด 2 นิ้ว)
Figure of step 1
(ภาพขั้นตอนที่ 1)
Figure of step 2
(ภาพขั้นตอนที่ 2)
Figure of step 4
(ภาพขั้นตอนที่ 4)
Figure of step 5
(ภาพขั้นตอนที่ 5)
Figure of step 6
(ภาพขั้นตอนที่ 6)
Figure of step 3
(ภาพขั้นตอนที่ 3)
Flange of the 1-inch pressure
pipe (หนาแปลนดานทอ
ความดัน 1 นิ้ว)
Adjusting screw
(สกรูปรับคอนโทรลวาลว)
Flange of the 1 1/4-inch suction
pipe (หนาแปลนทอดานดูด
1 1/4 นิ้ว)
How to install the single jet
วิธีการติดตั้งเจ็ตเดี่ยว (SJ)
3PPL063166-A.indd 73PPL063166-A.indd 7 07/21/11 9:06 AM07/21/11 9:06 AM
 Loading...