5
Pipe holder assembly
Jet body
assembly
Check valve
Strainer
Pipe band (5 pcs)
Socket(B)
Socket(C)
Hex nut M8 (3 pcs)
Hexbolt M8 x 30 (2 pcs)
Bolt M8 x 50 (1 pc)
Washer M8 D16 (5 pcs)
Pipeholder (2 pcs)
Pressure
fl ange
Packing
Venturi
Jet assembly
Screen
Sealing
Spring dock
Check valve
Strainer
Free fl ang
Packing
Adapter
Socket(2
")
Suction pipe(1
")
Sub-fl ang
O-ring
How to prime it วิธีการลอนํ้า
•
After installation on the first run, open the hopper cap and pour in some water. หลังจากทําการติดตั้ง
ในการเดินเครื่องครั้งแรกใหเปด HOPPER CAP แลวใสนํ้า
•
Do not expose the electric components such as motor, electronic parts, etc. to water. กรุณาระวังไม
ใหนํ้าไปถูกชิ้นสวนอุปกรณไฟฟา เชน มอเตอร เปนตน
•
For new pump, water must be filled into the suction pipe, compression pipe, and
pump head and securely close the hopper cap. ปมใหมตองเติมนํ้าในทอดูด, ทออัดและ
หัวปมใหเต็มปดฝาจุกใหแนน
•
Open the water tap at the supply side. เปดกอกนํ้าดานจายออก
•
Install the pressure gauge at the hopper cap. ติดเกจวัดแรงดันที่ฝาอุด
•
Close the control valve fully by turning it clockwise, and connect the power cord to
turn on the pump. ปดคอนโทรลวาลวจนสนิทโดยหมุนตามเข็มนาฬกาเสียบปลั๊กใหปมทํางาน
•
After the water flows into the pump, adjust the control valve by releasing the adjusting
screw. หลังจากนํ้าไหลเขาไปในปม ปรับคอนโทรลวาลวโดยคลายตัว Adjusting screw
•
After closing the water tap, check all conditions by opening or closing other water taps.
If there is a noise, adjust the adjusting screw by turning it 1-2 times. หลังจากปดกอกนํ้า,
เช็คสภาพใหพอเหมาะโดยเปดหรือปดกอกอื่นๆ ถามีเสียงดังใหปรับตัว Adjusting screw 1-2 รอบ
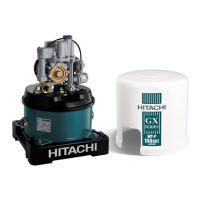
MODEL : DT-P300GX
Single Jet
เจ็ตเดี่ยว
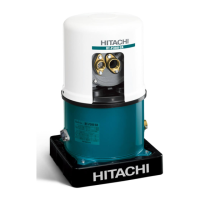
Parallel Jet
เจ็ตคู
Hopper cap
•
Remove the paper inside the cover after fi nishing installaiton. ถอดกระดาษขางในฝาครอบออกหลังจากติดตั้งเสร็จแลว
Adjusting screw
สกรูปรับ
Adjustment of Control Valve การปรับคอนโทรลวาลว
Pressure gauge
เกจวัดความดัน
Adjusting Pressure
100kPa (1.0kgf / cm
2
)
Hopper cap
ฝาจุกเติมนํ้า
Pressure port
ทอความดัน
Pressure tank
ถัง
Inlet (Suction)
ทอดูด (นํ้าเขา)
Outlet
ทอจายนํ้าออก
Power cord
ปลั๊กไฟ
Air charger
ตัวอัดอากาศอัตโนมัติ
Control valve
วาลวควบคุม
Pump head
หัวปม
•
Modifi cation pressure switch may cause
malfunction of machine and pump parts
damage. The warranty will be terminated
instantly if you modify pressure switch.
การปรับแตงสวิตชความดัน อาจทําใหปมนํ้า
ทํางานผิดปกติเปนสาเหตุทําใหชิ้นสวนเสียหาย
หรือชํารุด การรับประกันสินคาจะสิ้นสุดลงทันที
หากมีการปรับสวิตชความดัน
How to Prime it
วิธีการลอนํ้า
PART NAMES AND STRUCTURE
ชื่อชิ้นสวนและโครงสราง
3PPL063166-A.indd 53PPL063166-A.indd 5 07/21/11 9:06 AM07/21/11 9:06 AM
 Loading...