5
English
2. Inspecting the mounting screws
Regularly inspect all mounting screws and ensure that
they are properly tightened. Should any of the screws
be loose, retighten them immediately. Failure to do so
could result in serious hazard.
3. Inspecting the retainer (Fig. 1, Fig. 2)
The retainer may become loose due to excessive
use. Always, pay attention to its proper functioning to
securely hold the accessory shank portion. If any wear
and tear is found, bring this Demolition Hammer to an
authorized service center for maintenance service.
4. Maintenance of the motor
The motor unit winding is the very “heart” of the power
tool. Exercise due care to ensure the winding does not
become damaged and/or wet with oil or water.
5. Inspecting the carbon brushes (Fig. 4)
The Motor employs carbon brushes which are
consumable parts. When they become worn to or
near the “wear limit”, it results in motor trouble. When
an auto-stop carbon brush is equipped, the motor will
stop automatically. At that time, replace both carbon
brushes with new ones which have the same carbon
brush Numbers shown in the Fig. 4. In addition, always
keep carbon brushes clean and ensure that they slide
freely within the brush holders.
6. Replacing carbon brushes
Loosen the screws (Hexagon socket hd. bolts M4 × 12)
of the cap covers, then remove the cap covers (Fig. 5).
After removing the brush caps, the carbon brushes can
be removed.
After replacing the carbon brushes, tighten the brush
caps, then mount the cap covers securely.
7. Service parts list
A: Item No.
B: Code No.
C: No. Used
D: Remarks
CAUTION
Repair, modifi cation and inspection of Hitachi Power
Tools must be carried out by an Authorized Service
Center.
This Parts List will be helpful if presented with the power
tool to the Authorized Service Center when requesting
repair or other maintenance.
In the operation and maintenance of power tools, the
safety regulations and standards prescribed in each
country must be observed.
MODIFICATIONS
Hitachi Power Tools are constantly being improved
and modifi ed to incorporate the latest technological
advancements.
Accordingly, some parts (i.e. code numbers and/or
design) may be changed without prior notice.
NOTE
Due to HITACHI’s continuing program of research and
development, the specifi cations herein are subject to
change without prior notice.
3. Extension cord
When the work area is remote from the power source,
use an extension cord of suffi cient thickness and rated
capacity. The extension cord should be kept as short as
practicable.
4. Mounting an accessory, such as a bull point, a
cutter, etc.
CAUTION
Be sure to switch OFF and disconnect the attachment
plug from the receptacle to avoid a serious accident.
NOTE
For accessories such as a bull point and a cutter, use
only Hitachi genuine parts.
(1) Clean, then smear the accessory shank portion with
grease or machine oil. (Fig. 1)
(2) Rotate the stop lever 180° in a clockwise direction while
pulling it toward you. Next, insert the accessory shank
portion into the hexagonal hole on the front cover.
(Fig. 1)
(3) Clamp the accessory by turning the stop lever by half a
turn in the opposite direction. (Fig. 2)
NOTE
When removing the accessory, such as a bull point, a
cutter, etc., follow the above procedures in reverse.
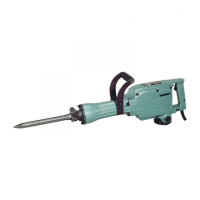
HOW TO USE THE DEMOLITION HAMMER
1. Pull the trigger switch after applying the tip of the bit to
the crushing position.
In some cases, it is necessary to punch the tip of the bit
against the crushing position forcibly in order to begin
the striking motion.
This is not due to malfunction of the power tool. It means
that the safe guard mechanism against no-load striking
is working.
2. Operate this Demolition Hammer by utilizing its empty
weight. The performance will not be better even if it
is pressed or thrust forcibly against the work surface.
Hold this Demolition Hammer with a force just suffi cient
to counteract the reaction. (Fig. 3)
GREASE REPLACEMENT
This Demolition Hammer is of full air-tight construction
to protect against dust and to prevent lubricant leakage.
Therefore, this Demolition Hammer can be used without
lubrication for long periods. Replace the grease as
described below.
Grease Replacement Period
After purchase, replace grease after every 6 months
of usage. Ask for grease replacement at the nearest
authorized Service Center.
MAINTENANCE AND INSPECTION
CAUTION
Be sure to swith OFF and disconnect the attachment
plug from the receptacle to avoid a serious accident.
1. Inspecting this Demolition Hammer
Since use of a dull accessory, such as a bull point, a
cutter, etc. will degrade effi ciency and cause possible
motor malfunction, sharpen or replace with a new one
as soon as abrasion is noted.
000BookH70SA.indb5000BookH70SA.indb5 2015/06/1112:11:192015/06/1112:11:19

 Loading...