2-29
SERVICING
(2.1 Outdoor Unit)
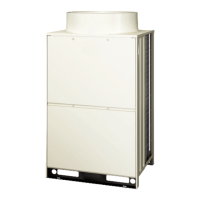
2.1.13 Removing Reversing Valve
(RAS-5FSG, RAS-8FSG, RAS-10FSG, RAS-16FSG, RAS-20FSG, RAS-5FS3, RAS-8FS3,
RAS-10FS3, RAS-16FS3, RAS-20FS3, RAS-8FXG, RAS-10FXG, RAS-8FX3 and RAS-10FX3)
Before starting this work, collect refrigerant into a cylinder from the cycle and turn off all power source
switches.
(1) Remove the front service panel according to the item 2.1.2 “Removing Front Service Panel”.
(2) Remove the electrical box cover according to the item 2.1.15 “Removing Electrical Components”.
(3) Remove all the field wiring at the terminal board for control between the indoor and outdoor units,
and power source terminal board.
(4) Disconnect the wiring connections and check
to ensure that all stop valves are open.
TURN OFF all power source switches.
(5) Disconnect the following to remove the reversing valve.
(a) Brazing Portion between Reversing Valve and Discharge Pipe.
(b) Brazing Portion of the Right and the Left Pipes of Three Pipes from the Reversing Valve.
(c) Brazing Portion of the Center Pipe of Three Pipes from the Reversing Valve
NOTE:
Cover the reversing valve with wet cloth to protect
it from excessively high temperature by a burner.
Phillips Screwdriver, Spanner,
Hexagon Wrench, Wet Cloth,
Burner, Pliers
Tool
Phillips Screwdriver, Spanner,
Hexagon Wrench, Wet Cloth,
Burner, Pliers
Tool
RAS-5FSG, 5FS3
8FSG, 8FS3
10FSG, 10FS3
RAS-8FXG, 8FX3
10FXG, 10FX3
RAS-16FSG, 16FS3
20FSG, 20FS3
8 and 10HP
Only
20HP Only
RVR2 or 21
2
8 and 10HP
Only
RVR1
RVR2
RVR1 or 21
1
RVR2 or 21
2
Brazing
Brazing
Brazing
Stop Valve
Power Source
Terminal Board
Terminal Board for
Control Circuit
 Loading...