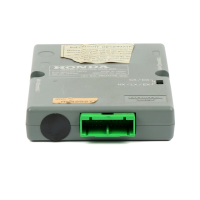
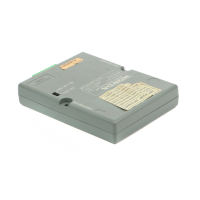
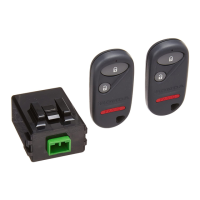
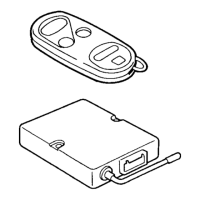
This document is the operating instructions for a Honda Security System, identified by Kit No.: 08E51-S84-100. The system comprises two main components: a main unit and a remote control transmitter.
Function Description:
The Honda Security System is designed to provide protection and convenience for your vehicle. The main unit, acting as the "brain," utilizes a programmable microprocessor to monitor the vehicle for optimal security. It offers various customizable options to suit different user preferences. The pocket-sized remote control allows users to arm and disarm the system from outside the vehicle, and for vehicles equipped with power door locks, it simultaneously locks and unlocks the doors. The transmitter can also be used to intentionally activate the horn or an optional siren in case of an emergency (panic mode).
Important Technical Specifications:
Main Unit:
- Design: Microprocessor, all solid state
- Operating Voltage: 13 V DC (9 V to 16 V allowable)
- Current Consumption (Arming): 2 mA
- Output Type/Maximum Current (Door Lock/Unlock): 0.1 A
- Operating Temperature: -40°C to +80°C (-40°F to +176°F)
- Dimensions: 100 mm x 130 mm x 25 mm (3-15/16" x 5-1/8" x 1")
- Net Weight: 0.33 kg (12 oz)
Remote Control Transmitter:
- Transmitter Type: Radio frequency
- Range: Average 50 feet
- Battery Type: Lithium (#CR2025)
- Battery Life: 1 year (typical)
- Operating Temperature: -20°C to +60°C (-4°F to +140°F)
- Dimensions: 30.7 mm x 65 mm x 11.5 mm (1-3/16" x 2-9/16" x 15/32")
- Net Weight: 21 g (0.7 oz)
The device complies with FCC Rules Part 15, subject to two conditions: it must not cause harmful interference, and it must accept any interference received, including that which may cause undesired operation.
Usage Features:
Remote Control Transmitter Controls and Functions:
- LOCK Button: Arms the security system and locks the doors.
- UNLOCK Button: Disarms the security system and unlocks the doors. Pressing once unlocks the driver's door; pressing a second time within 30 seconds unlocks all other doors (for vehicles with power door locks). When doors are unlocked, the interior light illuminates for 30 seconds if the interior light switch is set to the door-activated position. After disarming, the system will relock in 30 seconds if doors or trunk (or hood with optional switch) are not opened.
- OPTION Button: When pressed and held for more than one second, unlocks the hatch or trunk (functional only on vehicles with electrically driven unlock systems using accessories for glass hatch or trunk).
- OPTION + LOCK (simultaneously held for >1 second): Toggles the confirmation "BEEP" feature on/off. The remote control indicator LED flashes once for "BEEP" on, twice for "BEEP" off.
- PANIC Button: When pressed and held for more than 1 second, activates panic mode. The horn sounds for 30 seconds (or optional siren for 60 seconds), and parking lights flash. To deactivate, press "LOCK," "UNLOCK," "PANIC," or hold "OPTION" for more than 1 second.
- Signal Indicator LED: Lights up when a button is pushed, indicating signal transmission and battery condition (dims when battery is low). Also indicates "BEEP" on/off status.
System Controls (Main Unit Switches):
The main unit has switches for:
- Arming Mode Selection (3 positions):
- AUTO LOCK: System arms and locks doors automatically 20 seconds after ignition is turned off and the last door is closed. Can be locked/unlocked via remote.
- AUTO: System arms automatically 20 seconds after ignition is turned off and the last door/trunk is closed. Doors do not lock when system arms. Can be locked/unlocked via remote.
- MANUAL (Factory Preset): System is armed and doors are locked using the remote control transmitter.
- Horn/Siren (Selector) Switch (2 positions):
- Horn (30): Audible alarm signal from horn intermittently for 30 seconds.
- Siren (60): Audible alarm signal from optional siren continuously for 60 seconds (requires optional siren installation).
Glass Breakage Detector: A microphone that detects the sound of breaking glass, triggering the alarm. Sensitivity is preset at the factory but can be adjusted by a Honda dealer. Too low sensitivity may miss glass breakage; too high may cause false alarms.
Disarm/Valet Switch: Used for three functions:
- Disarming the Security System.
- Placing the Security System into Valet mode (only in Auto or Auto Lock mode).
- Accessing Tripped Sensor Recall.
The switch location varies by vehicle; consult your Honda dealer.
Arming Methods:
- Manual Arming (Remote Controlled): Press the LOCK button on the remote. System arms, status LED flashes once per second, parking lights flash once, doors lock. Horn/siren sounds once if beep mode is on. System will not arm if doors/trunk/hood are open (beeps 3 times).
- Auto Arming (Passive): (When main unit is set to "AUTO"). System arms automatically 20 seconds after the last door/trunk/hood is closed. Status LED flashes 4 times per second during exit delay, then once per second when armed. Parking lights flash once. Inserting ignition key during exit delay disarms the system. Remote LOCK button press during exit delay overrides auto arming.
- Auto Arming and Locking (Passive): (When main unit is set to "AUTO LOCK"). System arms and locks doors automatically 20 seconds after the last door/trunk/hood is closed. Behavior similar to Auto Arming, but doors also lock.
Alarm Mode (Alarm Triggered Mode):
Triggered by breaking glass sound or opening doors/trunk/hood when armed.
- Horn (30 seconds) or siren (60 seconds) sounds.
- Parking lights flash once per second.
- Status LED flashes twice per second.
- System automatically rearms after one alarm duration.
- Entry delay time (20 seconds) is active only in Auto Lock or Auto arming modes when a door is opened.
- Pressing "UNLOCK" on the remote cancels the alarm.
Disarming Methods:
- Remote Controlled Disarming: Press "UNLOCK" on the remote. System disarms, parking lights flash twice (if no alarm triggered) or three times (if alarm triggered). Driver's door unlocks (twice for all doors). Interior light illuminates for 30 seconds.
- Disarm/Valet Switch Disarming (During Alarming): Insert ignition key, turn to "ON" position, then press the Disarm/Valet Switch. This disarms the system and serves as an emergency override.
- Disarming (During Entry Delay Time): Insert ignition key after opening the door, turn to "ON" position. System disarms.
Panic Function:
Activated by holding the "PANIC" button for more than 1 second. Horn/siren sounds, parking lights flash. Deactivated by pressing "LOCK," "UNLOCK," "PANIC," or holding "OPTION."
Valet Mode (Auto/Auto Lock Mode):
Temporarily disables arming but allows panic function. Useful for car washes, servicing, or valet parking.
- Placing in Valet Mode: Disarm the system. With key out of ignition, press and hold Disarm/Valet switch for >3 seconds. Status LED flashes once.
- Exiting Valet Mode: With system in Valet mode and key out of ignition, press and hold Disarm/Valet switch for >3 seconds. Status LED flashes twice. System returns to Disarm mode.
Tripped Sensor Warning and Indication:
- Warnings: If system was tripped and auto-rearmed, status LED flashes twice per second, system "beeps" 3 times (if beep on) when disarmed, parking lights flash 3 times.
- Indication: After disarming, with key out of ignition, press Disarm/Valet switch 3 times in 5 seconds. Status LED flashes a specific number of times to indicate which sensor was tripped (1 for door, 2 for trunk, 3 for system switches, 4 for glass breakage, 5 for hood). This indication is reset when the system is armed or ignition key is inserted.
Last Tripped Sensor Recall:
A diagnostic tool to recall the last tripped sensor from memory, even if the system was not armed.
- Sit in vehicle, all doors/trunk closed. Key out of ignition, press and hold Disarm/Valet switch.
- Press "LOCK" then "UNLOCK" on remote.
- Release Disarm/Valet switch. Status LED indicates the last tripped sensor.
Optional Items:
- Soft Chirp Siren: Replaces horn sound with a "CHIRP" for arming/disarming confirmation and oscillating high-frequency tones when alarm is triggered. Requires main unit selector switch to be set to "Siren."
- Hood Switch: Triggers alarm when hood is opened. Hood must be closed for the security system to arm.
- Remote Control Transmitter: Additional transmitters can be added (up to four per system).
Maintenance Features:
Battery Replacement (Remote Control Transmitter):
- Requires one lithium battery (#CR2025).
- Turn battery cover counterclockwise with a coin to remove.
- Replace old battery with new one, ensuring correct polarity. Do not remove rubber cushion ring. Incorrect polarity can damage the transmitter.
- Replace cover, turn clockwise to lock.
- After replacement, press "LOCK" or "UNLOCK" button 6 times to ensure the main unit recognizes the transmitter. The confirmation "BEEP" feature is reset to off.
Remote Control Code Programming:
Allows up to four remotes to be stored in memory. All remotes to be programmed must be on hand. Steps must be completed within 5 seconds (10 seconds for step 13).
- Disarm system.
- Turn ignition key to "ON" (II).
- Press "LOCK" or "UNLOCK" on remote.
- Turn ignition key to "OFF" (0, I).
- Turn ignition key to "ON".
- Press "LOCK" or "UNLOCK" on remote.
- Turn ignition to "OFF".
- Turn ignition to "ON".
- Press "LOCK" or "UNLOCK" on remote.
- Turn ignition to "OFF".
- Turn ignition to "ON".
- Press "LOCK" or "UNLOCK" on remote. Power door locks cycle, Status LED illuminates for 1 second, indicating programming mode.
- Press the "LOCK" button of each remote (one at a time) to be stored. Power door locks cycle and Status LED illuminates for 1 second to confirm each entry. Perform within 10 seconds for each remote.
General Maintenance:
- Avoid mishandling the remote control (dropping, throwing).
- Avoid exposing the remote control transmitter to extreme hot or cold weather.
- Never submerge the remote control transmitter in water.
- Use a soft cloth to clean the main unit and remote control; do not use kerosene, thinner, or other solvents.
- If a remote control is lost, contact a Honda dealer for replacement and reprogramming of all remotes to prevent the lost one from operating the system.
- For optimal system performance, installation by a Honda dealer is highly recommended.