Notes
1) When the Installer Set-Up Mode is initiated, only Category 1 (
1) Set-Up Features are accessible.
Category 2 (
2) Set-Up Features are accessed by pressing the PROG 2 key.
2) Remember to always press the INFO
button to confi rm that you want to store your new Installer Set-Up setting.
3) To exit the Installer Set-Up Mode move the
CM67NG slider to the AUTO or MAN position (for CM61NG press the AUTO or MAN button).
4) These parameters are set centrally for the zoning system at the room unit confi gured as the system synchroniser
5) Minimum on-time setting applies only to the boiler controller. All HC60NG zone controllers will work with the minimum on-time of 30 secs.
Parameter
AM-PM/24h select
Reset time/temp program
Minimum ON time 4)
Accessory Module type
Heat/Cool operation
Pump exercise feature enable
Cycle Rate 4)
System Synchroniser
Upper setpoint limit adjust
Lower setpoint limit adjust
Measurement offset adjust (temp)
Prop band width
Optimisation enable*
Loss of Communications Instruction
Reset Installer Mode Parameters to
Defaults
Identifi er
1:CL
2:rP
3:Ot
4:At
5:HC
7:PE
8:Cr
9:Sn
10:UL
11:LL
12:tO
14:Pb
15:Op
16:LC
17:FS
Range
0 (24h) / 1(12h)
0 (user prog) /
1 (factory prog)
1, 2, 3, 4, 5
0 (no module) /
1 (ATS module)
0 (cool) /
1 (heat)
0 (disable) /
1 (enable)
3, 6, 9, 12
0 (standard operation of the room unit)
1 (room unit confi gured as Synchroniser)
21... 30°C (in increments of 1°C )
5... 16°C (in increments of 1°C)
-3.0... 3.0K (in increments of 0.1K)
1.5... 3.0K (in increments of 0.1K)
0 (disable) /
1 (enable)
0 (Relay Off)
1 (Relay 20% on 80% off)
0 (modifi ed) /
1 (factory)
Default
1 (12h clock display)
1 (factory prog)
1 min
0 (no module)
1 (heat)
0 (disabled)
6 cph
0 (Standard operation
of the room unit
)
30°C
5°C
0 K
1.5K
1 (enable)
0 (Relay Off)
1 (factory)
Category
1
1
2
2
2
2
2
2
2
2
2
2
2
2
2
You must now press the PROG 2 key to enter the next section
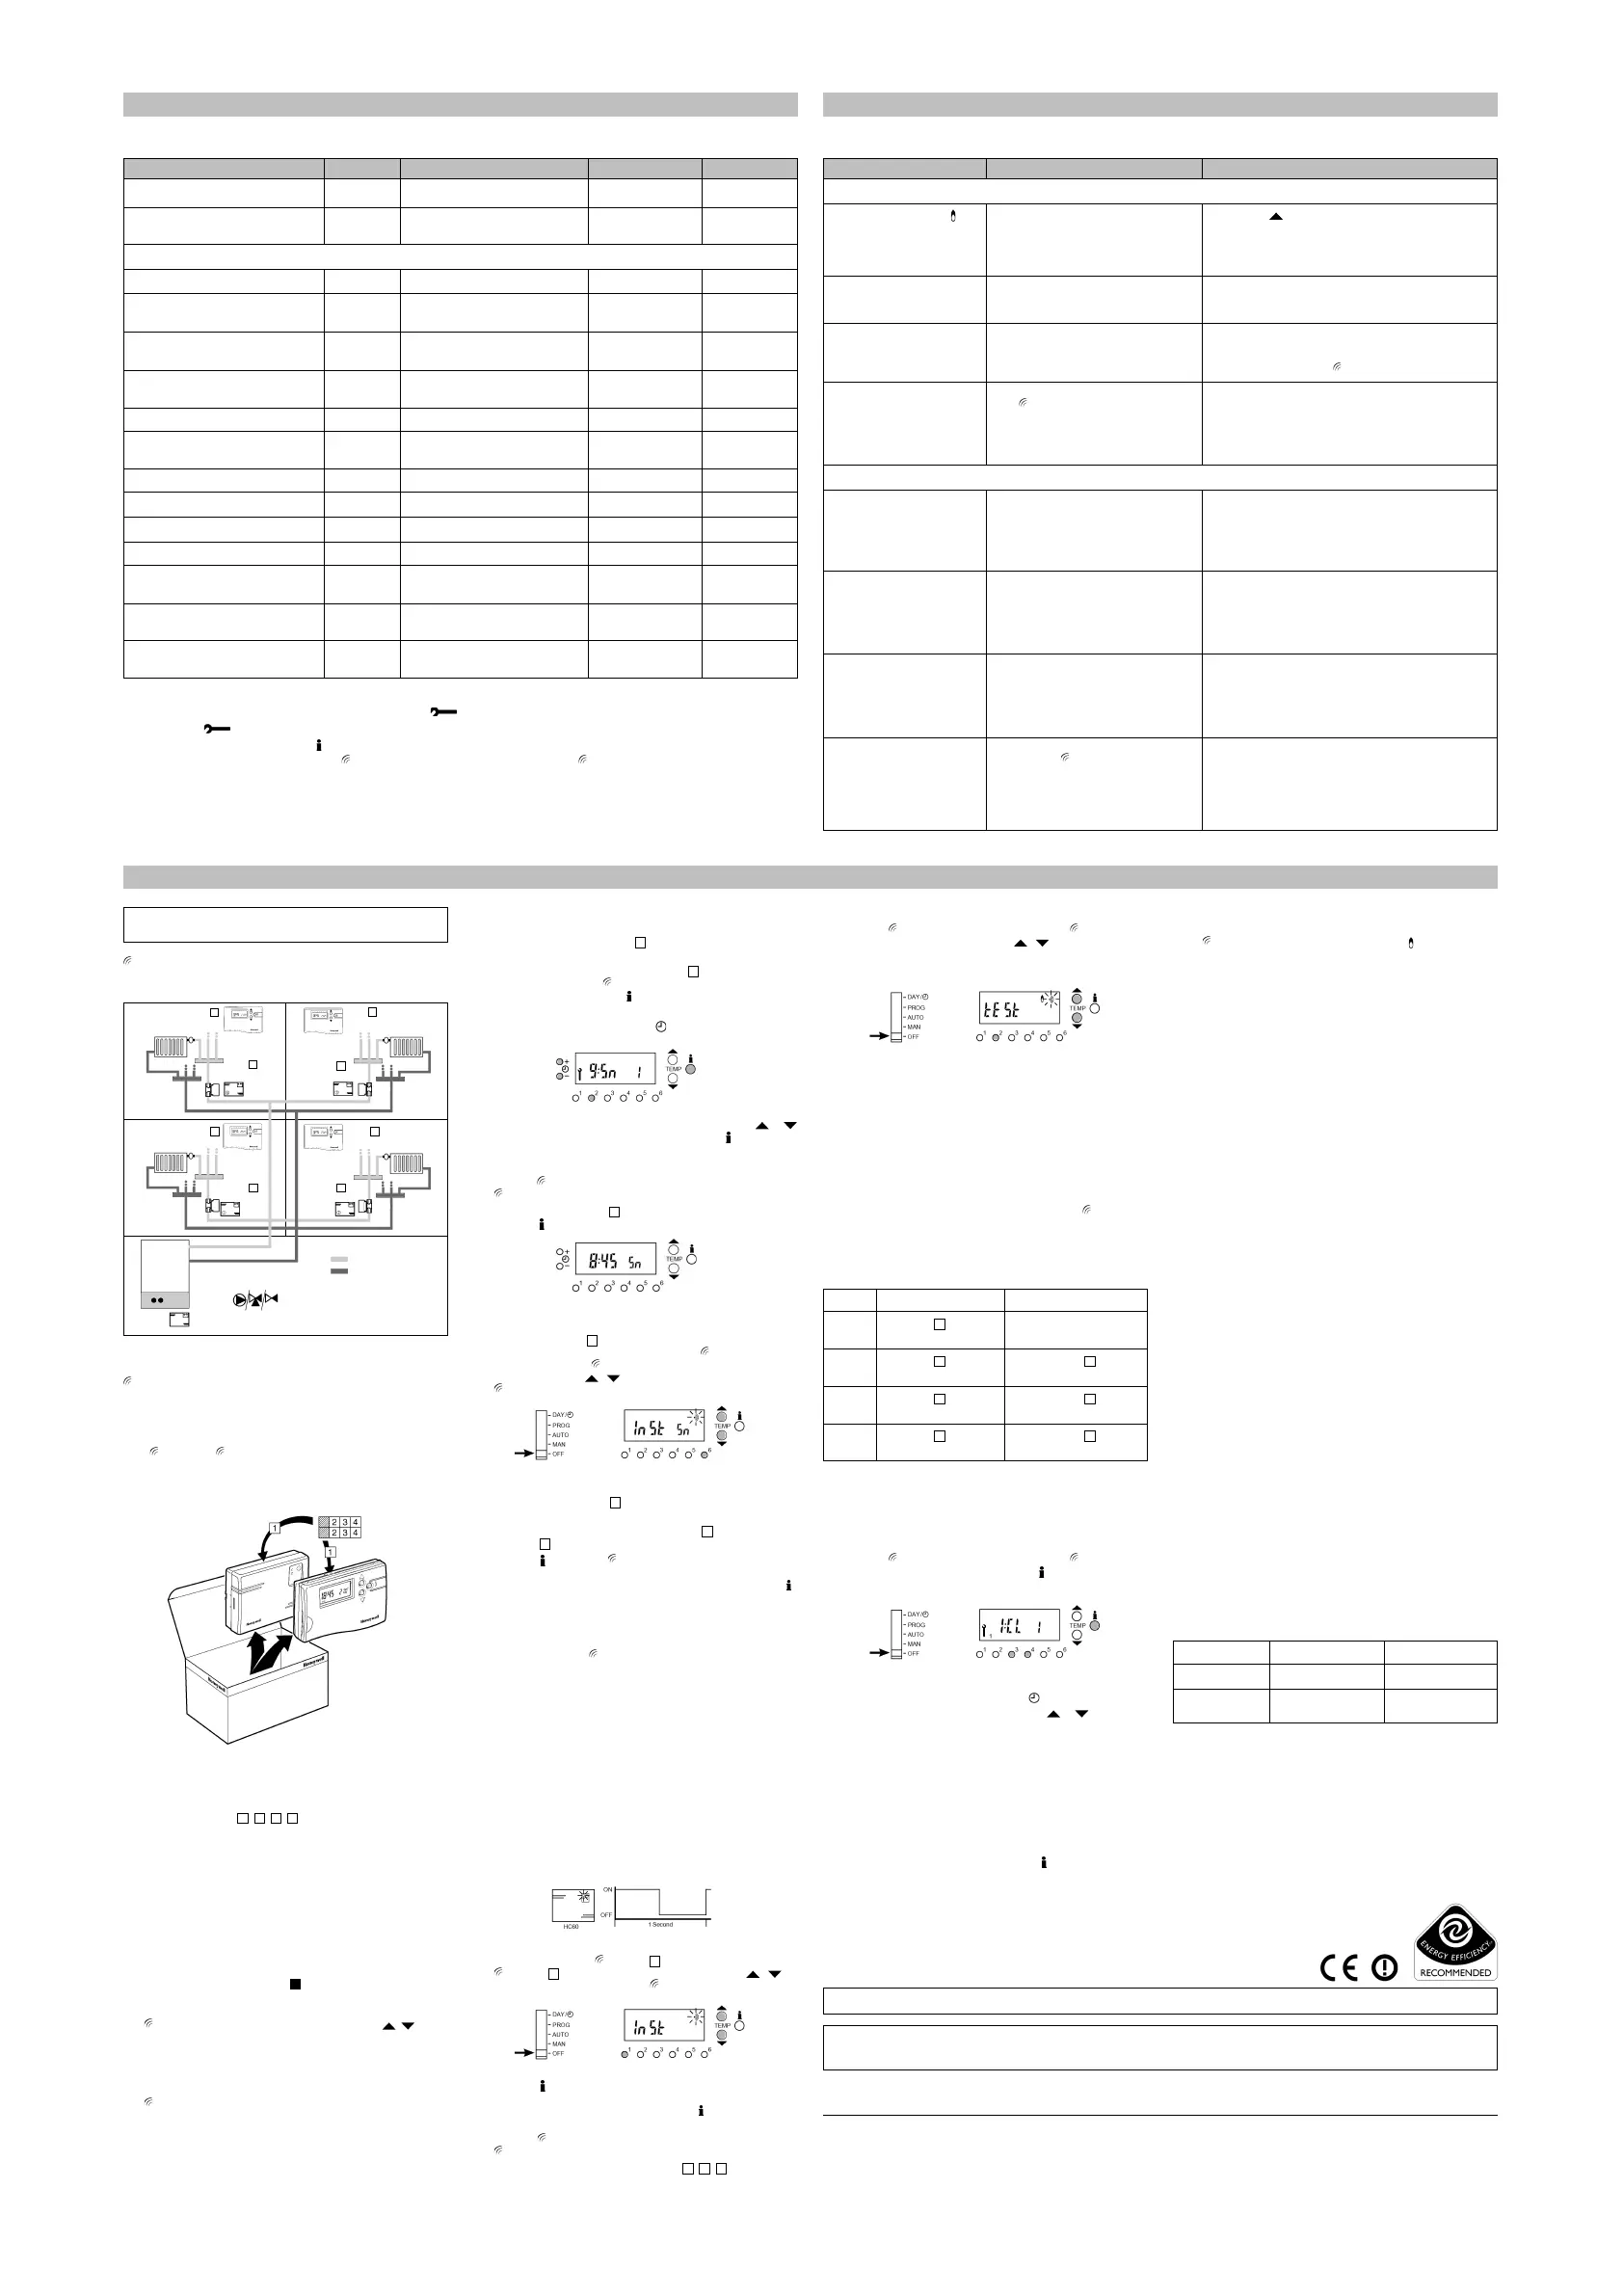
2. INSTALLER SET-UP MODE TABLE
* Reset by pressing and holding the button
on the HC60NG for 15 seconds
B. INSTALLER SET-UP MODE (CONTINUED)
2. SYSTEM SYNCHRONISATION
One of the room units has to be set up to govern the synchronisation
of all zones. To confi gure room unit
1
as system synchroniser follow
the procedure below:
1. Enter the installer’s mode of the room unit
1
by moving the slider
to the OFF position (for
CM61NG press the OFF button) and
pressing the PROG 3, 4 and
buttons together
2. Press the PROG 2 button to enter the category 2 parameters.
Select parameter 9:Sn by pressing
+ or - button
3. Set the 9:Sn parameter value to 1 by pressing the TEMP
or
button. Confi rm the selected value by pressing the
button
NOTE: Only one room unit can be confi gured as the system
synchroniser.
4.
Move the CM67NG slider to AUTO or MAN position (for
CM61NG press the AUTO or MAN button to exit the installer mode.
5. To check if the room unit
1
is confi gured as the synchroniser
press the
button twice. The unit will display the time and Sn
NOTE: If the Sn is not displayed repeat instructions above
6. Using the room unit
1
confi gured as the synchroniser, enter the
synchronisation binding mode by moving the
CM67NG slider to
the OFF position (for
CM61NG by pressing the OFF button) and
pressing the TEMP
, and PROG 6 buttons together. The
CM67/61NG will display InSt Sn
7. To enter the binding mode, press and hold the push button of the
HC60NG zone controller
2
for 5 sec (until the red LED starts
fl ashing at 0.5s on/0.5s off).
NOTE: It is not required to bind the room unit
1
to the zone
controller
1
as they are already factory bound.
8. Press the
button of the CM67/61NG synchroniser room unit to
send the timing binding signal. After successful binding operation
the red LED will be switched off If red LED still fl ashes push the
button again until binding is successful.
9. If you set-up a system with 3 or 4 zones, repeat steps 7 and 8 with
HC60NG zone controllers for zone 3 and 4
10. Exit the synchroniser binding mode by moving the slider to AUTO
or MAN position (for CM61NG by pressing the AUTO or MAN
button)
3. BINDING THE ROOM UNITS TO THE BOILER
CONTROLLER
To provide the heat demand signal from individual zones to the boiler,
each zone room unit has to be bound to the boiler controller
1. Install and wire-up the HC60NG boiler controller. The red LED will
fl ash 0.1s on/0.9s off.
NOTE: If it is not fl ashing as described above, press and hold the
push button for 15 sec to remove any stored binding data from
the memory.
2. Press and hold the push buttons of the boiler controller for 5 sec
to enter the binding mode. The red LED will start fl ashing at 0.5s
On/0.5 s Off. HC60NG is ready for binding
3. Move the slider of the
CM67NG
1
to OFF position (for
CM61NG
1
press the OFF button). Press the TEMP ,
and PROG 1 button together. The
CM67/61NG will display InSt
4. Press the
button to send the binding signal to the HC60NG boiler
controller. After successful binding operation the red LED will be
switched off. If red LED still fl ashes push the
button again until
binding is successful.
5.
Move the CM67NG slider to AUTO or MAN position (for
CM61NG press the AUTO or MAN button to exit the binding mode.
6. Repeat steps 2 to 5 with each room unit (
2
,
3
,
4
) in the system.
NOTE: Before commencing installation make sure that the
hydronic layout of the heating system is suitable for zoning.
CM67/61NG is designed to be able to control multi-zone systems
where heat transfer to the individual zones is controlled by means of
zone valves or pumps (see Fig. 1).
D. MULTI-ZONE RF SYSTEM (READ THIS SECTION ONLY IF YOU USE CM67/61NG TO CONTROL A MULTI-ZONE SYSTEM)
Fig.2 Marking the room unit and the zone controller as a pair.
Fig.1 Multi-zone System Plan
NOTE: If you replace any of the components of the multi-zone control
system, it is recommended to follow all procedures described in Part. D
C. TROUBLE SHOOTING GUIDE
The HC60NG zone controllers operate zone valves or pumps. The
CM67/61NG room units located in every zone provide heat demand
signal for each zone controller. The HC60NG boiler controller operates
the boiler. It is collecting the demand signals from all room units to
make sure that the boiler delivers enough heat to satisfy every zone.
To set up a multi zone system you will need:
- one
CM67NG or CM61NG system pack per zone in the installa-
tion. The system pack contains one room unit (transmitter) and one
zone controller (receiver)
- one HC60NG boiler controller
1. START-UP (max. 4 zones)
1. Mark the room units and relay boxes (zone controllers) from
system packs using
1
,
2
,
3
,
4
labels supplied (see Fig.2).
Leave the HC60NG boiler controller unmarked.
NOTE: It is important not to mismatch the pairs from the system
pack boxes as they are already pre-bound. Keeping them in pairs
will speed up system set-up. The HC60NG from the system packs
work as zone controllers (controlling the zone valves or zone
pumps), the HC60NG delivered separately will work as the boiler
controller (see Fig.1)
2. Install and wire up all the zone controllers following the installation
guidelines, zoning system plan (see Fig.1) and wiring diagrams.
NOTE: Do not connect power supply to the boiler controller.
3. Remove the insulation tabs from the room unit battery compart-
ments (see installation diagram
7
)
4. To check the factory pre-set RF link between the room unit and
zone controller, move the CM67NG slider into OFF position (for
CM61NG press the OFF button) and press TEMP , and
PROG 2 buttons together for 3 sec. The unit will display tESt and
it will send test signals, The zone controller 1 will start switching
green LED on and off every 5 sec (the relay output will remain
off)
5. Exit the test mode by moving the slider into AUTO position (for
CM61NG press the AUTO button)
NOTE: If green LED is not switched on and off at specifi ed
intervals, follow the procedure described in Part A. section 8.
BINDING.
6. Repeat steps 4 and 5 for every room unit and zone controller pair
in the system.
Symptom (Fault Message)
The room unit displays the
symbol but the relay does not
switch on
The HC60NG zone controller
does not react to setpoint
changes on the room unit
After binding procedure the red
LED is on and the green one is
fl ashing once every 3 sec
The red LED is on (Communica-
tion loss)
After procedure described in part
D. section 3.BINDING THE
ROOM UNITS TO THE BOILER
CONTROLLER the red LED is
on and the green one is fl ashing
twice every 3 sec.
After procedure described in part
D. section 2.SYSTEM
SYNCHRONISATION the red
LED is on and the green one is
fl ashing 3 times every 3 sec.
After procedure described in part
D. section 2.SYSTEM
SYNCHRONISATION the red
LED is on and the green one is
fl ashing 4 times every 3 sec.
The red LED is fl ashing 2.5 sec
on - 2.5 sec off (Communication
loss)
Possible Cause
This is normal operation. The room unit
sends only the demand signal (0-100%) to
the relay box. Depending on the demand
signal the relay box will switch the relay on
when required
The room unit and receiver are not bound.
Incorrect or incomplete binding procedure
Incorrect position of the room unit during
binding
The relay box receives no RF messages
from
CM67/61NG:
RF signal is blocked due to wrong location
of the room unit
Room unit batteries are exhausted
An attempt was made to bind more than 4
room units with the boiler controller
An attempt was made to bind the HC60NG
with system timing message when no
demand binding information is present
An attempt was made to bind two system
timing masters with one receiver box
The relay box is missing signals from
one (or more)
CM67/CM61NG but still
receives messages from other room units:
RF signal is blocked due to wrong location
of some room units in the system
Room unit batteries are exhausted
Remedy
Using TEMP button change the temperature setpoint by
a few degrees. The receiver should switch the relay on after
a few seconds delay
Reset* the HC60NG zone controller and follow the binding
procedure as described in part A. section 8 BINDING
Repeat the binding procedure
Repeat the binding procedure keeping approx. 1 m distance
between the HC60NG and
CM61/67NG
Re-locate the room unit(s) following instructions in:
Par t A. section 2. LOCATING THE CM67/61 NG ROOM UNIT
or Part D. section 4.LOCATING THE ROOM UNITS
Replace batteries in the room unit
Reset* the HC60NG boiler controller, repeat the following
binding procedures:
Par t A. section 8.BINDING
Par t D. section 3. BINDING THE ROOM UNITS TO THE
BOILER CONTROLLER
Reset* HC60NG zone controller, repeat the following binding
procedures:
Par t A. section 8.BINDING
Par t D. section 2. SYSTEM SYNCHRONISATION
The above listed operations should be repeated ONLY for the
receiver which displayed the fault message
Make sure that only one room unit in the system is confi gured
as synchroniser. Reset all the HC60NG’s in the system.
Bind matching room units with the zone controllers (1 with 1,
2 with 2, …) as described in Part A, section 8.BINDING
Follow the instructions described in Part D. MULTI-ZONE RF
SYSTEM SET-UP
Relocate the room unit(s) following the instructions in:
Par t D. section 4.LOCATING THE ROOM UNITS
Replace batteries in the room unit
This part of the trouble shooting guide refers to single-zone and multi-zone systems
This part of the trouble shooting guide refers to multi-zone systems only
Zone
1
room unit
Zone
1
controller
Zone
2
room unit
Zone
2
controller
Zone
3
room unit
Zone
3
controller
Zone
4
room unit
Zone
4
controller
Boiler
controller
= Supply
= Return
NOTES:
- alternative control options for the zone controllers
- safety valves and balancing valves are not represented on the
zoning system plan
This product has been designed with your environment in mind!
Please respect this by disposing of all packaging, used parts and eventually the product itself in an environmentally friendly manner.
honeywell
www.honeywell.com/uk/homes.htm
7. AUTOMATIC OPERATION
HC60NG receives the heat demand (0-100%) signal from one (or
more)
CM61/67NG. The room unit will display the symbol whenever
more heat is required. Depending on the demand signal the HC60NG
will switch the heating device on to match the current requirements
of the system.
Green LED on - relay on
Green LED off - relay off
The green LED indicates status of the relay output.
8. TEMPORARY MANUAL OVERRIDE
Pressing the HC60NG button will override the current relay position.
As soon as next signal is received from the room unit the HC60NG
will return to automatic operation as the automatic control has higher
priority than manual operation
9. COMMUNICATION LOSS
When the RF communication is lost for a period of 1 hour the red
LED will be switched on to indicate that no RF messages have been
received during the last hour.
The HC60NG will also enter the failsafe mode as selected in Installer’s
Mode (see 6. FAIL-SAFE MODE SET UP).
Red LED fl ashing at 2.5s on/2.5 sec off - if messages from one of the
room units is lost but the HC60NG still receives signals from others
units it is bound to.
The fail-safe mode operation depends on the HC60NG confi guration
and its function in the system:
- HC60NG boiler controller: Fail-safe mode/0 confi gured in all room
units => relay OFF
Fail-safe mode/1 confi gured in any
of room units => relay cycling 20%
ON/80% OFF
- HC60NG zone controller Fail-safe mode/0 confi gured in the
zone room unit =>relay OFF
Fail-safe mode/1 confi gured in the
zone room unit => relay ON
When the HC60NG does not receive the synchronising message it will
indicate the communication loss status (red LED fl ashing at 2.5s on/2.5
sec off) It will operate using the available heat demand information.
The system synchronisation may be lost and consequently tempera-
ture control performance will become unsatisfactory. See section C.
TROUBLE SHOOTING GUIDE for possible cause and remedy.
For the set-up of the fail-safe mode see 6. FAIL-SAFE MODE SET-UP.
10. SYSTEM PARAMETERS CONFIGURATION
The key parameters of the boiler control algorithm are set centrally
at the unit confi gured as the system synchroniser. The following param-
eters of the synchroniser unit will be used for boiler control:
4. LOCATING THE ROOM UNITS
1. Move the CM67NG slider into OFF position (for CM61NG push
the OFF button) and push the TEMP
, and PROG 2 buttons
together to enter the RF communication test mode. The room unit
will display tESt
2. The room unit will start sending RF signals switching the green
LED of the HC60NG’s on and off every 5 seconds for 10 minutes.
NOTE: All the HC60NG relays will be off.
3. Review the RF Communication Check Table to establish which
HC60NG should react to the test signals of the room unit
4. Observing the room unit location guidelines (Fig. 9) fi nd suitable
location for the room unit where RF communication is reliable.
5. The reliable communication is indicated when all appropriate
HC60NG’s (see RF COMMUNICATION CHECK TABLE) are
switching the green LED every 5 seconds.
6.
Install the room unit in the selected location following CM67/61NG
Installation Guide (alternatively use the optional table stand).
7. Repeat the testing procedure with all the room units in the system.
5. RF COMMUNICATION CHECK TABLE
Zone 1
Zone 2
Zone 3
Zone 4
Room Unit in Test Mode
Room Unit
1
, System
synchroniser
Room Unit
2
Room Unit
3
Room Unit
4
Responding Relay Boxes
All zone controllers, Boiler
controller
Zone controller
2
, Boiler
controller
Zone controller
3
, Boiler
controller
Zone controller
4
, Boiler
controller
If no modifi cations to the values of these parameters are made the
default values apply (see part B. INSTALLER SET-UP MODE).
For detailed information on setting Installers parameters refer to part B.
INSTALLER SET-UP MODE.
NOTE: The minimum on time setting applies only to the boiler control-
ler. All HC60NG zone controllers work with a standard minimum on
time of 30 seconds.
6. FAIL-SAFE MODE SET-UP
The failsafe mode selected defi nes the HC60NG output relay status
if the RF communication is lost. The factory setting keeps the relay
permanently off when communications is lost. If the factory setting
needs to be changed follow the instructions below:
1. Move the
CM67NG slider into OFF position (for CM61NG
press the OFF button). Press and hold the
and PROG 3 & 4
buttons together.
2. Press the PROG 2 button to enter the category 2 parameters.
Select the parameter 16:LC by pressing
+ or - button.
3. Select the fail-safe mode by pressing TEMP
or buttons
0 - when RF communication is lost the relay will be held in OFF
position
1 - when RF communication is lost the relay output will cycle at
20% on 80% off
IMPORTANT:
- To enable the frost protection when RF communication is lost
select the fail-safe mode 1
- For systems with separate frost protection thermostat or where
frost protection is not required select fail-safe mode 0
4. Confi rm the selected value by pressing the
button
5. Attach appropriate label to the HC60NG to indicate the selected
fail-safe mode.
NOTE: You can set fail-safe mode operation individually for each zone.
Parameter
- minimum on time:
- cycle rate
Factory Setting
default value 1 minute
default value 6 cycles
per hour
Range
range: 1-5
choice of 3, 6, 9 and
12 cycles per hour
This product can be used in the United Kingdom, Republic of Ireland
Home Comfort & Systems
Honeywell Control Systems Ltd.
Arlington Business Park
Bracknell, Berkshire RG12 1EB
Tel:01344 656000
 Loading...