You have now installed the Programmable Thermostat. For gas boiler applications, the factory system settings will not need to
be changed (for other applications see below). You can now use the to program the unit and demonstrate how
it works to the homeowner.
Gas Boiler (<30kW)
Oil Boiler
Thermal Actuator
Zone Valve
Electric Heating
(resistive load 3-5A)
Cycle /Hour
6
3
12
6
12
Minimum ON
time
1
4
1
1
1
Note: All parameters listed below belong to category 2
– system parameters (see Installer Parameter Table)
No changes required
Set 1:Ot parameter to 4
Set 2:Cr parameter to 3
Set 2:Cr parameter to 12
No changes required
Set 2:Cr parameter to 12
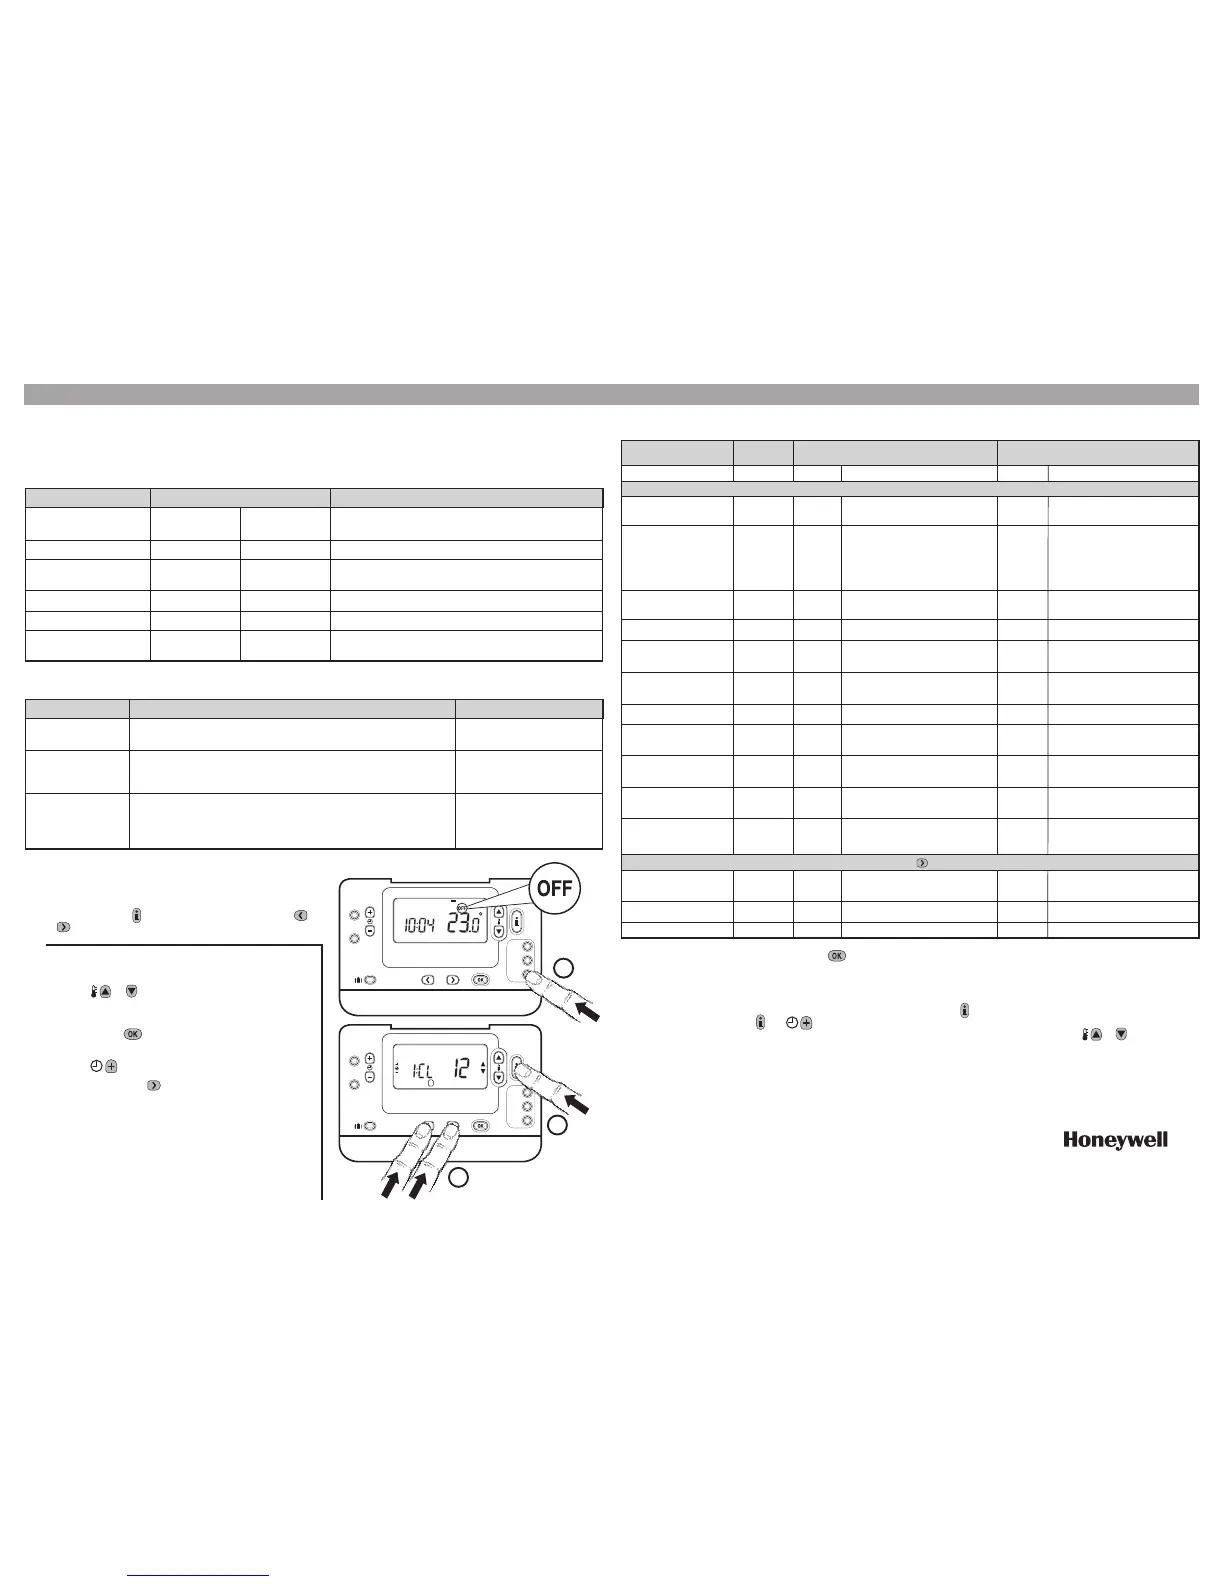
Press the button.
Press and hold the button and the two
or buttons together.
The unit will display the first parameter of installer
parameter group category 1 (
from Parameter No. 1 to 20
).
Press the or button to change the factory setting.
The display will flash indicating that a change has been
made.
Press the green button to confirm the change. The
display will stop flashing.
Press the button to go to the next parameter.
Press the button to go to Installer parameter
group category 2 (from Parameter No. 1 to 5).
To exit installer mode, press the , or
button.
AM-PM / 24hr Display
Reset Time/ Temp
Program
Auto Summer/Winter
Time Change
LCD Backlight
Upper Temp Limit
Lower Temp Limit
Optimisation
Temperature Offset
Proportional Band
Width
Scheduled Maintenance
Alert Period (months)
Reset Parameters to
Factory Defaults
Minimum boiler ON
time
Cycle Rate
Pump Exercise
1:CL
2:rP
3:tC
5:bL
6:UL
7:LL
8:Op
12:tO
13:Pb
19:SP
20:FS
1:Ot
2:Cr
5:PE
Always remember to press the green button to confirm that you want to store the new Installer Set-Up setting. To exit
the Installer Set-Up Mode press the or button.
To enter the diagnostic mode press the button then press and hold the button for 5 sec. The unit will enter the user settings
mode. Next press and hold the and buttons together. The unit will hold the relay on for 5 minutes and the following information
will be available on the display: model ID, date code (WW/YY) and checksum. To view this info press the or button.
Display
12
1
1
1
35
5
0
0
1.5
0
1
1
6
0
Description
12 hr – AM/PM clock display
format
Time / Temp profile set to factory
default
Changes to 0 when one of the
time/temp profiles are changed
Auto Summer/Winter Time
Change enabled
Backlight enabled
5°C Lower Temp. Limit
No temperature offset
Optimisation disabled
Proportional band of 1.5 degree
All settings at factory defaults.
Scheduled Maintenance Alert
Period disabled
Changes to 0 when one of the
parameter is changed
1 minute minimum ON time
6 cycles per hour (cph)
Pump exercise disabled
Display
24
0
1
0
0
21-34
6-20
1
-3 to +3
1.6 to 3.0
0 to 48
0
1
2 to 5
3,9,12
1
Description
24 hr clock display format
Time / Temperature are as
programmed
To restore the factory profile
set to 1
Auto Summer/Winter Time
Change disabled
Backlight disabled
21°C to 34°C adjustment in
1°C steps
6°C to 21°C adjustment in
1°C steps
Optimisation enabled
-3°C to +3°C adjustment in
0.1°C steps
1.6°C to 3.0°C adjustment in
0.1°C steps
0 to 48 months adjustment in 1
month steps
Settings are as modified above
To restore the factory profile set to 1
Selection of 2, 3, 4 or 5
minutes minimum ON time
Selection of 3, 9 or 12 cph
Pump exercise enabled
COPY
DAY
DATE/
DAY
1..4
MANAUTO
1 2 3 4 5 6 7
AUTO
MAN
OFF
“Manufactured for and on behalf of the Environment and Combustion Controls Division of Honeywell Technologies Sàrl, Ecublens, Route du Bois 37,
Switzerland by its Authorised Representative Honeywell International Inc.”
42010938-007 R1
© 2006 Honeywell International Inc.
Arlington Business Park,
Bracknell
Berkshire
RG12 1EB
Technical Help Desk: 08457 678999
www.honeywelluk.com
Summer/Winter Auto
time change
Optimisation
(Variable Start Time)
Scheduled
Maintenance Alert
Period
This feature moves time automatically on the last Sunday of March
and the last Sunday of October. The feature is factory enabled.
The thermostat will adjust the start time in the morning/afternoon
so the desired temperature is reached by the start of the program
period. The system will restrict the start time to a max of 2 hours.
If the installation requires scheduled maintenance and the user
needs to be reminded that the service is due the parameter value
can be set to the required number of months (1-48). When the preset
period expires the CM701/CM707 will display the ‘’ icon.
To enable: Set parameter 3:
tC (category 1) to 1.
To enable: Set parameter 8:
OP (category 1) to 1.
Set parameter 19 to the
required value to enable
maintenance alert. Value set
to zero disables the function.
COPY
DAY
DATE/
DAY
1..4
1 2 3 4 5 6 7
AUTO
MAN
OFF
1 2
 Loading...