DISTRIBUTED I/O
27 EN0B-0090GE51 R0802
Troubleshooting (Controller Autobinding)
Wiring Check
NOTE: In the case of CARE 4.0, the controller cannot be
used to perform autobinding. However, you can use
XILON to perform the wiring test.
In the case of Excel 500 controllers with controller firmware
version 2.04.xx, Distributed I/O modules can be checked out
without even having an application loaded in the controller.
This is possible using a special test mode previously active
only for internal I/O modules. This test mode, accessible
through the “Data Point Wiring Check” option on the second
screen of the start-up sequence, allows manually setting
outputs and reading inputs to verify the I/O wiring. The
procedure is described in detail in the XI581/582 User Guide,
EN2B-0126.
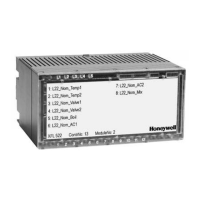
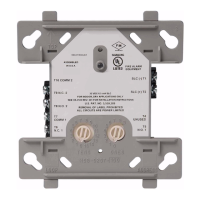
Fig. 36. Distributed I/O module faceplate and LEDs
Each Distributed I/O module has a green Power ON LED (L1)
and a red LONWORKS service LED (L2) at the upper left of the
faceplate. The L
ONWORKS service LED (L2) is used for
diagnosing the state of the Distributed I/O module (see
below).
Fig. 37. Distributed I/O module troubleshooting example
If you have more than one module connected to one XSL511,
you should check the modules to the left and to the right of
the defect module (status of green power LED L1 and red
L
ONWORKS status LED L2). A module is "working" in Table 18
if L1 is lit up green and if the L
ONWORKS communication is
working.
Table 18. Troubleshooting of Distributed I/O modules
Modules to the left side
working
Modules to the right
side working
Possible causes
no no
• Power OFF
• CPU not working
• Incorrect wiring
• Sliding bus connector on XSL511 not closed properly
• Defective hardware → contact your Honeywell dealer
yes no
• Sliding bus connector on the left side not closed properly
• Defective hardware → contact your Honeywell dealer
yes yes
• Wrong L
ONWORKS address (HEX switch setting)
• Defective hardware → contact your Honeywell dealer
In case of problems, check if the behavior is changed if you:
1. Push the LONWORKS service button to reconfigure the
Distributed I/O module. The L
ONWORKS service LED will
light as long as you push the L
ONWORKS service button.
The hardware is defective if this is not the case.
2. Switch the power ON / OFF.
3. Set the rotary HEX switch to an unused address for a few
seconds and then select the correct address. This will
reset the Distributed I/O module.
Please contact Honeywell if the above actions do not solve
the problem.
Service Pin Message and LED
A service pin message is sent when
• powering-up or resetting,
• transitioning to the configured/online state, or
• turning the DIP switch.
In the case of a power-up or reset, the service pin message
is delayed a random time between 1 and 5 seconds to avoid
an overload of a network management node receiving these
messages when a large number of Distributed I/O modules
are powered up simultaneously.
The service LED indicates the status of the Neuron® chip.
Normally, the service LED will blink a few times during the
power-up/reset phase and then remain off. During normal
commissioning, the service LED will stay on briefly and then
flash briefly before remaining off. The time required for com-
missioning is variable, lasting from approximately 10 to 60
seconds, depending upon the amount of network information
 Loading...