Do you have a question about the Honeywell PW7K1OUT and is the answer not in the manual?
Critical safety warnings for electrical installation, fire safety, and liability.
Procedures for handling shipping damage claims and precautions against electrostatic discharge.
Notes on FCC rules compliance and acceptance of the Honeywell Software Agreement.
Defines product liability and mutual indemnification terms.
Explains EU compliance declarations and CE/WEEE marking requirements.
Guides on unpacking the product and shipping it back if necessary.
Details the product's limited warranty terms and confidentiality obligations.
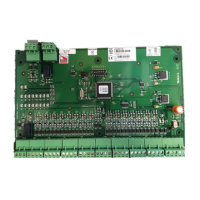
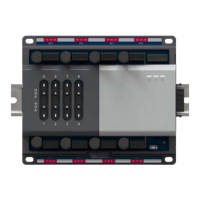
Details the functionality and features of the 16-relay output board.
Lists technical specifications including power, relays, inputs, communication, wiring, and environment.
Explains jumper settings and DIP switch configurations for module setup.
Describes the function of onboard LEDs for status indication during power-up and normal operation.
Details the power requirements and connection guidelines for the output board.
Explains the RS-485 communication interface and wiring requirements for connecting to the host controller.
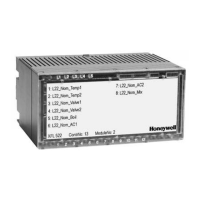
Provides information on input wiring for tamper/power fault and control output wiring for relays.
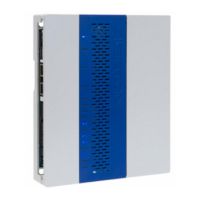
Describes methods for mounting the board in rack-mount enclosures or flat.
Step-by-step guide for installing the output module, including jumper settings and connections.
Illustrates the wiring connections for relays and communication interfaces on connectors 1-8.
Shows wiring details for connectors 7-10, including relays, tamper/PFL inputs, and power.
The Honeywell Pro-Watch 7000 Output Module (PW7K1OUT) is a versatile device designed to provide 16 relay outputs for various access control and security applications. This module can be mounted in two configurations: rack-mounted or flat-mounted, offering flexibility based on installation requirements and available space.
When rack-mounted, the module presents one edge for wiring, which includes connectors for power, communication with the controller, and 12 relay output connections. This configuration is suitable for installations where space is a premium and a compact setup is desired. However, it's important to note that when rack-mounted, four additional relay outputs and two dedicated inputs located on the opposite edge of the board become inaccessible and should not be used.
For installations requiring more I/O or remote placement, the module can be flat-mounted. This configuration makes all 16 relay outputs accessible, along with two dedicated inputs for cabinet tamper and power fault detection. Flat mounting is particularly useful when the module needs to be located near the doors it monitors, allowing for local control of horns or other equipment through the additional general-purpose outputs. In such cases, the dedicated inputs can be utilized to monitor the integrity of the cabinet and the power supply.
The module's 16 form-C relay outputs are designed to handle dry-circuit signals, making them suitable for a wide range of applications. These outputs are configurable via host software as either standard (energize to activate) or fail-safe (de-energize to activate), providing adaptability to different security protocols. The energized or ON time for each relay can be precisely configured using pulse control, allowing for single or repeating pulses. The duration of a single pulse can be extended up to 24 hours, while repeating pulses can have their on/off times defined in 0.1-second increments and repeated up to 255 times. This granular control over relay operation enhances the module's utility in complex security systems.
Communication with the host controller (PW7K1IC or PW6K1IC) is established through an RS-485 interface. This interface supports multi-drop communication over distances up to 4,000 feet (1,200 meters) per port, utilizing two twisted-pair shielded cables (minimum 24AWG). The default communication speed is 38.4Kbps, but it can be adjusted to 19.2Kbps or 9.6Kbps if line conditions or receiving equipment necessitate a slower speed. Proper wiring for the RS-485 port involves connecting TR+ to the plus side of the transmit and receive differential signal, TR- to the negative side, and GND to the signal ground. The GND connection is crucial and not optional, and it must not be connected to chassis ground. For daisy-chaining multiple RS-485 ports, TR+ and TR- wires from upstream and downstream boards are connected to the respective terminals. If the module is the last device on the RS-485 bus, a jumper (J1) must be installed to provide the necessary bus termination.
The module incorporates onboard LEDs to provide status information during both power-up and normal operation. During power-up, LEDs indicate the initiation of hardware setup, RAM testing, and ROM testing, culminating in LED D1 flashing four times upon completion of initialization. In normal operation, a processor heartbeat LED (D1) flashes once per second. A short ON time (approximately 20% duty cycle) signifies that the board is offline or has lost serial communication with the controller, while a long ON time (approximately 80% duty cycle) indicates that the board is online and communicating effectively. Another LED (D2) flashes when there is activity on its serial port. Additionally, 16 individual LEDs are present to show the status of each relay; when a relay is energized or ON, its corresponding status LED illuminates and remains ON for the duration of the relay's energized state.
For power, the module requires a 12VDC input, with an operating range of 10VDC to 14VDC. Polarity is critical, and the +12VDC must be connected to the terminal labeled +12V, with the return connected to the terminal labeled GND. To minimize voltage loss, the power source should be located as close as possible to the board, and a minimum of 18AWG cables should be used for power connections.
When installing the module, several steps are crucial. First, jumpers and DIP switches must be set according to the desired configuration. The board is then mounted in the appropriate enclosure, with the component side facing right if rack-mounted. The communications and power supply are connected using the Power Supply Harness. Wiring to input sensors or installing jumper wires for unused inputs follows. A critical safety precaution is to not connect the power supply to the AC socket until all wiring has been installed and rechecked. After this, relay output wiring is connected, and communications wiring is connected to the Intelligent Controller. A final recheck of all wiring for correct connections and continuity is essential before connecting the power supply cord. Finally, the panel controls are set up using the host software.
Maintenance considerations include the recommendation to use sufficiently large gauge wires for load current to prevent voltage loss. For optimal system reliability and to minimize premature contact failure, especially when switching inductive loads like door strikes, a contact protection circuit is highly recommended. This circuit should be located as close as possible to the load (within 12 inches or 30cm), as its effectiveness diminishes with increased distance. The module is designed to maintain all previous output settings if communication with the controller is lost, ensuring a level of operational continuity.
Honeywell emphasizes that the PW-7000 Output Module and related products should not be used as a primary warning or monitoring system, as primary systems must comply with local fire and safety codes. Installers are responsible for obtaining all necessary approvals in writing. Regular testing of the system by the end-user is also advised to ensure proper functionality and to mitigate potential liabilities. The module's design and features aim to provide a robust and flexible solution for managing outputs in an access control environment, with clear guidelines for installation, operation, and basic maintenance.
| Output Type | Relay |
|---|---|
| Description | Output Interface Module |
| Operating Temperature | 0°C to 50° C |
| Humidity | 5% to 95% non-condensing |
| Power Supply | 24V DC |
| Relay Outputs | 8 Form-C |
| Input Voltage | 24V DC |
| Mounting Type | DIN rail |