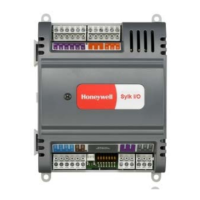
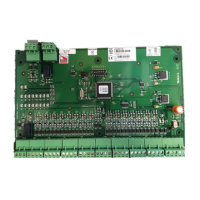
The Honeywell Pro-Watch 6000 Input Module (PW6K1IN) is a device designed to provide supervised input connections and relay outputs for security and access control systems. It can be integrated into a larger system, communicating with a host controller via an RS-485 interface.
Function Description:
The primary function of the PW-6000 Input Module is to expand the input and output capabilities of a security system. It offers 16 supervised inputs and two form-C relay outputs. These inputs can be configured to monitor general-purpose alarm sensors or used as control inputs. The module supports both normally open and normally closed contacts, and can operate in supervised mode (using standard ±1 tolerance 1K ohm End-of-Line resistors) or non-supervised mode.
In addition to the 16 general-purpose inputs, the module provides two dedicated unsupervised inputs for monitoring cabinet tamper and power fault conditions. These dedicated inputs are particularly useful when the board is mounted remotely and cannot leverage the tamper and power fail detection inputs on the main controller board. If these inputs are not used, a short piece of wire should be installed at the input to indicate a safe condition. Input configuration, including sensitivity and hold time, is managed via host software.
The two form-C relay outputs are designed for controlling other devices. They can be configured as standard (energize to activate) or fail-safe (de-energize to activate) through the host software. The energized or ON time for each relay can be set using pulse control for single or repeating pulses. A single pulse's ON time can be extended up to 24 hours, while repeating pulses allow for on/off times defined in 0.1-second increments, repeatable up to 255 times. Relay 1 is a general-purpose relay output that is not available when the board is rack-mounted.
Communication with the host controller is established through an RS-485 interface, supporting multi-drop communication over distances up to 4,000 feet (1,200 m). The default communication speed is 38.4 Kbps, but it can be downgraded to 19.2 Kbps or 9.6 Kbps if line conditions or receiving equipment require it, adjustable via jumper and DIP switch settings. When communication to the controller is lost, the module maintains all previous output settings.
Important Technical Specifications:
- Primary Power: 10 to 16VDC, 250mA. Polarity is crucial: +12VDC to the +12V terminal and return to the GND terminal.
- Relay Contacts: Relays 0 and 1 outputs are Form-C, rated for 2A @ 28VDC, resistive.
- Inputs:
- 16 supervised inputs, using End-of-Line resistors (1k ohm ± 1% tolerance).
- 2 unsupervised dedicated inputs (for tamper and power fault).
- Wire Requirements:
- Power: 1 twisted pair, 18AWG.
- RS-485: 24AWG, 4,000 feet (1,200 m) max., 2-twisted pair with shield (120Ω, 23pf) (Belden 9842 or equivalent). TR+ and TR- are for transmit/receive differential signals, and GND is the signal ground (required, not optional, and must NOT be connected to chassis GND). For daisy-chaining, connect TR+ wires from upstream and downstream boards to the TR+ terminal, and similarly for TR- wires.
- Alarm inputs: 1 twisted pair per input, 30 ohms max.
- Outputs: As required for the load.
- Readers: 6 conductors, 18AWG, 500 feet (150m) max. shield and drain.
- Mechanical:
- Dimension: 5.5" (140mm) W x 9" (229mm) L x 1" (25mm) H.
- Weight: 12 oz. (340g) nominal.
- Environment:
- Operating Temperature: 0°C to +49°C.
- Storage Temperature: -55°C to +85°C.
- Humidity: 0% to 85% RHNC.
Usage Features:
- Mounting Options: The board can be mounted on-edge in a Honeywell rack-mount enclosure or flat against any surface using standoffs. Flat mounting increases available I/O but reduces the number of boards in one enclosure. When rack-mounted, certain connectors (one general-purpose output, two general-purpose outputs, and two dedicated inputs) are not accessible.
- RS-485 Termination: Jumper J1 controls the RS-485 End-of-Line terminator. By default, J1 is open (terminator not active). If the board is the last on the RS-485 bus, J1 should be closed to activate the terminator.
- Address and Speed Configuration: DIP switches (S1-S5) are used to set the module's address (0-31) and communication speed (9,600 BPS, 19,200 BPS, 38,400 BPS). The default address is 1, and the default speed is 38,400 BPS.
- Power-up Sequence: The module provides visual feedback during power-up via LEDs D1 and D2, indicating hardware setup, RAM testing, ROM testing, and initialization completion.
- Normal Operation: During normal operation, LED D1 acts as a processor heartbeat, flashing once per second. A short ON time (20% duty cycle) indicates the board is offline or has lost serial communication, while a long ON time (80% duty cycle) signifies that the board is online and communicating. LED D2 flashes when there is activity on its Serial Port.
- Input and Relay Status LEDs: The board includes two relay status LEDs (D21, D22) and 16 input status LEDs (D3-D18). Input LEDs flash when an alarm is associated with the input. All status LEDs illuminate when their corresponding relay or input is energized or ON, remaining ON as long as the component is energized. Dedicated tamper (D19) and power (D20) status LEDs are also present.
Maintenance Features:
- ESD Protection: Electrostatic discharge can damage CMOS integrated circuits. Users are advised to use static shield packaging, handle components at static-controlled workstations, and wear ESD wrist straps.
- Wiring Precautions: Before installation, the external circuit breaker supplying power to the system must be turned OFF. Power should not be applied until installation is complete and all wiring has been rechecked. Proper grounding of all enclosures is required.
- Contact Protection: For relay outputs, a contact protection circuit is highly recommended, especially when switching inductive loads (e.g., strikes), to minimize premature contact failure and EMI. This circuit should be located as close to the load as possible (within 12 inches [30cm]). Honeywell recommends only DC strikes and S-4 suppressors.
- Regular Testing: Honeywell emphasizes that the PW-6000 should not be used as a primary warning or monitoring system. Installers must regularly test the system and instruct end-users on daily testing procedures to ensure proper functionality and prevent liability.
- Troubleshooting: The onboard LEDs provide diagnostic information during power-up and normal operation, aiding in troubleshooting.
- Shipping Instructions: For returning equipment, customers must contact Honeywell's customer service to obtain a Return Authorization Number (RMA). The RMA number must be clearly marked on all packages to avoid refusal at the factory. Original packing materials should be used for reshipment.