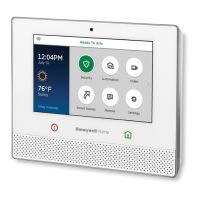
Lyric Controller Installation and Reference Guide
- 7 -
In
InIn
Installing
stallingstalling
stalling
the Control
the Controlthe Control
the Control
Backup
BackupBackup
Backup
Battery Installation
Battery InstallationBattery Installation
Battery Installation
The Lyric Controller is equipped with an integral, replaceable, rechargeable battery pack rated at 7.2Vdc. In the
event of an AC power loss, the system is supported by the long life backup battery that is supervised for
connection and for low voltage conditions. If the battery is missing, or a low battery condition is detected, a
“low battery” message is displayed and a report is sent to the Central Station. In addition, the system will beep
once every 45 seconds to audibly indicate a low battery condition (press any key to stop the beeping). Select
the appropriate battery pack, based on the installation’s requirement, and install the battery pack. Follow the
steps and refer to the figure below to install and connect the battery.
Battery Selection
Battery SelectionBattery Selection
Battery Selection
Select the appropriate battery pack, based on the installation’s requirement, and install the battery pack.
Battery Part Number
Battery Part NumberBattery Part Number
Battery Part Number Battery StandbyTime
Battery StandbyTimeBattery StandbyTime
Battery StandbyTime Low Battery Notification
Low Battery NotificationLow Battery Notification
Low Battery Notification
LCP500-4B (300-03864-AIO) 4-hours (minimum) Approximately 1-hour before battery depletion
LCP500-24B (300-03866-AIO) 24-hours (minimum) At least 1-hour before battery depletion
Installing the Rechargeable Backup Battery
Installing the Rechargeable Backup BatteryInstalling the Rechargeable Backup Battery
Installing the Rechargeable Backup Battery
1. Insert the battery pack into controller’s rear case.
2. Install the battery retainer.
3. Secure the battery retainer with the provided screw.
4. Connect the battery pack connector to the receptacle on the back of the controller.
5. Align the slots on the back of the controller with the hooks on the wall mount as shown below.
6. Once attached, insert the screw to secure the controller to the wall mount.
7. Plug the power supply into a 24-hour, 110VAC unswitched outlet. Upon power-up, the “System Standby!”
screen will be displayed.
SCREW
lyric-031-V1
SCREW
LCP500-4B
STANDARD CAPACITY
BATTERY PACK
(p/n 300-03864-AIO)
RETAINER
OR
RETAINER
LCP500-24B
HIGH CAPACITY
BATTERY PACK
(p/n 300-03866-AIO)
Rechargeable batteries may take up to 48
Rechargeable batteries may take up to 48Rechargeable batteries may take up to 48
Rechargeable batteries may take up to 48-
--
-hours to fully charge. The “Low Battery” message
hours to fully charge. The “Low Battery” message hours to fully charge. The “Low Battery” message
hours to fully charge. The “Low Battery” message
should clear within four hours or by entering Test Mode.
should clear within four hours or by entering Test Mode.should clear within four hours or by entering Test Mode.
should clear within four hours or by entering Test Mode.
Replacing the Rechargeable Backup Battery
Replacing the Rechargeable Backup BatteryReplacing the Rechargeable Backup Battery
Replacing the Rechargeable Backup Battery
1. When battery replacement is required, at the Installer Programming Tools Menu select “Test” OR at the
Master User Tools Menu screen select the “Advanced” icon.
2. Select “Install Backup Battery” and follow the displayed steps to replace the battery or follow the steps
below.
R
RR
Remove the battery
emove the batteryemove the battery
emove the battery
1. Unscrew the screw securing the controller to the wall mount (if used).
2. Release the catch that secures the controller to the wall mount.
3. Rotate the controller away from the wall and lift it from the wall mount, being careful not to damage the
wiring.
 Loading...