12
CANOPY INSTALLATION
18. Lift the canopy up so the partially installed mounting
bracket screws are situated in the L-slots on each
side of the canopy. Rotate the canopy clockwise
and install the two remaining mounting bracket
screws and washers (Fig. 18).
Mounting
Bracket
Canopy
Fig. 18
Washer
Washer
Mounting
Bracket
Screw and
Washer
Mounting Bracket
Screw
Blade Screws
Blade
Blade Screw
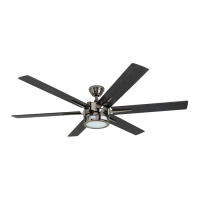
BLADE INSTALLATION
Fig. 19
19. Insert the blade through the slot on the band on
the motor housing. Alight the holes and attach the
blade to the motor housing with blade screws and
washers. Tighten each blade screw starting with
the one in the middle. Repeat for remaining blades
(Fig. 19).

 Loading...