RPLS740B/RPLS741B 7/8
Hour setting
Réglage de l’heure
Ajuste de la hora
or/ou
Sunset or sunrise selection
Sélection du coucher/lever du soleil
Selección de la puesta o salida del sol
Briefly press this button to go to preceding menu or setting.
Appuyer brièvement sur ce bouton pour passer au menu ou réglage précédent.
Presionar brevemente este botón para ir al menú o ajuste precedente.
Briefly press this button to go to next menu or setting.
Appuyer brievement sur ce bouton pour passer au menu ou réglage suivant.
Presionar brevemente este botón para ir al menú o ajuste siguiente.
Auto/Manual/Random
Auto/Manuel/Aléatoire
Auto/Manual/Aleatorio
(sec. 5.1)
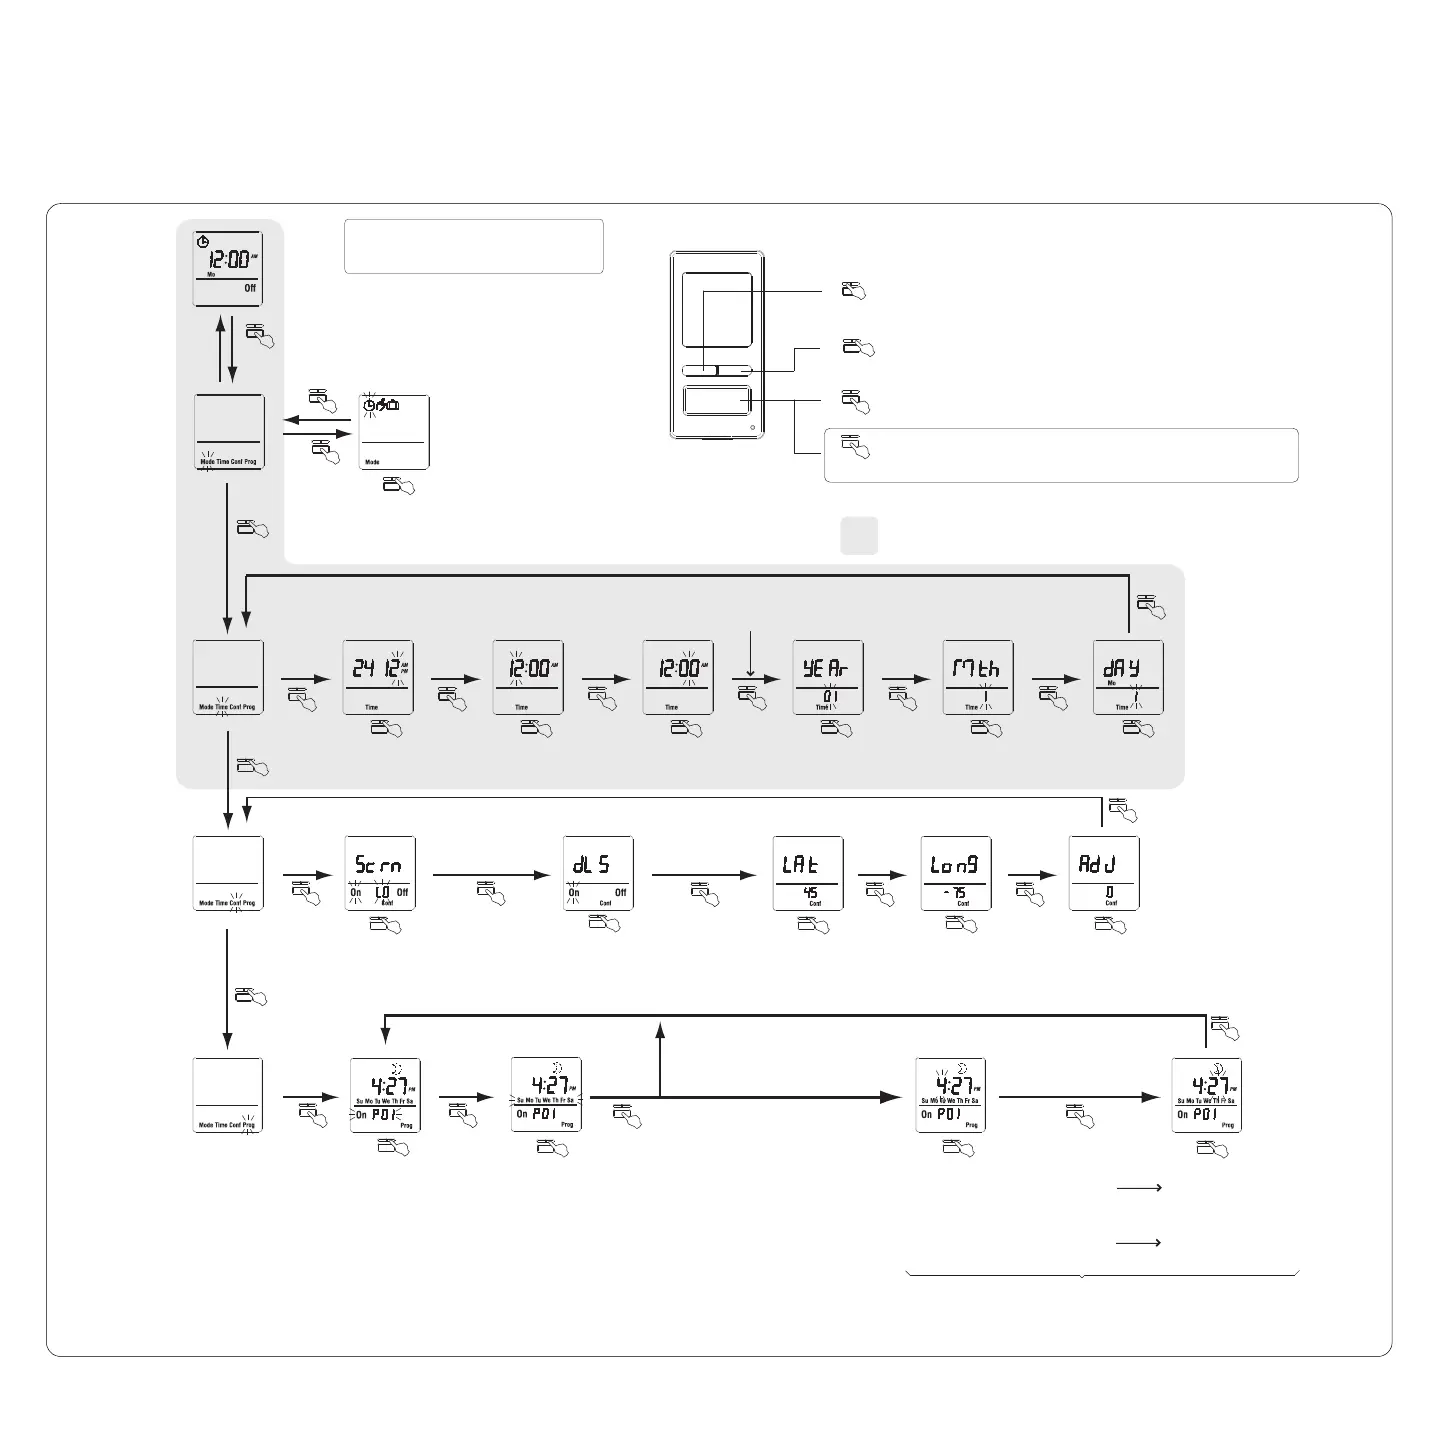
Mode menu
Menu de mode
Menú de modo
Time menu
Menu de l’heure
Menú de la hora
Configuration menu
Menu de configuration
Menú de configuración
Program menu
Menu de programme
Menú de programa
Hour
Heure
Hora
Minutes
Minutes
Minutos
Year
Année
Año
Month
Mois
Mes
Day
Jour
Día
24H / 12H
Automatic Daylight Savings Time
Passage automatique à l’heure avancée
Cambio automático a la hora de verano
(sec. 5.3.2)
Correction factor
Facteur de correction
Factor de corrección
(sec. 5.3.4)
Program number
No. du programme
Nº del programa
(sec. 5.4.1)
Program day(s)
Jour(s) du programme
Días del programa
(sec. 5.4.2)
Legend / Legende / Leyenda
Briefly press this button to accept setting and display next parameter.
Appuyer brievement sur ce bouton pour accepter le réglage et afficher le prochain paramètre.
Presionar brevemente este botón para aceptar el ajuste y visualizar el parámetro siguiente.
Backlight
Rétroéclairage
Retroiluminación
(sec. 5.3.1)
(3 sec.)
Minutes setting
Réglages des minutes
Ajuste de los minutos
or/ou
Offset setting
Réglage de l’écart
Ajuste de la desviación
None selected
Nul (None) sélectionné
Ninguno (None) seleccionado
Day(s) selected
Jour(s) sélectionnés
Días seleccionados
Press this button for 3 seconds to enter or exit the setup menus.
Appuyer sur ce bouton pendant 3 secondes pour entrer ou sortir des menus.
Presionar este botón durante 3 segundos para entrar o para salir los menús.
Latitude *
Latitude
Latitud
(sec. 5.3.3)
Longitude *
Longitude
Longitud
(sec. 5.3.3)
(3 sec.)
Minimum settings for quick start-up
Réglages minimaux pour démarrage rapide
Ajustes mínimos para el encendido rápido
Clock starts.
L’horloge commence à compter.
El reloj comienza a contar.
Program start time
Heure du début du programme
Hora de comienzo del programa
(sec. 5.4.3)
Flowchart shows default settings
Le diagramme contient les réglages par défaut.
El diagrama contiene los ajustes por defecto.
* Enter a negative value for a south latitude or a west longitude.
Inscrire une valeur négative pour une valeur de latitude sud ou une valeur de longitude ouest.
Ingresar un valor negativo para un valor de latitud Sur o un valor de longitud Oeste.
RPLS740B/RPLS741B
Menu flowchart
Organigramme des menus
Organigrama de los menus
69-2455EFS-01_400-071-003-A (TI071_RPLS740B) USA.book Page 7 Tuesday, May 18, 2010 10:49 AM
 Loading...