EasyManua.ls Logo

Honeywell SiXSMOKE User Manual

Honeywell SiXSMOKE
4 pages
To Next Page IconTo Next Page
Page #1 background imageLoading...
Page #1 background image
SiX
TM
Series
SiXSMOKE / SiXSMOKE-CN
Installation Instructions
This wireless smoke/heat detector
is intended for use with Honeywell
controls that support SiX™ series
devices.
To remove the mounting bracket,
turn the top of the detector 15
degrees counterclockwise and
separate the mounting bracket and
top cover.
SiXSMOKE /
SiXSMOKE-CN
PULL
TO
CONNECT
PULL
TO
CONNECT
Open
Enroll
This device can be enrolled and programmed either
before or after installation.
1. Set the Lyric Controller in Programming Mode and go
to Zone Programming. Select Add New and then
Serial Number.
2. Remove the battery tabs to activate the device and
begin the enrollment process.
3. The Green LED flashes rapidly during enrollment (up
to about 20 seconds*).
*NOTE: Enrollment time varies depending on the signal
strength between the device and the controller.
The detector sends its unique MAC ID (Serial
Number) and Services information to the controller.
The controller registers the device and displays the
transmitter data on screen.
4. Enrollment is confirmed when the Green LED is ON
for 3 seconds and the device chirps.
5. Repeat the process, pressing the Test Switch to start
enrollment, and select Heat Sensor Device type to
enroll the heat sensor. The device will enroll the
same MAC ID in another Zone.
6. Press SAVE.
If the detector is not successfully enrolled during the
enrollment period, the LED turns off and the device
powers down. Activate the tamper or press the Test
switch to restart the enrollment process.
The device can also be manually enrolled. See the
Controller’s Programming Guide for details.
Serial Number Loop Number
Zone Description 1 Zone Description 2
Device Type Response Type
Alarm Report Chime Supervision
Panic Home
1
3
4
The Green LED is
ON for 3 seconds
Programming Mode > Zones >
Add New > Serial Number
The LED
Flashes for
up to about
20 seconds
30
0
45
20
10
2
Trigger the device
again to complete
enrollment
PULL
TO
CONNECT
PULL
TO
CONNECT
PULL
TO
CONNECT
PULL
TO
CONNECT
5
Press SAVE
6
Enroll
After enrolling, update the detector firmware (via the
Controller) to ensure the latest version is used. See the
Controller’s instructions.
NOTE: Once enrolled in a system, the detector cannot be used
with another controller until it is removed from the current
controller. See the Controller’s instructions for details.
Program
Consult the Controller’s instructions to program the device in the system.
Fault device features to learn the device Services in the controller:
- Smoke and Heat detector - Reports to panel:
Smoke Alarm when smoke is detected
Temperature Alarm when temperature of 135° F (57° C) or greater OR when there is a
temperature increase of 15° F (8.33° C) or greater within one minute
- Percentage of obscuration (smoke or dirt in the detector)
- Cover tamper: The 10 minute tamper timer is reset every time the tamper switch is closed and
opened or the detector cover is opened.
-
Supervision – 200 second check-in compatible
NOTE: If programmed in
the panel to operate in
one-go-all-go mode, all
smoke detectors
programmed as one-go-
all-go in the system will
sound on alarm.
Question and Answer IconNeed help?

Do you have a question about the Honeywell SiXSMOKE and is the answer not in the manual?

Honeywell SiXSMOKE Specifications

Battery IconBattery
battery typeTwo 3V Lithium
recommended batteriesHoneywell 466, Panasonic CR123A, Duracell DL123 or DL123A
Operating Environment IconOperating Environment
operating temperature0° to 35° C / 32° to 95° F
relative humidity95% max. (Agency Compliance – 93% max.), non-condensing
maximum spacing50ft x 50ft
Weight and Dimensions IconWeight and Dimensions
diameter13.46 cm / 5.3 in.
thickness4.19 cm / 1.65 in.
rf frequency2.4GHz

Summary

Enrollment and Programming

Device Enrollment Steps

Details the steps for enrolling the device, including LED indicators and confirmation.

Enrollment Confirmation

Confirms enrollment by Green LED ON for 3 seconds and device chirp.

Manual Enrollment Reference

Mentions manual enrollment process and refers to controller guide for details.

Programming the Detector

Consult controller instructions for programming device services and features.

Fault Detector Features

Details fault detection for smoke, heat, tamper, and supervision.

One-Go-All-Go Mode Operation

Explains behavior in one-go-all-go mode for synchronized alarms.

Mounting and Testing

Mounting Guidelines and Location

Provides guidelines for detector spacing, placement, and signal strength verification.

Testing Frequency and Methods

Detector should be tested annually; covers test switch, heat, smoke, and signal strength tests.

Test Switch Operations

Explains press/release for circuitry and press/hold for sounder test.

LEDs, Sounder, and Maintenance

LED and Sounder Status Summary

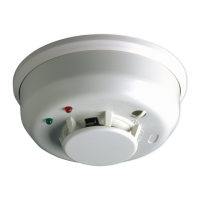
Summarizes LED colors, flashes, and sounder patterns for various device statuses.

Detailed Status Indicators

Provides a detailed table of LED/sounder patterns for enrollment, normal mode, alarms, and tamper.

Silencing the Detector

Describes how to silence the detector via test switch or controller, with 5-minute re-alarm.

Maintenance and Cleaning

Explains detector maintenance for dirt/dead head and cleaning procedure.

Battery Replacement and Specifications

Battery Replacement Procedure

Step-by-step guide for replacing batteries, including recommended types and cautions.

Product Specifications

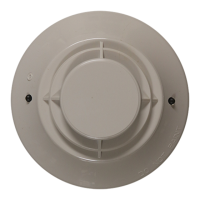
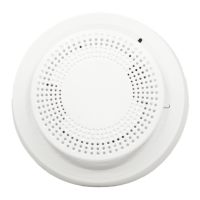
Lists technical specifications including battery, RF frequency, operating temperature, and dimensions.

Approval Listings and Standards

Details FCC/IC, ETL, UL, ULC, ANSI/SIA-CP-01, and RoHS compliance.

FCC/IC and RF Exposure Statements

Provides regulatory compliance statements for FCC/IC and RF exposure warnings.

Related product manuals