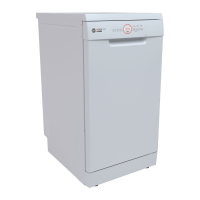
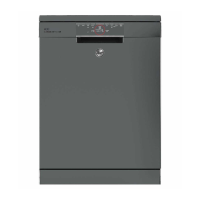
This document is a user manual for a Hoover dishwasher, model HDPH 2D945W-86, providing comprehensive instructions for its safe and proper installation, use, and maintenance.
Function Description
The Hoover dishwasher is designed for washing normal household utensils. It operates by spraying water and detergent onto dishes to remove food particles, followed by rinsing and drying cycles. The appliance features a water softening system to ensure good washing results, especially in hard water areas, and a rinse aid dispenser for streak-free, sparkling clean dishes. Various wash programs are available to cater to different levels of soil and types of load, from light soil to heavy soil, and from delicate glassware to pots and pans. The dishwasher is equipped with an ON/OFF button, a program select button, a start delay button, and additional function buttons for features like acceleration and child lock. A time and info display provides real-time information such as program cycle time, start delay time, and error codes.
Usage Features
The dishwasher offers several features to enhance usability and washing performance:
Program Selection and Operation:
- Programmes: The manual details seven distinct wash programs:
- ECO (50°C, 298min): For normally soiled tableware, most efficient in terms of combined energy and water consumption.
- Universal (60°C, 115min): For normal soil, suitable for dinnerware, cutlery, pots, and pans.
- Intensive (70°C, 130min): For heavy soil, ideal for casseroles, sauces, potatoes, pasta, rice, roasted or fried food.
- Prewash (45°C, 20min): A quick rinse program to prevent food from bonding and eliminate bad odors; no detergent should be used.
- Rapid (45°C, 32min): For fresh soil remnants like coffee, cake, milk, cold drinks, salad, and sausages.
- Special (45°C, 72min): For dishes to be stored for a few days before washing, suitable for all types of items.
- Total Care (45°C, 98min): For light soil, suitable for delicate glassware, dinnerware, and cutlery.
- Starting a Programme: To start, open the door, press the ON/OFF button, select the desired program using the program select button, press the START/PAUSE button, and close the door.
- Pause and Restart: The program can be paused by carefully opening the door. The time remaining will flash, and a pause beep will sound. Dishes can be loaded, removed, or rearranged, and closing the door restarts the program. Caution is advised due to hot water spray arms.
- Cancel or Change Programme: To cancel, pause the program, then press and hold the START/RESET button for 3 seconds. A new program can then be selected.
- Start Delay: A delayed start can be set for 3, 6, or 9 hours by selecting a program, pressing and holding the reservation button, and then pressing the START/PAUSE button and closing the door. The reservation can be cancelled by pressing the reservation button again.
- Memo Mode: If enabled, the dishwasher remembers the last program used and pre-selects it upon the next switch-on.
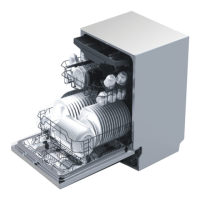
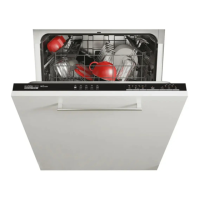
Loading Utensils:
- Pre-treatment: Large food particles should be removed, and heavily soiled items should be soaked or pre-disposed with a dishcloth. Pre-rinsing under running water is not necessary.
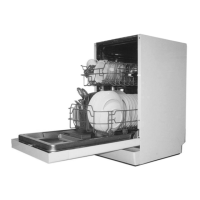
- Upper Rack: Designed for glasses, cups, saucers, plates, and shallow pans. Its height can be adjusted to accommodate taller items in the lower basket. Small items can be placed on the foldable cup holder. Sharp and pointed items should be placed with the blade pointing downward into the knife rack.
- Lower Rack: For larger items like pots, pans, lids, serving dishes, and bowls. Tines can be folded down for flat placement. Ensure items do not block the lower spray arm.
- Cutlery Basket: Spoons should be mixed with other cutlery to prevent bonding. The grid element helps separate cutlery. Handles should face down for better washing results. Long items that might block spray arms can be placed horizontally in the upper basket.
Detergent and Rinse Aid:
- Detergent: Only detergents recommended for automatic dishwashers should be used. Detergent is added to the dispenser, with '15' and '25' markings indicating grams for powdered detergent. Tablets should be placed in the main wash compartment. The dispenser cover should click shut.
- Rinse Aid: Liquid rinse aid is recommended for drying results and to prevent tarnishing. The dispenser cover is opened by pulling a button. Rinse aid should be poured into the circular opening up to the MAX marking, avoiding spills. The normal dosage is R3, but can be adjusted (R1-R4) based on water conditions or if using multi-tab detergents (R1 recommended).
User Preference Settings:
- Accessing Settings: Press and hold the program selection button for 5 seconds to enter user setting mode.
- Language Setting: Navigate through 25 languages using the backward and forward buttons.
- Water Softener Setting: Adjust the water hardness level from S1 to S6 based on local water hardness. The default is S4.
- Buzzer Setting: Enable or disable the acoustic signal for program completion.
- Rinse Aid Setting: Adjust the rinse aid dosage level from R1 to R4. The default is R3.
- Memo Mode Setting: Enable or disable the feature that remembers the last program used.
- Saving Settings: Press the program selection button to save the current setting and move to the next, or press and hold the power button for 3 seconds to save all settings and exit.
Maintenance Features
Regular cleaning and maintenance are crucial for the dishwasher's efficiency and longevity:
General Maintenance:
- Safety First: Always disconnect the appliance from the power supply and turn off the water supply before any cleaning or maintenance. Allow parts to cool.
- Cleaning Aids: Do not use plastic or stainless steel scouring pads, abrasive/solvent/household cleaners, acid/alkaline cleaners, laundry detergents/disinfectants, stainless steel cleaners/polishes, or hand-washing liquids/soap, as these can damage surfaces.
- Broken Items: Carefully remove any broken crockery or glass to prevent injury or damage.
- Post-Cleaning Check: After cleaning, ensure spray arms and filters are correctly in place.
Exterior Cleaning:
- Wipe exterior surfaces with a clean, soft damp cloth and dry with a lint-free cloth.
- For non-flush surfaces like control buttons, use a circular wiping motion.
- Avoid excessive wetting of the control panel area. Keylock can be activated to disable buttons during cleaning.
Interior Cleaning:
- Clean the door seal and interior thoroughly with warm water and a soft, lint-free cloth.
- For heavy soil, use a dishwasher cleaner/descaler according to manufacturer instructions.
Filter Cleaning:
- Frequency: Clean filters whenever food particles are evident.
- Procedure: Turn the drain filter anti-clockwise to release and lift out. Then, lift out the filter plate. Rinse both thoroughly under running water.
- Reassembly: Replace filters correctly, ensuring the filter plate is flush with the dishwasher base.
- Caution: Be careful when handling the sharp outer edge of the filter plate.
Spray Arm Cleaning:
- Frequency: Clean spray arms about once a month, or more often if needed, to prevent blockages from limescale and food particles.
- Upper Spray Arm/Head: Do not remove. Clean with a small plastic-bristled brush. For heavy soil or blockages, use a dishwasher cleaner/descaler.
- Centre Spray Arm: Unscrew its locking nut, rinse thoroughly under running water, and refit. Ensure the locking nut is firmly twisted back on the water supply tube and the arm rotates freely.
- Lower Spray Arm: Lift off its mounting, rinse thoroughly under running water, and refit.
Troubleshooting:
The manual provides a detailed troubleshooting guide for common issues, including:
- Appliance not starting: Check if the door is closed, delay start is set, mains plug is connected, or fuse is damaged.
- Rinse Aid/Salt Aid indicators: Refill dispensers and reset indicators.
- Error codes (E10, E30): Address water supply issues (closed tap, kinked hose, clogged filter, low pressure) or anti-flood device activation (water leakages, blocked inlet valve, drainage issues).
- Unsatisfactory washing results: Check for clogged filters or spray arms, incorrect program selection, improper loading, insufficient detergent, or interrupted wash cycles.
- Water drop stains or streaks: Adjust rinse aid dosage, check quality of rinse aid/multi-tab, or ensure proper drying phase.
- Wet and matte dishes: Refill rinse aid, check quality of rinse aid/multi-tab, or ensure proper drying phase.
For issues not covered or persistent problems, users are advised to contact customer service.