15
CARE AND CLEANING
Defrosting
Warning! This is an air-cooled and frost-free refrigerator with automatic defrost and
water produced by defrost is stored in evaporating pan and eventually evaporates,
so there is no need for manual defrost.
Warning! Except for means recommended by the manufacturer, no mechanical
equipment or other means shall be adopted to accelerate the defrost process.
Cleaning
Food left in the refrigerator can produce bad odors, so the refrigerator must be
cleaned regularly.
For safety, please unplug the power cord before cleaning.
Use a soft towel or a sponge dampened in warm water (can be added with a
neutral detergent) to clean the refrigerator.
Warning! Do not use stiff brush, steel brush, abrasives (e.g.: toothpaste, cleanser,
etc.), organic solvent (e.g.: gasoline, banana oil, acetone, ethanol, etc.), hot water,
acid or alkaline to clean your refrigerator.
Wipe the surface of the refrigerator with a dry towel.
Warning! Do not directly sprinkle water onto the refrigerator, since it will easily cause
rust, electric leakage and faults.
When the inner is stained with cooking oil or seasoning, please wipe it off in time.
Always keep clear of the dust on the back and left and right sides of the refrigerator
to improve heat dissipation.
Door seal strips are easily soiled, please be careful to keep them clean.
Warning! It is not allowed to damage the refrigeration tubes during maintenance
and cleaning.
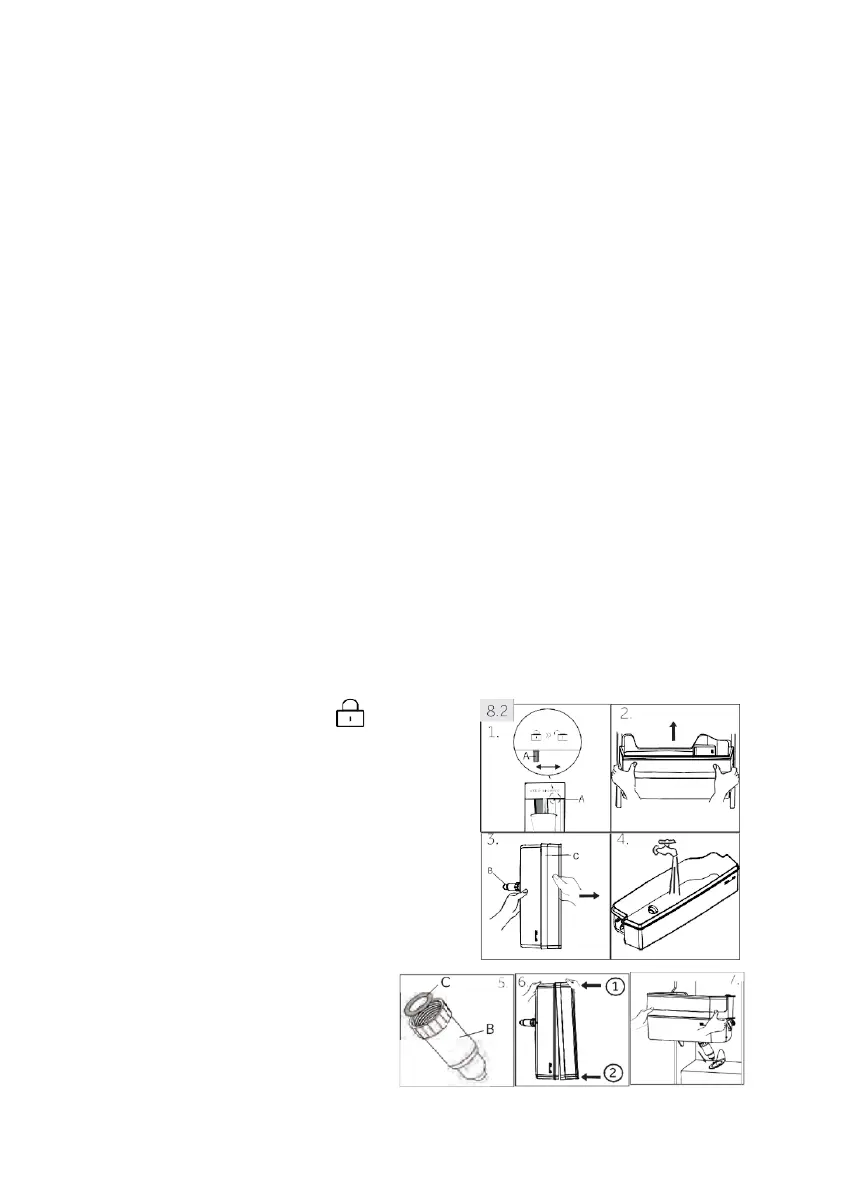
Cleaning the water tank (only for HHSWD918F1XK)
1. Slide the lock (A) to position “Lock”
2. Take the water tank out of the appliance
3. Remove the cover (C) and unscrew the
dispenser spout (B) gently
4. Clean the water tank and the dispenser
spout with warm running water and liquid
dishwashing detergent. Make sure all soap is
rinsed off.
5. Mount the dispenser spout (B) and take
care that it is firmly screwed to the water tank,
while the O-ring (C) is in position
6. Press the cover to fix it with one side of the
water tank, and then do the same for the
other side. Check the water tank
and cover is assembled completely.
7. Replace the tank inside the
appliance. Make sure the dispenser
spout is correctly inserted into the
hole of the door.
 Loading...