This document is a user manual for a HOOVER vacuum cleaner, providing detailed instructions for its safe use, assembly, operation, and maintenance.
Function Description
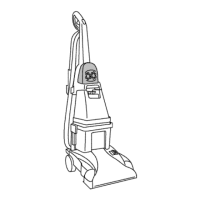
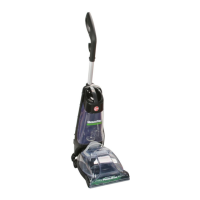
The HOOVER vacuum cleaner is designed for domestic cleaning, offering efficient dust and debris removal from various floor types and surfaces. It is a bagless model, featuring a dust container and washable filters for easy maintenance. The cleaner is equipped with a range of accessories to tackle different cleaning tasks, from general floor cleaning to specialized areas and pet hair removal. The device is designed to be user-friendly with features like a cord reel pedal for easy storage and a telescopic tube for adjustable cleaning height.
Important Technical Specifications
The manual does not explicitly list technical specifications such as motor power, suction power in Airwatts, or dust container capacity in liters. However, it does mention compliance with European Directives 2014/35/EU, 2014/30/EU, and 2011/65/EU, indicating adherence to European safety and environmental standards. It also refers to Commission Regulations (EU) 665/2013 and (EU) 666/2013 regarding energy efficiency and dust pick-up ability, suggesting that the cleaner meets specific performance criteria. The device is equipped with a thermal cut-out feature to prevent overheating, which automatically switches off the cleaner if a blockage occurs or if it is used for an extended period. This safety mechanism requires approximately 45 minutes to reset after the fault is corrected.
Usage Features
The vacuum cleaner offers several usage features to enhance the cleaning experience:
- Suction Regulator (A): Allows adjustment of suction power to suit different cleaning needs.
- Hose Handle (B): Ergonomically designed for comfortable grip and control.
- Telescopic Tube Adjuster (C) and Telescopic Tube (D): Enables adjustment of the tube length to the desired height for comfortable cleaning, as shown in image [5].
- Floor Type Selector Pedal (E): Located on the Carpet & Floor Nozzle (GP)**, this pedal allows users to switch between "Hard Floor" mode (brushes lowered to protect the floor) and "Carpet" mode (brushes raised for deepest clean), as illustrated in image [6].
- On/Off Pedal (I): For switching the cleaner on and off, as shown in image [7].
- Cord Reel Pedal (K): Automatically retracts the power cord back into the cleaner for convenient storage, as depicted in image [9].
- Parking Slot (L): Allows the tube and nozzle to be parked on the back of the cleaner for storage or temporary breaks during use, as shown in image [8].
- Accessories: The cleaner comes with a variety of nozzles and tools for specialized cleaning:
- Carpet & Floor Nozzle (GP): A general-purpose nozzle suitable for both carpet and hard floors.
- Carpet Nozzle (CA): Specifically designed for carpet cleaning.
- Hard Floor Nozzle (HF): Optimized for hard floor surfaces.
- 2 in 1 Accessory (T): Combines a Crevice Tool (for corners and hard-to-reach areas) and a Dusting Brush (for bookshelves, frames, keyboards, and delicate areas).
- Pet Hair Remover Mini Turbo Nozzle (U):* Ideal for stairs, textile surfaces, and effective pet hair removal.
- Allergen Remover Mini Turbo Nozzle (V):* Similar to the pet hair remover, designed for deep cleaning and allergen removal.
- Parquet Nozzle (W):* Specifically for parquet and other delicate floors.
- Note: Mini turbo nozzles should not be used on rugs with long fringes, animal hides, or carpets deeper than 15mm, and should not be kept stationary while the brush is rotating.
Maintenance Features
Regular maintenance is crucial for optimal performance and longevity of the vacuum cleaner. The manual provides clear instructions for:
- Emptying the Dust Container: When the dust reaches the max level indicator, the dust container (Q) should be emptied. This involves pressing the dust container release button (J), removing the container assembly [10], opening the lid [11], removing the pre-motor filter assembly [12], vortex finder [13], and cyclone body [14], then emptying the dust [15]. Reassembly should ensure all parts are clear of dirt and debris.
- Cleaning the Washable Filters: The cleaner is equipped with a pre-motor filter (N) and an exhaust filter (R). These filters should be regularly removed and tapped to release dust. Washing with lukewarm water (not hot water or detergents) is recommended every 5 cassette empties or when the filter has excessive dust. It is crucial to ensure the filters are fully dry before re-use [16, 20]. Failure to clean filters can lead to air blockage, overheating, and product failure, potentially invalidating the guarantee.
- Accessing the Pre-Motor Filter: Remove the dust container [10], open the lid [11], and remove the pre-motor filter assembly [12].
- Accessing the Exhaust Filter: Unclip the exhaust filter cover (S) from the rear of the cleaner [17], then remove the exhaust filter [18].
- Cleaning the Dust Container / Separation Unit: The separation unit can be disassembled for thorough cleaning. This involves removing the dust container [10], opening the lid [11], removing the pre-motor filter [12], vortex finder [13], and cyclone body [14]. Excessive dust can be removed with a cloth, and the dust container can be rinsed with lukewarm water (without soap detergents) [16]. All components must be dry before reassembly.
- Removing a Blockage: The manual advises checking if the dust container is full, if filters need cleaning, or if there is a blockage in the extension tube or flexible hose. It also suggests checking if the pre-motor filter is fitted correctly and if the separation unit needs cleaning. A rod or pole can be used to clear blockages in the hose or nozzle.
- Hoover Service: For continued safe and efficient operation, any servicing or repairs should be carried out by an authorized HOOVER service engineer. Genuine Hoover spares and consumables should always be used.