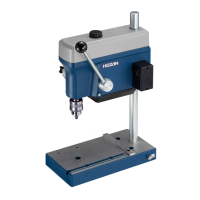
The HOZAN K-21 DESK DRILL PRESS is a precision instrument designed for drilling tasks, offering adjustable speed and depth control for various materials and applications. It is intended for use with proper care and handling to ensure long-term, trouble-free operation.
Function Description
The K-21 DESK DRILL PRESS is used for drilling holes in materials such as ferrous and non-ferrous metals. It features a main shaft with adjustable revolution speeds, allowing users to select the appropriate speed for different drill bit sizes and materials. The device includes a vertical lift handle for precise control of the drill bit's descent, and a depth adjustment mechanism to set the maximum drilling depth. For enhanced precision and repetitive tasks, an optional slide-guide can be installed on the base to drill holes in a line and prevent workpiece rotation. The drill press requires secure mounting to a workbench and proper grounding for safe operation.
Important Technical Specifications
- Main shaft revolution speed: The drill press offers three adjustable speeds by changing the belt position:
- Low speed: 2100 rpm (for 6.0-3.0mm drill bits)
- Medium speed: 4500 rpm (for 3.0-1.5mm drill bits)
- High speed: 6200 rpm (for 1.5-0.5mm drill bits)
These speeds are achieved by adjusting the belt on the pulleys.
- Drilling performance: Capable of drilling up to 6.0mm in ferrous and non-ferrous metals.
- Main shaft axial play: 0.04mm (without chuck installed), ensuring high precision.
- Chuck clamping capacity: 0.8-6.0mm, accommodating a range of drill bit sizes.
- Rated usage time: 15 minutes. Continuous operation beyond this time requires an equivalent rest period to prevent motor damage from overheating.
- Power requirements: 100Vac 50/60Hz.
- Power consumption: 80W.
- Dimensions: 120(W) × 350(H) × 225(D)mm.
- Weight: 4kg.
- Maximum drilling depth: 30mm, adjustable via the depth adjustment mechanism.
Usage Features
Preparation and Setup:
- Mounting: The base of the drill press must be securely attached to a workbench using commercially available wood screws (less than 6mm diameter).
- Handle Installation: The vertical lift handle threads into the main unit clockwise.
- Height Adjustment: The main unit's height can be adjusted according to the workpiece thickness by loosening a T-screw at the back, moving the unit up or down, and then securely tightening the T-screw. The maximum available height can be observed by removing the belt cover.
- Drill Bit Installation: The drill bit is installed by holding the drill chuck, inserting the chuck wrench to loosen it, inserting the drill bit, and then tightening the chuck with the wrench. It is crucial to remove the chuck wrench before operation. Before first use, fully lower the vertical lift handle to ensure the drill bit enters the center of the recess hole without touching anything.
- Grounding: The device requires proper grounding. The grounding wire connects to a screw on the base and then to a grounding terminal at the power supply. If no grounding terminal is available, a qualified electrician should install a separate grounding rod.
- Power Connection: Ensure the ON/OFF switch is off before plugging the power cord into a properly-rated wall outlet.
Operation:
- Power On: After ensuring the chuck wrench is detached, turn the power switch on to start the drill.
- Drilling: Gradually lower the vertical lift handle to begin drilling. Avoid excessive force, as it can impede the drill's spinning.
- Completion: Gently raise the vertical lift handle after drilling, holding it to prevent it from returning violently due to spring action.
- Power Off: Turn off the power switch and disconnect the power plug after work is finished. The drill continues spinning for a short time after the switch is off or the plug is disconnected, so keep hands and objects away from the spinning part.
Adjusting Operation Speed:
- Turn the grip bolt counter-clockwise to remove the belt cover.
- Adjust the belt to one of the three pulley settings (top, middle, bottom) according to the desired speed and drill bit size, as indicated in the provided table.
- Replace the belt cover after adjustment. The belt should only be attached horizontally.
Adjusting Drilling Depth:
- Adjust the main unit's height so the drill bit touches the workpiece.
- Turn the knob of the depth adjustment mechanism to align the stopper with the desired drilling depth on the scale (maximum 30mm).
Using the Slide-Guide (Optional):
- Install the slide-guide on the base.
- Tighten it with the provided hex wrench once the position is determined.
- The slide-guide helps drill holes in a line and prevents workpiece rotation.
Maintenance Features
Belt Tension Adjustment:
- The belt tension is pre-adjusted at the factory but may require readjustment over time.
- To adjust, use a wrench to slightly loosen the two motor mounting nuts, then move the motor pulley forward or backward to adjust tension.
- Place the belt at the top of the pulley during adjustment.
- Securely tighten the motor mounting nuts and replace the belt cover.
- Caution: If the belt tension is too tight, motor revolution will drop, and belt/motor life will shorten. If too loose, belt slippage will occur.
Post-Operation Cleaning:
- After work, ensure the power plug is disconnected, then remove the drill bit using the chuck wrench.
- Clean scraps and dust from the base.
- Regularly check for loose parts or malfunctions. If any problems are found, contact a HOZAN dealer for repairs.
General Care:
- Store the K-21 in an appropriate place, away from shock, vibration, direct sunlight, high temperatures, or humidity.
- The K-21 is not waterproof; do not use water or a wet cloth for cleaning.
- The base is die-cast, so avoid hitting or dropping solid objects on it to prevent cracks and dents.
Safety Precautions (General):
- Always wear safety glasses during operation to protect against cutting dust and fragments. A dust-proof mask may also be necessary.
- Do not wear loose-fitting clothes, ties, or long hair that could get caught in moving parts. Avoid wearing gloves.
- Do not bring hands, eyes, or face close to the drill bit while operating.
- Do not run the K-21 under excessive loads to prevent motor overheating.
- Avoid pulling the vertical lift handle hastily or squeezing it excessively, as this can cause malfunction or damage to the drill bit.
- Ensure the chuck wrench is detached before powering on to prevent injury from it flying off.
- Do not use the K-21 in the presence of flammable liquids or gases.
- Avoid using the K-21 in damp or wet conditions, and always ground the device to prevent electric shocks.
- Do not use with line voltage higher than specified on the rating plate.
- Regularly check the power cord, motor, moving parts, and ON/OFF switch for damage.
Optional Accessories:
- K-21-1 COLLET CHUCK: Improves axial play precision (0.04mm) compared to conventional drill chucks (0.07mm). Applicable for drills from 1.0mm to 3.0mm (special collets available for each size).
- K-50 XY-Table: Suitable for precise drilling, especially for PCBs, allowing holes at regular intervals.
- K-24 Vise: Supports workpieces and is mountable on the K-21 parallel guide.
- Drill bit sets: Various sets are available, including K-5 (7 pieces, 0.8-3.2mm), K-493 (13 pieces, 1.5-6.5mm), K-494 (19 pieces, 1.0-10.0mm), and K-495 (5 pieces, 0.5-1.2mm). Note that the chuck clamping capacity is 0.8 to 6.0mm, so drills outside this range cannot be attached.