30 Operation C9148-90909
Using the control panel
Layout and operation
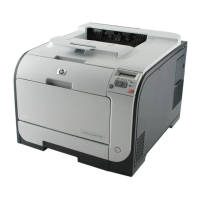
Figure 8. Control panel
1 ? (Help): provides Help files that contain information about the control-panel display when
problems occur.
2 Control-panel display.
3 Navigation buttons: four arrow buttons that are used to move among elements on the
control-panel display. Use the central
SELECT ( ) button to choose an element or enter a
menu.
4 C (Clear): resets the copy count or other numeric entries.
5
MENU: use to choose device configuration menus on the control panel.
6 Status lights: Ready light, Data light, and Attention light.
7 Light and dark buttons: use to increase or decrease the brightness of the copy image
8
REDUCE and ENLARGE buttons: use to scale the copy size.
9
RESET: returns all current job settings to their default values.
10
STOP: cancels a copy job, digital send job, or print job.
11
START: begins or resumes a job.
12 Numeric keypad and keyboard: the keypad is used to type numerical values. The keyboard is
used for digital-sending features and for typing other data.
Hint If the MFP is put into a paused mode (see “Menu map” on page 33), the control panel displays
the message Paused at the top of the display. To return the MFP to the ready mode, press
MENU
and then use the navigation buttons (callout 3) to highlight RESUME on the control-panel display.
Press the
SELECT ( ) button. The message displayed on the control panel changes from Paused
to Ready.
The MFP paused mode is not the same as PowerSave mode. When the MFP is in PowerSave
mode, the control-panel displays the message P
OWERSave On at the top of the display. When in
PowerSave mode, pressing any key or button on the control panel will return the MFP to the ready
state.
1
8
2
5
6
3 4
7
11
12
13
10
9
 Loading...