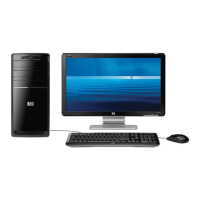
Do you have a question about the HP Pavilion a1000 - Desktop PC and is the answer not in the manual?
Memory | Up to 2 GB DDR SDRAM |
---|---|
Processor | Intel Pentium 4 or Celeron |
Storage | 40GB to 160GB HDD |
Optical Drive | CD-RW or DVD-ROM |
Operating System | Windows XP Home |
Chipset | Intel 865G |
Graphics | Integrated Intel Extreme Graphics 2 |
Networking | 10/100Base-T Ethernet |
Ports | USB 2.0, parallel, serial |
Expansion Slots | PCI |
Steps for assembling the PC and arranging workspace for comfort and productivity.
Connect main hardware devices like monitor, keyboard, and mouse to the PC ports.
Steps to power on the PC and perform the initial Windows setup and configuration.
Instructions for signing up with an ISP and establishing an Internet connection.
Procedures for installing new software and hardware programs onto the PC.
Information on preloaded HP software for peripherals and their automatic setup.
Guidance on using the Windows Transfer Wizard to move files and settings to a new PC.
Explanation of desktop shortcuts for easy access to PC functions and applications.
Details on the HP Organize tool for managing PC shortcuts and Internet links.
Description of special function buttons on the keyboard and their primary uses.
Steps to personalize special keyboard buttons for specific functions or websites.
Connect and configure speaker systems, including stereo and multi-channel setups.
Steps to connect a 3-connector audio speaker system to the PC's rear or front ports.
Instructions to configure sound settings using the Multi-Channel Sound Manager.
Adjusting audio properties in WinDVD for multi-channel sound from DVD movies.
Identification of the six audio connectors on the PC for multi-channel sound systems.
Steps to connect a 6-connector audio speaker system to the PC's rear ports.
Steps to configure sound settings using the 6-connector Sound Effect Manager.
Setting up the PC for sound recording using the Sound Effect Manager.
Selecting specific connectors for sound recording in the 6-connector setup.
Overview of the Sound Effect Manager's control screens and features.
Using the Audio Wizard to configure audio connectors on the PC's front panel.
Information about using the PC's docking bay for storage and connecting devices.
Instructions for storing media in the PC's bay.
Steps to install peripherals like iPod docks or camera stations in the bay.
Details on using the PC's multistorage bay for storage and device docking.
Instructions for storing media in the PC's multistorage bay.
Steps for docking a peripheral device into the multistorage bay.
Instructions for placing a peripheral device on the top of the PC chassis.
Details on installing and using an optional camera docking station.
Instructions for inserting and removing memory cards using the reader.
Information on the video and audio cables required to connect a TV to the PC.
Steps for connecting the PC to a TV using S-video or composite video cables.
Steps to display the PC image on the TV screen and adjust display settings.
Configuring PC display settings using the nView tab in display properties.
Configuring PC display settings using the Ge Force tab in display properties.
Configuring PC display settings using the Displays tab in display properties.
Steps to disconnect the TV and revert the PC display to its original resolution.
Steps to disable TV output using the nView tab.
Steps to disable TV output using the Ge Force tab.
Steps to disable TV output using the Displays tab.
Information on connecting the HP Personal Media Drive externally or internally.
Steps for inserting the HP Personal Media Drive into a drive bay.
Finding the drive in My Computer and assigning a drive letter.
Procedures for storing, playing media, and playing music files using the drive.
Safe procedures for removing the HP Personal Media Drive from the PC.
Using HP Image Zone Plus software to manage photos, scanned images, and video clips.
Steps to burn labels on discs using LightScribe technology.
Creating disc labels using HP Image Zone Plus software.
Creating backup discs with LightScribe labels for image files.
A table listing software programs and their capabilities for creating CDs and DVDs.
Step-by-step guide to create music CDs using iTunes.
Instructions for creating music CDs using Windows Media Player.
Steps to create data CDs using Windows XP.
Procedures for creating CDs using the RecordNow! software.
Guide to create audio CDs for playback on car or home stereo systems.
Steps to create CDs that can be played on your PC.
Instructions for saving data files onto DVD or CD discs.
How to make copies of music or data discs.
Steps to erase files from rewritable DVDs and CDs.
Creating archives of files onto DVDs or CDs.
Converting CD/DVD files into a single image file for duplication.
Steps to save a disc image file.
Burning a previously saved disc image file onto a new disc.
Using LightScribe technology for direct disc labeling.
Designing and burning labels on discs using LightScribe.
Creating LightScribe labels for discs burned from iTunes playlists.
Tables detailing disc types and their compatibility.
Information on CD-R discs, their capacity, and usage.
Information on CD-RW discs, their capacity, and reusability.
A table summarizing disc features and compatibility with various players.
A quick reference chart for optical drive capabilities.
Initial steps to launch and begin using WinDVD Creator for movie creation.
Understanding the Preview window's functionality for different tasks in WinDVD Creator.
Managing video clips, images, and audio tracks within the Media Library.
Organizing media and adding effects using the Storyboard in WinDVD Creator.
What is needed to capture video files using WinDVD Creator.
Steps to capture video from analog sources like VCRs using WinDVD Creator.
How to capture still images from a video source using WinDVD Creator.
Using the Edit module to customize captured video files with effects.
Incorporating images into video projects using the Storyboard.
Adding audio tracks and sound effects to video clips.
Applying transition effects between video clips.
Adding text titles and effects to video clips.
Applying video filters to enhance video clips.
Creating interactive menus with chapters for DVDs.
Finalizing the DVD project by selecting format and burning the movie.
Locating onscreen guides and documentation included with the PC.
Accessing PC guides and information via the Internet and support websites.
Accessing the Help and Support Center for driver updates and technical support.
Using HP Instant Support to diagnose and solve PC problems over the Internet.
Utilizing HP's internet-based service for product notices and system updates.
Viewing previously received messages from HP Updates.
Disabling the HP Updates service to stop receiving messages.
Restoring the HP Updates service to receive messages again.
Accessing PC utilities for support information and programs.