READ THROUGH ENTIRE INSTALLATION
INSTRUCTIONS BEFORE PROCEEDING
1. PositionandmountwithtapetheenclosedMainFrameMounting
TemplatetotherearofTableSaw,asshowninFigure1.SettheBase
Line(onthetemplate)31/2"belowthetabletopsurfaceofthetablesaw.
Important:BaseLinemustbeparallelwiththetabletoporOutfeed
Rollerunitwillnotworkproperly.
2. Usingacenterpunch,markthefour(4)mountingholesontheTemplate.
Drill1/8"pilotholestoreducebitwanderinsheetmetal.Thenenlarge
holesbydrillingwith11/32"drilltoaccommodate5/16"mountingbolts.
Stepdrillsworkespeciallygoodinsheetmetal.
3. MounttheMainFrameAtothesawcabinetusingtwo(2)studpadsB,
alongwith(2)5/16"-18x1"boltsD,(2)5/16"-18nutsJ,(4)5/16"flat
washersHand(4)5/16"lockwashersI.(Handtightenonly.)
Tip:WheninstallingthestudpadsandMainFrameonsomemachine
models,you’llneedto“hang”thestudthroughoneoftheholes,then
rotatethestudpadintopositionandthreadtheboltintoplace.Usually
thebackofthesawcabinetcanbereachedfromtheopeningontheside
ofthesaw.Ontherareoccasionsit’snecessarytolaythesawonits
sideandfeedtheminfromthebottom.Figure2.
4. AssembletheLowerMainFrameBrackettotheMainFrame.Mountas
lowasispracticallypossible,forbestresults.Itcanbeflippedoverif
needed.Thepointistoavoidanyinterferencesonthecabinet.
Important:DoNotDrillthelowerholesinthecabinetatthistime.
5. AttachtheCamsNtotheMainFrameusingCamBolts P and Knobs O
asshowninFigures3&4.
6. Install(1)oneofthePivotBoltsQintooneoftheCams,asshownin
Figures4&5.ThensliptheRollerFrameontothisPivotBolt.Swingthe
FrameintopositionbetweentheCamsandthreadtheotherPivotBolt
intoplace.Refertophotostogetthecorrectorientation.
7. AttachtheAdjustmentPlateLtotheundersideoftheRollerFrameas
showninFigure11using(4)four5/16"CarriageBoltsM,washers,lock
washersandnuts.UsecaretoorienttheAdjustmentBolttothe‘front’as
shown.
8.PivotRollerFrameoutofyourway.Itcanflipoverontothetopofthe
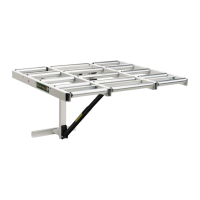
saw.AttachtheSupportArmAssembly K,asshowninFigure6,tothe
bottomoftheMainFramewithaPivotRod Gand(2)twoAcornNuts.
Note:ItisveryimportanttomountthecorrectendoftheSupportArm
Assembly.
Roller
Roller
Frame
Cam
Cam
Main
Frame
Main
Frame
Front
View
Side
View
Lock
Knob
Lock
Knob
Cam
Bolt
Cam
Bolt
Pivot
Pin
Pivot
Pin
Figure 4
9
Figure 2
Figure 3
Figure 5
Figure 6
 Loading...