Do you have a question about the Huawei EchoLife HG532 and is the answer not in the manual?
Connect the HG532 for broadband access without a telephone.
Connect the HG532 for broadband and telephone access.
Connect the HG532 for broadband, telephone, and fax connections.
Power on the HG532 and check initial status indicators.
Set up internet access using a Huawei HSPA data card.
Configure ADSL connection using embedded software or PC dial-up.
Quickly connect PC to HG532 using Wi-Fi Protected Setup (WPS).
Manually configure wireless connection using PC or OS software.
Modify the password for accessing the HG532's web interface.
Control the HG532's wireless network capability via button or utility.
Customize SSID and password for the wireless network.
Connect wirelessly using WPS technology without credentials.
Modify the IP address used to access the HG532's web interface.
Reset the HG532 to its factory default configuration.
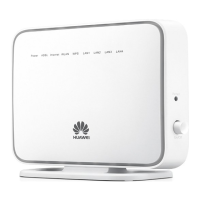
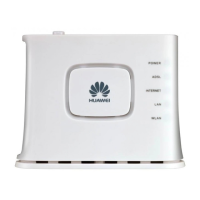
Description of status indicators on the HG532.
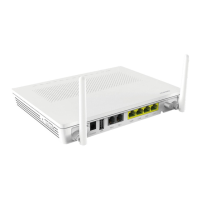
Details of physical ports and buttons on the HG532.
List of default parameters for the HG532.
Technical details and performance metrics of the HG532.
The EchoLife HG532 Home Gateway is a device designed to provide home users with broadband network access, supporting both ADSL2+ and High-Speed Packet Access (HSPA) uplinks. It facilitates dynamic mutual backup of voice and data services through these links, ensuring reliable connectivity. The device can be configured for various network access scenarios, including simple broadband-only connections, as well as setups involving one or multiple telephones and fax machines. Its wireless network function allows for convenient internet access without the need for physical cable connections to computers.
For basic setup, the HG532 can be connected directly to a telephone jack on the wall if the line is used solely for broadband access. In this configuration, a power adapter powers the device, and a computer can be connected via an Ethernet cable. If the wireless network function is utilized, connecting a computer with an Ethernet cable is not necessary. When a telephone connection is also required, a splitter is used to separate the telephone line into modem and phone connections, allowing both broadband access and telephone usage. For multiple telephones or fax machines, additional microfilters and T connectors can be employed to ensure proper signal separation and prevent interference. Once powered on, the device undergoes an activation process, indicated by the blinking ADSL light, which then turns solid along with the POWER light when the device is working correctly.
The HG532 offers flexible network access parameter configuration. For HSPA uplink, a Huawei HSPA data card needs to be installed. Users can log into the web-based configuration utility using a web browser and navigate to the WAN settings to configure the UMTS connection. This involves enabling the WAN connection, entering the APN and Dial number provided by the network operator, and setting a user name and password. There's also an option to verify the SIM card's PIN code. For ADSL uplink, the device supports two primary methods for internet access: through its embedded PPP dial-up software or through PPP dial-up software on the user's computer. When using the embedded software, the HG532 automatically establishes a dial-up connection after startup, allowing connected computers to access the internet without additional dial-up software or operations. This involves configuring the HG532's WAN settings to "Route" mode, specifying VPI/VCI parameters, and selecting PPPoE as the connection type with the provided user name and password. If the computer's PPP dial-up software is preferred, the HG532 must be set to "Bridge" mode, and the dial-up connection needs to be configured on the computer itself, typically through the operating system's network connections settings.
The wireless network connection on the HG532 can be configured in several ways. The device supports Wi-Fi Protected Setup (WPS), allowing for quick and secure wireless connections with WPS-compatible network adapters. To use WPS, the wireless network function must first be enabled, and a wireless network name (SSID) and access password (WPA-PSK) must be set via the web-based configuration utility. Then, pressing the WPS button on the HG532 and enabling the WPS negotiation function on the PC's wireless network adapter within two minutes will establish the connection. The WPS indicator on the HG532 will blink and then turn solid to confirm a successful connection. For network adapters that do not support WPS, a wireless connection can be set up manually. This involves enabling the wireless network function and setting the SSID and WPA-PSK password on the HG532, and then configuring the wireless network connection on the computer using its operating system's wireless configuration software, such as Wireless Zero Configuration in Windows XP.
Beyond connectivity, the HG532 provides several configuration and maintenance features. Users can change the administrator password for logging into the web-based configuration utility for security or ease of remembrance. This is done through the "Maintenance > Account" section, where the current and new passwords can be entered. The wireless network function can be quickly enabled or disabled by pressing the WLAN button on the device, with the WLAN indicator showing its status. Alternatively, this function can be controlled through the web-based configuration utility under "Basic > LAN > WLAN." The wireless network name and access password can also be changed in this section. For advanced users, the IP address used for logging into the web-based configuration utility can be modified through the "Basic > LAN > DHCP" page. This requires ensuring the computer's IP address is in the same network segment as the new HG532 IP address for continued access.
In terms of maintenance and troubleshooting, the HG532 offers a reset function to restore default settings. This can be done by pressing and holding the RESET button on the rear panel for over six seconds after the device is powered on. It's important to note that this will erase all customized data. The default settings can also be restored through the web-based configuration utility under "Maintenance > Device > Reset." The device's indicators provide visual cues for its operational status: POWER (on/off), ADSL (blinking for activation, solid for active, off for powered off), INTERNET (blinking for data transmission, solid for successful PPP dial-up/routing mode with no data, off for bridging mode or failed dial-up), WLAN (blinking for enabled with data, solid for enabled with no data, off for disabled), USB (blinking for data, solid for connected, off for not connected), and LAN1-LAN4 (blinking for data, solid for connected, off for not connected).
Troubleshooting steps are provided for common issues, such as inability to access the internet. These include checking the POWER indicator (ensuring the device is on, power supply is adequate, and cables are connected), the ADSL indicator (waiting for it to become solid, checking telephone line connections, and ensuring distance from strong magnetic/electric fields), and the LAN indicator (verifying network adapter enablement and cable connections). If the LAN indicator remains off, re-installing the network adapter driver might be necessary. Users are also advised to check if the correct PPP dial-up user name and password have been entered and if the dial-up software can successfully connect. If web pages are not displayed or the WLAN connection is unsteady, users should ensure the terminal and other devices are connected through a splitter, check telephone line connections, and position the terminal away from electric appliances and in an open area. During thunderstorms, it is recommended to avoid using the terminal for WLAN access. The device is designed to allow simultaneous internet access and telephone calls without degrading quality or speed, thanks to frequency division multiplexing (FDM) and splitter technologies.
| WAN Ports | 1 x ADSL2+ |
|---|---|
| Wireless Standard | 802.11b/g/n |
| Wireless Speed | Up to 300 Mbps |
| Antenna Type | 2 x external antennas |
| Operating Temperature | 0°C to 40°C |
| Operating Humidity | 10% to 90% (non-condensing) |
| Power Supply | 12V DC, 1A |
| LAN Ports | 4 |
| USB Ports | 1 |
| Security | WEP, WPA, WPA2 |
| Storage Temperature | -40°C to 70°C |