EU EN
QUICK START GUIDE
For a full explanation of all features and instructions, please refer to the User’s Guide (available for
download from support.hubbleconnected.com).
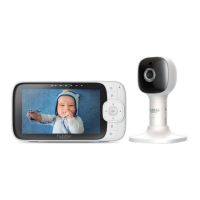
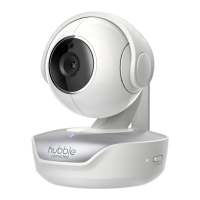
1. Setting up your Digital Video Baby Monitor
A. Connecting the Power Supply of the Baby Unit.
• Connect the USB type-C plug of the power adapter to the
Baby Unit and the other end to a suitable electrical outlet.
• Only use the enclosed adapter (5V DC / 1500mA).
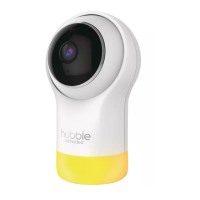
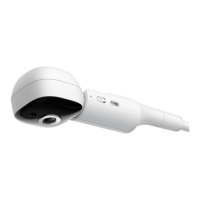
Privacy Protector
This is to disable the live camera video feed by blocking the
camera lens.
• Press the knob to release the lock.
• You can move the protector to its open or closed position
after the lock is released.
• When you hear the click sound the protector is at its
proper positions.
IMPORTANT:
Make sure the privacy protector does not cover the camera lens
when in use.
Sound is NOT disabled when the protector covers the camera
lens.
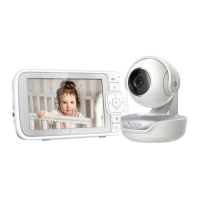
Model:
Nursery Pal
Connect
WARNING:
Strangulation
hazard. Children can
be STRANGLED on
cords. Keep this cord
out of the reach of
children (more than
3 feet away). Never
use extension cords
with AC Adapters.
Only use the AC
Adapters provided.
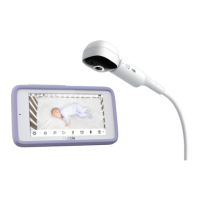
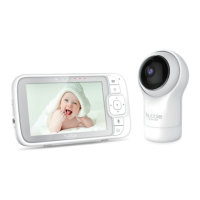
B. Connecting the Power Supply of the Parent Unit
The parent unit contains a rechargeable battery (Lithium ion 2100mAh). This allows you to
move the parent unit without losing the link and picture from the Baby Unit. We recommend
charging the parent unit for at least 4 hours before first use, and when the Parent Unit indicates
the battery is low.
• Connect the small plug of the power adapter
to the parent unit and the other end to
mains power. Only use the enclosed adapter
(DC5V/1000mA).
• Press and hold the
0
button to turn the
Parent unit on, the Parent unit and Baby unit
are automatically linked and ready to use.
Note:
When the Baby and Parent Units are both turned on and within range, the Parent Unit should show a
colour image from the Baby Unit camera, but if the room is dark, the image will be in black and white,
with an
icon showing the Baby Unit is in Night Vision mode.
C. Desktop Stand of the Parent Unit
• The parent unit comes with a desktop stand attached to the back of
the parent unit.
• To place the parent unit on a desk, simply pull out the stand, as
shown.
Note:
Place the parent unit on a fl at, even surface.
2. Basic operation of the keys
Parent unit
0
ON/OFF button Press and hold to switch the Parent Unit ON/OFF.
Vol+ and Vol-
buttons
Press -/+ to select volume level of the Parent Unit.
+-
UP/DOWN buttons
Press to tilt the camera upward or downward.
Press to adjust menu setting when menu is active.
<>
LEFT/RIGHT
buttons
Press to pan the camera left or right.
Press to access menu options when menu is active.
MENU button Press to open menu options or exit the menu.
OK button Press to confirm a selection.
VIDEO button Press to turn the LCD screen ON/OFF.
T
TALK button Press and hold to talk to your baby.
RESET pin hole Press and hold with a small pin to reset the unit.
Baby Unit
PAIR button
Press and hold to pair with the parent unit or for Hubble Wi-
Fi® Setup. Located on the bottom of the camera.
* Download the User’s Guide showing button location from website: support.hubbleconnected.com.
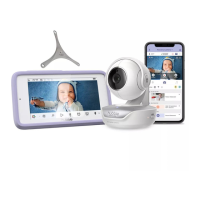
3. Setting up the Camera Unit for Wi-Fi
®
internet viewing
A. Install HubbleClub by Hubble Connected App
• Scan the QR code with your smart device and download
HubbleClub by Hubble Connected App from the App
Store for iOS devices or from the Google Play™ Store for
Android™ devices.
• Install HubbleClub by Hubble Connected App on your
device.
B. View on Compatible Smartphones and Tablets
Camera Unit
Connect to Internet
via Wi-Fi
®
Compatible
Viewing Devices
1. Open the HubbleClub by Hubble Connected App on your compatible smartphone or tablet.
2. Follow the in-app instructions to create your Hubble account and connect to your device.
Please take note of the following minimum system requirements:
Smartphones/Tablets: iOS 12.0, Android™ 8.0
Wi-Fi
®
requirements:
At least 0.6 Mbps upload bandwidth per Smart Monitoring Companion, test your Internet speed at:
http://www.speedtest.net/
EU DE
SCHNELLSTARTANLEITUNG
Eine vollständige Erklärung aller Funktionen und Anweisungen finden Sie in der Bedienungsanleitung
(zum Download unter support.hubbleconnected.com).
1. Einrichten Ihres Nursery Pal Deluxe
A. Anschließen der Stromversorgung der Babyeinheit
• Verbinden Sie den USB-Typ-C-Stecker des Netzteils
mit der Babyeinheit und das andere Ende mit einer
geeigneten Steckdose.
• Verwenden Sie nur den beiliegenden Adapter (5V DC /
1500mA).
Privatsphärenschutz
Dies dient dazu, den Live-Video-Feed der Kamera zu
deaktivieren, indem das Kameraobjektiv blockiert wird.
• Drücken Sie den Knopf, um die Sperre zu lösen.
• Sie können den Sichtschutz nach dem Entriegeln in die
geöffnete oder geschlossene Position bringen.
• Wenn Sie das Klickgeräusch hören, befindet sich der
Schutz in der richtigen Position.
WICHTIG: Stellen Sie sicher, dass der Sichtschutz das
Kameraobjektiv während des Gebrauchs nicht bedeckt.
Der Ton wird NICHT deaktiviert, wenn der Schutz das
Kameraobjektiv abdeckt.
Modell:
Nursery Pal
Connect
ACHTUNG:
Strangulations-gefahr.
Kinder können sich
am Kabel erdrosseln.
Bewahren Sie dieses
Kabel außerhalb
der Reichweite von
Kindern auf (mehr als
1m entfernt).
Entfernen Sie nicht
die Etiketten von
den Netzteilen.
Verwenden Sie nur
die mitgelieferten
Netzteile.
B. Anschließen der Stromversorgung des Elterngeräts
Die Elterneinheit enthält einen wiederaufladbaren Akku (Lithium-Ionen 2100mAh). Auf
diese Weise können Sie die Elterneinheit bewegen, ohne die Verbindung und das Bild von
der Babyeinheit zu verlieren. Wir empfehlen, die Elterneinheit vor dem ersten Gebrauch
mindestens 4 Stunden lang aufzuladen, und wenn die Elterneinheit anzeigt, dass die Batterie
schwach ist.
• Verbinden Sie den kleinen Stecker des
Netzteils mit der Elterneinheit und das
andere Ende mit dem Stromnetz. Verwenden
Sie nur den beiliegenden Adapter
(DC5V/1000mA).
• Halten Sie die
0
-Taste gedrückt, um die
Elterneinheit einzuschalten. Die Elterneinheit
und die Babyeinheit werden automatisch
verbunden und sind einsatzbereit.
Hinweis:
Wenn die Baby- und Elterneinheit eingeschaltet sind und sich in Reichweite befi nden, sollte
die Elterneinheit ein Farbbild von der Kamera der Babyeinheit anzeigen, aber wenn der Raum
dunkel ist, ist das Bild schwarzweiß mit einem Symbol
an, das das Baby anzeigt Das Gerät
befi ndet sich im Nachtsichtmodus.
C. Tischständer des Elterngeräts
• Die Elterneinheit wird mit einem Tischständer geliefert, der an
der Rückseite der Elterneinheit befestigt ist.
• Um die Elterneinheit auf einen Schreibtisch zu stellen, ziehen Sie
einfach den Ständer wie abgebildet heraus.
Hinweis:
Stellen Sie die Elterneinheit auf eine ebene, ebene Fläche.
2. Grundlegende Bedienung der Tasten
Elterneinheit
0
ON/OFF button Gedrückt halten, um die Elterneinheit ein-/auszuschalten.
Vol+ and Vol- buttons
Drücken Sie -/+, um die Lautstärke des Elterngeräts
auszuwählen.
+-
AUF/AB-Tasten
Drücken Sie diese Taste, um die Kamera nach oben oder unten
zu neigen.
Drücken Sie diese Taste, um die Menüeinstellung anzupassen,
wenn das Menü aktiv ist.
<>
LINKS/RECHTS-
Tasten
Drücken Sie diese Taste, um die Kamera nach links oder rechts
zu schwenken.
Drücken Sie diese Taste, um auf Menüoptionen zuzugreifen,
wenn das Menü aktiv ist.
MENÜ-Taste
Drücken Sie diese Taste, um Menüoptionen zu öffnen oder das
Menü zu verlassen.
OK-Taste Drücken Sie, um eine Auswahl zu bestätigen.
VIDEO-Taste
Drücken Sie diese Taste, um den LCD-Bildschirm ein-/
auszuschalten.
T
SPRECH-Taste Halten Sie gedrückt, um mit Ihrem Baby zu sprechen.
RESET-Stiftloch
Drücken und halten Sie mit einem kleinen Stift, um das Gerät
zurückzusetzen.
Babyeinheit
PAIR-Taste
Zum Verbinden mit der Elterneinheit oder Hubble Wi-Fi® Setup
gedrückt halten.
* Laden Sie die Bedienungsanleitung von der folgenden Webseite herunter:
support.hubbleconnected.com.
3. Einrichten der Kameraeinheit für die Wi-Fi
®
-Internetübertragung
A. Installieren Sie HubbleClub (by Hubble Connected App)
• Scannen Sie den QR-Code mit Ihrem Smart-Gerät und
laden Sie die HubbleClub by Hubble Connected App
aus dem App Store für iOS-Geräte oder aus dem Google
Play™ Store für Android™-Geräte herunter.
• Installieren Sie die HubbleClub by Hubble Connected App
auf Ihrem Gerät.
B. Auf kompatiblen Smartphones und Tablets anzeigen
Kameraeinheit
Internetverbindung
über WLAN
®
Kompatible
Anzeigegeräte
1. Öffnen Sie die HubbleClub by Hubble Connected App auf Ihrem kompatiblen Smartphone oder
Tablet.
2. Befolgen Sie die Anweisungen in der App, um Ihr Hubble-Konto zu erstellen und eine Verbindung
zu Ihrem Gerät herzustellen.
Bitte beachten Sie die folgenden Mindestsystemvoraussetzungen:
Smartphones/Tablets: iOS 12.0, Android™ 8.0
WLAN
®
-Anforderungen:
Mindestens 0,6 Mbit/s Upload-Bandbreite pro Smart Überwachungskamera, testen Sie Ihre
Internetgeschwindigkeit unter: http://www.speedtest.net/
EU FR
GUIDE DE DÉMARRAGE RAPIDE
Veuillez-vous référer au Guide de l'utilisateur pour obtenir une explication complète de toutes les
fonctionnalités et instructions (disponible pour téléchargement sur support.hubbleconnected.com).
1. Configuration de votre Nursery Pal Deluxe
A. Connexion de l'alimentation électrique de l'unité bébé
• Branchez la fiche USB de type C de l'adaptateur électrique
à l'unité bébé et l'autre extrémité à une prise électrique
appropriée.
• Utilisez uniquement l'adaptateur fourni (5VCC/1500mA).
Protecteur vie privée
Cette fonction permet de désactiver l'alimentation vidéo en
direct de la caméra en bloquant l'objectif de la caméra.
• Appuyez sur le bouton pour libérer le verrouillage.
• Vous pouvez déplacer le protecteur en position ouverte et
fermée une fois que le verrou est relâché.
• Lorsque vous entendez le clic, le protecteur est à sa
position correcte.
IMPORTANT : Assurez-vous que le dispositif de protection
vie privée ne couvre pas l'objectif de la caméra durant son
utilisation.
Le son n'est PAS désactivé lorsque la protection couvre l'objectif
de la caméra.
Modèle :
Nursery Pal
Connect
MISE EN GARDE :
Danger
d’étranglement.
Des enfants peuvent
accidentellement
S’ÉTRANGLER avec
des cordons. Tenez
ce cordon hors de
portée des enfants
(à plus de 1 m (3 pi))
N'utilisez jamais de
rallonges avec des
adaptateurs secteur.
Utilisez uniquement
les adaptateurs CA
fournis.
B. Connexion de l'alimentation électrique de l'unité parents
L'unité parents contient une batterie rechargeable (Lithium ion 2100mAh). Vous pouvez ainsi déplacer
l'unité parents sans perdre la liaison et l'image de l'unité bébé. Nous recommandons de charger la
batterie de l’unité parents pendant au moins 4 heures avant la première utilisation, ou dès que l'unité
parents indique que la batterie est faible.
• Branchez la petite fiche de l'adaptateur
électrique à l'unité parents et l'autre
extrémité à l'alimentation secteur.
Utilisez uniquement l'adaptateur fourni
(5VCC/1000mA).
• Maintenez la touche
0
et enfoncée pour
allumer l'unité parents, l'unité parents et
l'unité bébé sont automatiquement liées et
prêtes à être utilisées.
Remarque :
Lorsque les unités bébé et parents sont toutes les deux allumées et à portée, l'unité parents
affi chera une image en couleur venant de la caméra de l’unité bébé, mais si la pièce est
sombre, l'image sera en noir et blanc, avec une icône
affi chée indiquant que l'éclairage
infrarouge de la caméra de l’unité bébé est utilisée.
C. Support de l'unité parents
• L'unité parents est livrée avec un support de bureau fixé à l'arrière
de l'unité parents.
• Pour placer l'unité parents sur un bureau, tirez simplement le
support, comme illustré.
Remarque :
Placez l'unité parents sur une surface plane et uniforme.
2. Fonctionnement de base des boutons
Unité parents
0
Touche ON/OFF Maintenez-la enfoncée pour allumer ou éteindre l'unité parents.
Touches Vol+ et Vol-
Appuyez sur -/+ pour sélectionner le niveau de volume de l'unité
parents.
+-
Touches HAUT/BAS
Pressez pour incliner la caméra vers le haut ou le bas.
Appuyez sur cette touche pour régler les paramètres du menu
lorsque celui-ci est actif.
<>
Touches GAUCHE/
DROITE
Pressez pour effectuer un panoramique de la caméra à gauche
ou à droite.
Appuyez sur cette touche pour régler les paramètres du menu
lorsque celui-ci est actif.
Touche MENU
Appuyez sur cette touche pour ouvrir les options du menu ou
quitter le menu.
Touche OK Appuyez sur cette touche pour confirmer votre sélection.
Touche VIDÉO Appuyez pour allumer ou éteindre l'écran LCD.
T
Touche PAROLE Maintenez-la enfoncée pour parler à votre bébé
Orifice RESET
Maintenez enfoncé avec une petite épingle pour réinitialiser
l'appareil.
Unité bébé
Bouton APPAIRAGE
Maintenez cette touche enfoncée pour effectuer l'appairage
avec l'unité parents ou le système Hubble Wi-Fi® Setup.
* Le guide de l'utilisateur indiquant l'emplacement des touches peut être téléchargé à partir du site
Web : support.hubbleconnected.com.
3. Configuration de la caméra pour la visualisation sur internet par Wi-Fi
®
A. Installation de l'application HubbleClub by Hubble Connected
• Scannez le code QR avec votre appareil intelligent
et téléchargez l'application HubbleClub by Hubble
Connected App de la boutique App Store pour les
appareils iOS ou de la boutique Google Play™ pour les
appareils Android™.
• Installez l'application HubbleClub by Hubble Connected
sur votre appareil.
B. Visionnage sur les smartphones et tablettes compatibles
Caméra
Connexion à l’Internet
par Wi-Fi
®
Dispositifs de
visualisation compatibles
1. Ouvrez l'application HubbleClub by Hubble Connected sur votre Smartphone ou votre tablette
compatible.
2. Suivez les instructions de l'application pour créer votre compte Hubble et connecter votre appareil.
Veuillez noter les confi gurations système minimales suivantes
Smartphones/Tablettes : iOS 12.0, Android™ 8.0
Exigences Wi-Fi
®
:
Au moins 0,6 Mbps de bande passante en amont par compagnon de surveillance intelligente,
testez votre débit Internet sur : http://www.speedtest.net/
EU NL
SNELSTARTGIDS
Voor een volledige uitleg van alle functies en instructies wordt verwezen naar de
Gebruikershandleiding (beschikbaar om te downloaden op support.hubbleconnected.com).
1. Uw Nursery Nursery Pal Deluxe
A. Het Babytoestel op netspanning aansluiten
• Sluit de USB Type C stekker van de voedingsadapter
aan op het Babytoestel en het andere uiteinde op het
geschikte stopcontact.
• Gebruik alleen de meegeleverde adapter (5VDC/1500mA).
Privacybescherming
Dit is om de live camera video feed uit te schakelen door de
camera lens te blokkeren.
• Druk op de toets om het slot te ontgrendelen.
• U kunt de beschermer naar de open of gesloten positie
verplaatsen nadat het slot is ontgrendeld.
• Wanneer u het klikgeluid hoort, bevindt de beschermer
zich in de juiste positie.
BELANGRIJK: zorg ervoor dat de privacybeschermer de
cameralens tijdens gebruik niet bedekt.
Het geluid is NIET uitgeschakeld wanneer de beschermer de
cameralens bedekt.
Model:
Nursery Pal
Connect
WAARSCHUWING
:
Wurgingsgevaar.
Kinderen kunnen
GEWURGD worden
door de kabels. Houd
het snoer buiten het
bereik van kinderen
(op meer dan 1 m
afstand). Gebruik
nooit verlengsnoeren
met AC-adapters.
Gebruik alleen de
meegeleverde
AC Adapters.
B. De voeding van het Oudertoestel aansluiten.
Het oudertoestel bevat een oplaadbare batterij (Lithium-ion 2100mAh). Hierdoor kunt u het
oudertoestel verplaatsen zonder de link en het beeld van het Babytoestel te verliezen. We
raden u aan om het Oudertoestel minimaal 4 uur op te laden voor het eerste gebruik en
wanneer het Oudertoestel aangeeft dat de batterij bijna leeg is.
• Sluit de kleine stekker van de
voedingsadapter aan op het Oudertoestel en
steek het andere uiteinde in het stopcontact.
Gebruik alleen de meegeleverde adapter
(DC5V/1000mA).
• Houd de
0
toets ingedrukt om het
Oudertoestel in te schakelen, het
Oudertoestel en het Babytoestel zijn
automatisch gekoppeld en klaar voor
gebruik.
Opmerking:
Als het Baby-en Oudertoestel beide zijn ingeschakeld en zich binnen het bereik bevinden,
moet de Oudertoestel een kleurenafbeelding van de camera van het Babytoestel weergeven.
Maar als de kamer donker is zal de afbeelding zwart-wit worden, met een
pictogram dat
weergeeft dat het babytoestel in de nachtzichtmodus staat.
C. Tafelstandaard van het Oudertoestel
• Het Oudertoestel wordt geleverd met een tafelstandaard aan
de achterkant van het Oudertoestel.
• Om het Oudertoestel op een tafel te plaatsen, trekt u
eenvoudig de standaard uit zoals afgebeeld.
Opmerking:
Plaats het Oudertoestel op een vlak, effen oppervlak.
2. Basisfuncties en toetsen
Oudertoestel
0
AAN-/UIT-toets
De schakelaar ingedrukt houden om het Oudertoestel AAN/
UIT te schakelen.
Vol+ en Vol- toetsen
Druk op -/+ om het volumeniveau van het Oudertoestel te
selecteren.
+-
HOGER-/LAGER-
toetsen
Druk op om de camera omhoog of omlaag te kantelen.
Indrukken om de menu-instelling aan te passen als het menu
actief is.
<>
LINKS/RECHTS-
toetsen
Indrukken om de camera naar links of rechts te verschuiven.
Indrukken om menu-opties te openen als het menu actief is.
MENU-toets Indrukken om de menu-opties te openen of te sluiten.
OK-toets Indrukken om een instelling te bevestigen.
VIDEO-toets Indrukken om het LCD-scherm AAN/UIT te zetten.
T
SPREEK-toets Ingedrukt houden om tegen uw baby te spreken.
RESET-speldgat
Ingedrukt houden met een kleine speld om het apparaat te
resetten.
Babytoestel
KOPPELING-toets
Ingedrukt houden om het Oudertoestel of Hubble Wi-Fi® Setup
te koppelen.
* Download de gebruikershandleiding met de locatie van de toetsen via de website:
support.hubbleconnected.com.
3. De Camera-eenheid instellen voor weergave via Wi-Fi
®
internet
A. Installeer HubbleClub door Hubble Connected App
• Scan de QR-code met uw smartapparaat en download
HubbleClub door Hubble Connected App uit de App
Store voor iOS-apparaten of uit de Google Play™ Store
voor Android™-apparaten.
• Installeer HubbleClub door Hubble Connected App op uw
apparaat.
B. Bekijk op compatibele smartphones en tablets
Camera-eenheid
(Verbinden met internet)
via wifi
®
Compatibel
Apparaten bekijken
1. Open de HubbleClub door Hubble Connected App op uw compatibele smartphone of tablet.
2. Volg de instructies aangegeven in de app om uw Hubble-account aan te maken en uw apparaat
te verbinden.
Houd rekening met de volgende minimale systeemvereisten:
Smartphones/tablets: iOS 12.0, Android™ 8.0
Wi-Fi
®
-vereisten:
Minimaal 0,6 Mbps uploadbandbreedte per Smart Monitoring Companion, test uw internet
snelheid op: http://www.speedtest.net/
EU ES
GUÍA DE INICIO RÁPIDO.
Para obtener una explicación completa de todas las funciones e instrucciones, consulte la Guía del
usuario (disponible para descargar en support.hubbleconnected.com).
1. Configuración de su Nursery Pal Deluxe.
A. Conexión de la fuente de alimentación de la unidad para bebés.
• Conecte el enchufe USB tipo C del adaptador de
corriente a la unidad para bebés y el otro extremo a una
toma de corriente adecuada.
• Utilice únicamente el adaptador incluido (5V DC /
1500mA).
Protector de privacidad.
Esto es para deshabilitar la transmisión de vídeo de la cámara en
vivo bloqueando el lente de la cámara.
• Presione la perilla para liberar el bloqueo.
• Puede mover el protector a su posición abierta o cerrada
después de que se libere el bloqueo.
• Cuando escuche el sonido de un clic, el protector está en
su posición correcta.
IMPORTANTE: Asegúrese de que el protector de privacidad no
cubra el lente de la cámara cuando esté en uso.
El sonido NO se desactiva cuando el protector cubre el lente de
la cámara.
Modelo:
Nursery Pal
Connect
ADVERTENCIA:
Peligro de
estrangulamiento.
Los niños pueden
ESTRANGULARSE
con cables. Mantenga
este cable fuera del
alcance de los niños
(a más de 3 pies de
distancia). Nunca use
cables de extensión
con adaptadores de
CA.
Utilice solo el
Adaptadores de CA
previsto.
B. Conexión de la fuente de alimentación de la unidad para padres.
La unidad de padres contiene una batería recargable (iones de litio de 2100 mAh). Esto le permite mover
la unidad para padres sin perder el enlace y la imagen de la unidad para bebés. Recomendamos cargar la
unidad para padres durante al menos 4 horas antes del primer uso y cuando la unidad para padres indique
que la batería está baja.
• Conecte el enchufe pequeño del adaptador
de corriente a la unidad para padres y el otro
extremo a la red eléctrica. Utilice únicamente
el adaptador incluido (DC5V / 1000mA).
• Mantenga presionado el botón
0
para
encender la unidad para padres, la unidad
para padres y la unidad para bebés se
vinculan automáticamente y están listas para
usar.
Nota:
Cuando las unidades para bebés y para padres están encendidas y dentro del alcance, la
unidad para padres debe mostrar una imagen en color de la cámara de la unidad para bebés,
pero si la habitación está oscura, la imagen será en blanco y negro, con el ícono
que indica
que la unidad para bebés está en modo visión nocturna.
C. Soporte de escritorio de la unidad para padres.
• La unidad para padres viene con un soporte de escritorio adjunto
a la parte posterior de la unidad para padres.
• Para colocar la unidad para padres en un escritorio, simplemente
extraiga el soporte, como se muestra.
Nota:
Coloque la unidad para padres sobre una superfi cie plana y uniforme.
2. Funcionamiento básico de las teclas
Unidad para padres
0
Botón ON/OFF
Mantenga presionado para encender / apagar la unidad para
padres.
Botones Vol+ y Vol-
Presione - / + para seleccionar el nivel de volumen de la unidad
para padres.
+-
Botones ARRIBA/
ABAJO
Presione para inclinar la cámara hacia arriba o hacia abajo.
Presione para ajustar la configuración del menú cuando el menú
está activo.
<>
Botones
IZQUIERDA/
DERECHA
Presione para mover la cámara hacia la izquierda o hacia la
derecha.
Presione para acceder a las opciones del menú cuando el menú
está activo.
Botón MENÚ
Presione para abrir las opciones del menú o salir del menú.
Botón OK Presione para confirmar una selección.
Botón VÍDEO Presione para encender / apagar la pantalla LCD.
T
Botón HABLAR Mantenga presionado para hablar con su bebé.
Orificio para
RESTABLECER
Mantenga presionado con un alfiler pequeño para restablecer
la unidad.
Unidad para bebés
Botón SINCRONIZAR
Manténgalo presionado para sincronizar con la unidad para
padres o la configuración de Hubble Wi-Fi®.
* Descargue la Guía del usuario que muestra la ubicación del botón desde el sitio web:
support.hubbleconnected.com.
3. Configuración de la unidad de cámara para visualización de
Internet Wi-Fi
®
.
A. Instalar la aplicación HubbleClub by Hubble Connected.
• Escanee el código QR con su dispositivo inteligente y
descargue la aplicación HubbleClub by Hubble Connected
desde App Store para dispositivos iOS o desde Google
Play ™ Store para dispositivos Android ™.
• Instale la aplicación HubbleClub by Hubble Connected en
su dispositivo.
B. Ver en teléfonos inteligentes y tabletas compatibles.
Unidad de
cámara
Conectar a Internet
vía Wi-Fi
®
Dispositivos de
visualización compatibles
1. Abra la aplicación HubbleClub by Hubble Connected en su teléfono inteligente o tableta
compatible.
2. Siga las instrucciones de la aplicación para crear su cuenta Hubble y conectarse a su dispositivo.
Tenga en cuenta los siguientes requisitos mínimos del sistema:
Teléfonos inteligentes/Tabletas: iOS 12.0, Android™ 8.0
Requerimientos de Wi-Fi
®
:
Ancho de banda de carga de al menos 0.6 Mbps por Smart Monitoring Companion, pruebe la
velocidad de su Internet en: http://www.speedtest.net/