INSTALLATION
12
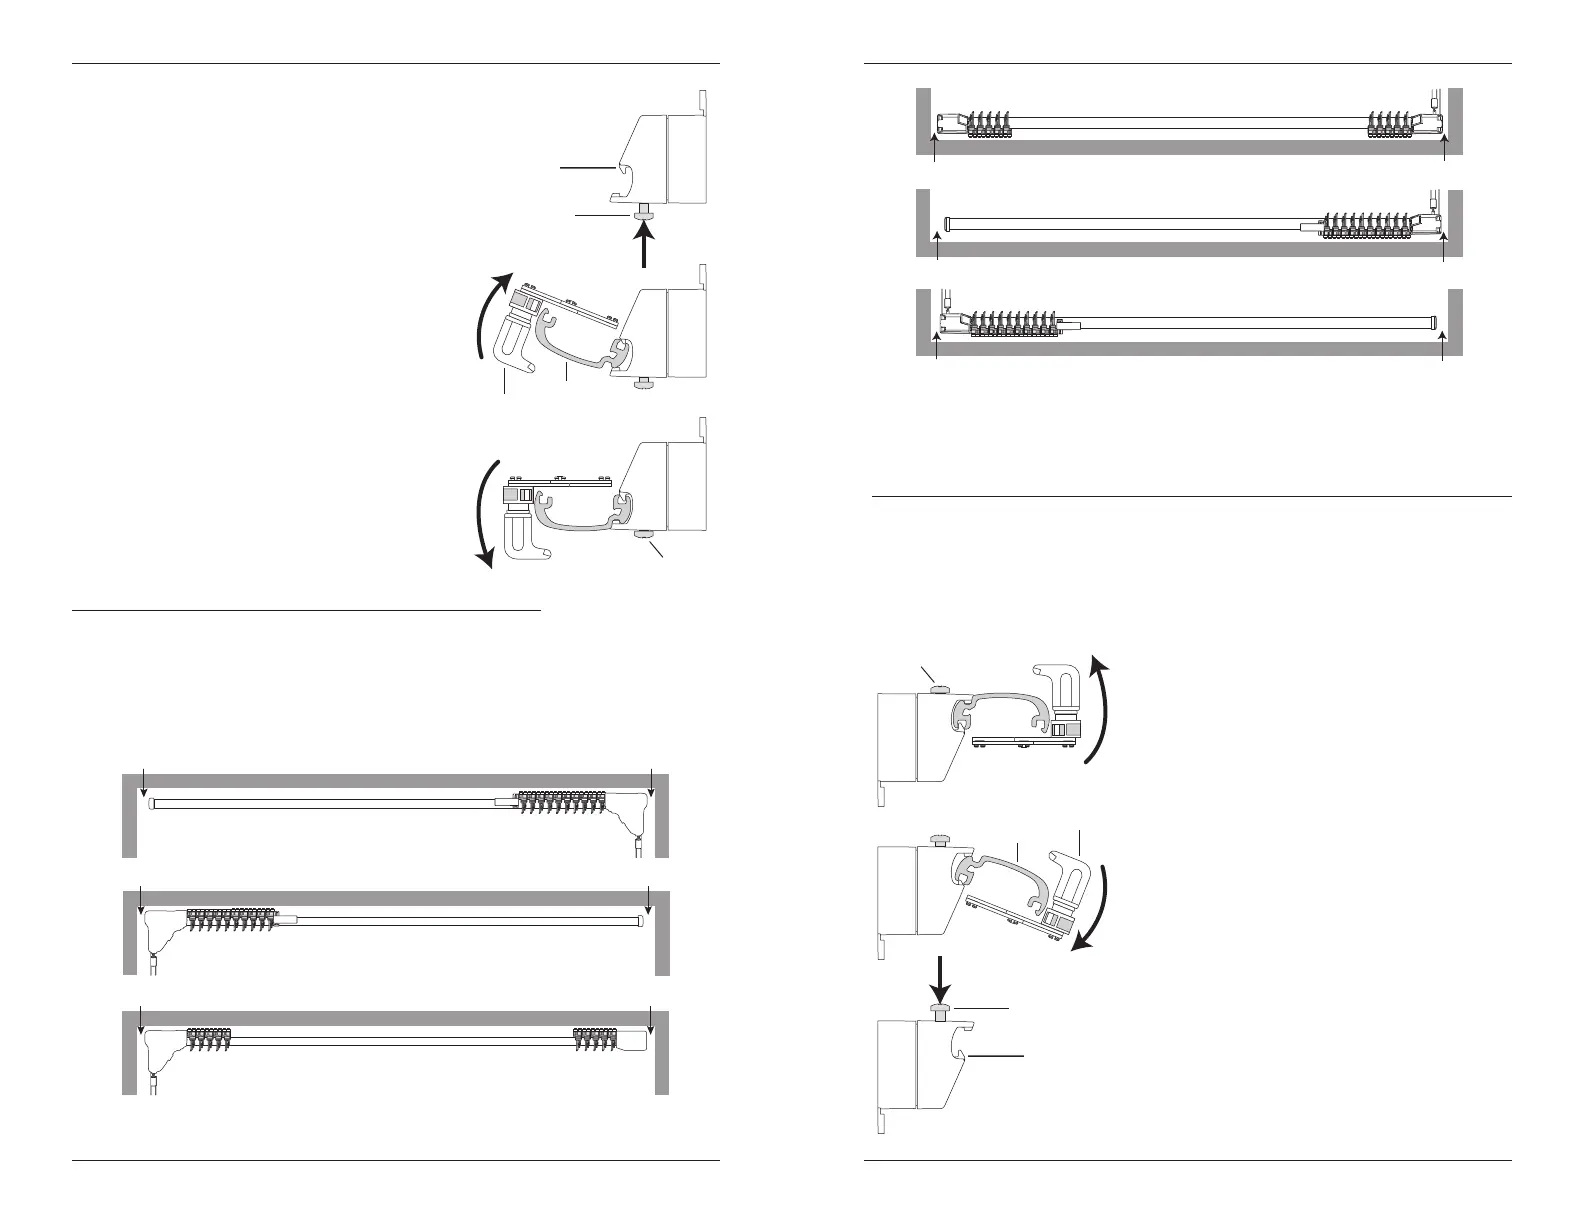
Install the SofTrak
™
Headrail
If you ordered an optional Traveling Wand
™
, it may be
necessary to attach the wand to the SofTrak
™
headrail.
Refer to “Install the Traveling Wand (Optional)” on page 14.
■ Push up on the locking screws. This raises the
locking tab and makes the headrail easier to install.
■ The grooves on the back of the headrail are designed
to snap into the locking tab on the faceplate and
inside/ceiling mount bracket.
➤ Tilt the front of the headrail (the side with the
pinion clips) up so the top groove fits into the
locking tab on each installation bracket.
■ With the top groove in place on all brackets, tilt
the headrail down so the bottom groove fits into
the bottom tabs on the installation brackets.
■ Position/centre the headrail and tighten the locking
screws until snug. Do not overtighten.
Inside Mount and Wall-To-Wall Outside Mount Installations
■ After the SofTrak headrail is installed into the installation brackets, check the clearance at
eachend and make any necessary adjustments.
IMPORTANT: The recommended amount of clearance varies according to the control end
and stack design, as shown below.
Tilt Down
Pinion
Clip
Tighten
Tilt Up
Locking
Tab
SofTrak
™
Headrail
Locking
Screw
Right Stack Design — Minimum Clearances
Left Stack Design — Minimum Clearances
Split Stack Design — Minimum Clearances
Control End Non-Control End
5
/
8
"
5
/
8
"
Control End Non-Control End
5
/
8
"
7
/
8
"
Control EndNon-Control End
7
/
8
"
5
/
8
"
INSTALLATION
12
Installation du boîtier supérieur SofTrak
MC
Si vous avez commandé la baguette Traveling Wand
MC
en option, il sera probablement nécessaire de fixer la
baguette au boîtier supérieur SofTrak
MC
. Consultez « Fixer
la baguette Traveling Wand (en option) » à la page 14.
■ Poussez vers le haut sur les vis de blocage. Ce geste
soulève la languette de verrouillage et facilite
l’installation du boîtier supérieur.
■ Les rainures à l’arrière du boîtier supérieur sont
conçues pour s’engager dans la languette de
verrouillage se trouvant sur la plaque de montage et
les supports d’installation au plafond.
➤ Inclinez le devant du boîtier supérieur (le côté
comportant les agrafes) vers le haut
de manière que la rainure du haut s’insère dans
la languette de verrouillage de chaque support
d’installation.
■ Une fois la rainure du haut en place dans tous les
supports, faites basculer le boîtier supérieur vers
le bas de manière que la rainure du bas s’insère
dans les languettes de verrouillage des supports
d’installation.
■ Placez/centrez le boîtier supérieur et serrez les vis de blocage avec un tournevis.
Ne serrez pas trop.
Pose à l’intérieur de l’encadrement et mur à mur à l’extérieur de l’encadrement
■ Une fois le boîtier supérieur SofTrak installé dans les supports, vérifiez le dégagement à
chaque extrémité et procédez aux ajustements nécessaires.
IMPORTANT : Le dégagement recommandé varie en fonction du côté commande et du
genre de rangement, tel qu’illustré ci-dessous.
Rangement à droite – dégagement minimal
Côté sans commande Côté commande
Rangement à gauche – dégagement minimal
Côté commande
Côté sans commande
Ouverture au centre – dégagement minimal
Côté commande
Côté sans commande
5
/
8
po
5
/
8
po
7
/
8
po
7
/
8
po
5
/
8
po
5
/
8
po
Basculer vers
le bas
Agrafe
Serrer
Incliner vers
le haut
Languette de
verrouillage
Boîtier
supérieur
SofTrak
MC
Vis de
blocage
 Loading...