Do you have a question about the Husqvarna 1070 and is the answer not in the manual?
Adjust tangential play in the hook gear for smooth operation.
Set gap between hook cover and driver for thread clearance.
Ensure presser foot is parallel to stitch plate marking lines.
Align presser foot needle hole with stitch plate needle hole.
Calibrate sewing head step motor for correct needle positioning.
Set needle to pass through center of presser foot hole.
Minimize gap between hook tip and needle for loop formation.
Center stitch plate relative to needle in feeding direction.
Set hook tip to pass needle center at specific point.
Adjust needle height for zig-zag stitch positioning.
Check bobbin case thread tension using a 18-22g weight.
Adjust upper thread tension via the dial and step motor.
Calibrate the step motor for automatic thread tension.
Adjust thread take-up spring for stitch completion timing.
Ensure feed dog is parallel with stitch plate grooves.
Check feed dog moves freely sideways in stitch plate grooves.
Set feed dog height above the stitch plate.
Ensure feed dog does not strike stitch plate during movement.
Set automatic stop for full bobbin winding.
Balance stitch length for buttonholes and patterns.
Calibrate guide step motor for specified distance.
Calibrate side motion step motor for equal distance.
Adjust play in feeding mechanism bearings.
Procedures for removing rear and lower machine covers.
Steps for removing and installing the front cover.
Details on LCD board, guide board, and connections.
Procedure for replacing the exchangeable memo-chip.
Instructions for removing and replacing the foil keyboard.
Steps for removing and installing the transformer.
Procedures for dismounting and mounting the main motor.
Steps for replacing the main circuit board.
Instructions for dismounting and servicing the foot control.
Procedures for fitting the feeding guide block and fork.
Dismounting and mounting the connecting rod and feeding mechanism.
Steps for removing the thread tension device.
Procedures for removing and installing the driver.
Steps for removing lower shaft and adjusting axial play.
Procedures for removing and installing the sewing head.
Steps for removing arm shaft and adjusting axial play.
Procedure for removing the side feeding mechanism.
Guide for diagnosing and resolving machine issues.
Check stitch plate for damage and ensure correct mounting with screws.
Inspect presser foot for scratches and ensure it holds fabric properly.
Verify feed dog teeth are undamaged and free from debris.
Ensure the tension spring is parallel and presses against the bobbin case.
Check the inside of the hook cover for any damage.
Inspect the hook tip and surface for any damage or wear.
Ensure the driver surface is not damaged or worn, affecting thread passage.
Verify the proper operation of the main switch and feed dip button.
Confirm the foot control allows continuous speed adjustment from low to high.
Ensure the foot control cable extracts easily and rewinds correctly.
Adjust the tension of the short cog belt for optimal performance.
Adjust the long cog belt tension using a spanner and tension roller.
Diagram showing how external units connect to the main driveboard.
Specific wiring diagrams for models 1050 and 1090.
Specific wiring diagram for model 1070.
Specific wiring diagrams for models 1100 and 1200.
Instructions for inserting and using the service cassette in models 1100/1200.
How to enter the service program mode for models 1050/1070/1090.
Detailed explanation of the functions assigned to each key on the service cassette.
Detailed explanation of the functions assigned to each key in the service program for model 1070.
Detailed explanation of the functions assigned to each key in the service program for model 1050.
Detailed explanation of the functions assigned to each key in the service program for model 1090.
Check the switch operation by measuring resistance between pins.
Measure the potentiometer resistance when the measuring wheel is turned.
Verify the IR-diode, mirror, and photo transistor for lower thread detection.
Troubleshoot problems with automatic thread tension adjustment.
Troubleshoot incorrect zigzag movement caused by the step motor.
Troubleshoot problems with the feeding direction controlled by the step motor.
Troubleshoot issues with the side feeding function of the step motor.
Check transformer function using diagnostic gauge 412 02 56-01.
Overview of circuit boards, guide board, and foil keyboards for models.
Details components and functions on the main circuit board.
Describes components like LEDs and microchips on the guide board.
Explains the arrangement and buttons on foil keyboards for different models.
Steps to diagnose and fix main motor non-operation issues.
Check transformer function using diagnostic gauge 412 02 56-01.
Overview of boards and keyboards for models 1100/1200.
Details components and functions on the main circuit board.
Describes LCD board components, driving, and checks.
Details guide board components and checks using service cassette.
Explains foil keyboard functions and checks using service cassette.
Steps to diagnose and fix main motor non-operation issues.
Adjust the angle of LCD displays for optimal viewing.
Troubleshooting steps for non-functional cassette keys.
Troubleshooting for incorrect seams from a different cassette.
Troubleshooting for keys below the panel not functioning.
Troubleshooting for sewing advisor keys not functioning.
Troubleshooting for upper foil keyboard key issues.
Troubleshooting for lower foil keyboard key issues.
Troubleshooting when none of the machine keys operate.
Troubleshooting for machine running only at reduced speed.
Troubleshooting when motors, displays, and diodes are not functioning.
Troubleshooting when the foot control does not operate the machine.
Troubleshooting for machine racing when switched on or operated by foot control.
Troubleshooting for incorrect or non-existent zig-zag movement.
Troubleshooting for incorrect or non-existent feeding movement.
Troubleshooting for incorrect stitch length balance in various stitches.
Troubleshooting for the automatic thread tension system not working.
Troubleshooting for one or both LCD displays not working or partially working.
Troubleshooting for sewing advisor diodes not functioning.
Troubleshooting for the lower thread alarm not activating when thread runs out.
Troubleshooting for the machine sewing while the presser foot is lifted.
Troubleshooting for the buttonhole sensor not working correctly.
Troubleshooting for the machine always selecting buttonhole measuring.
Troubleshooting for the side motion feature not working at all.
Troubleshooting for incorrect display marks during side motion stitches.
Troubleshooting for the machine only sewing straight stitches backward.
Troubleshooting for all symbols flashing on the display.
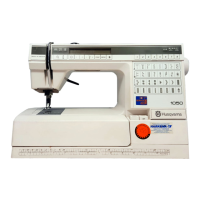
| Brand | Husqvarna |
|---|---|
| Model | 1070 |
| Category | Sewing Machine |
| Language | English |