100x150
100x150
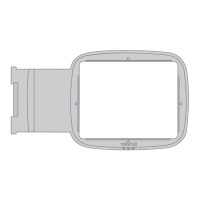
FREE ARM EMBROIDERY HOOP
150x100mm
User Instructions
The Free Arm Embroidery Hoop is preferrable to
use for many different occasions. You can easily
embroider difficult-to-hoop projects without
opening a seam. Simply slide part of your
project around the free-arm when attaching the
optional Free-Arm Embroidery Hoop. You can
use the hoop on any type of garments or other
projects, as long as it is possible to slide the
hooped part on to the free arm of the machine.
Outer Hoop Inner HoopFree Arm Embroidery Hoop
Quick Release
Retaining Screw
The embroidery surface measures 150x100mm. In the machine user
interface the embroidery area is shown with the (imagined) quick
release in the lower right corner. Consider that when positioning the
design.
• Open the quick release on the outer hoop, and loosen the retaining
screw. Remove the inner hoop.
• Place the project on a flat surface. Use suitable stabilizer at the
wrong side of the project. Place the outer hoop inside the project.
• Place the inner hoop on top of your project. The embroidery hoop
connector to the left of the inner hoop should be placed towards
the "closed" part of the project.
• Push the inner hoop firmly into the outer hoop.
• Close the quick release. Adjust the pressure of the outer hoop by
turning the retaining screw. The fabric should be taut in the hoop
for the best results.
• Remove the accessory tray from the machine and connect the
embroidery unit.
• Position your design as you wish in the embroidery area in the
machine user interface. Go to Embroidery Stitch-Out.
• Slide the hooped project around the free arm. It cannot be too
tight, the hoop must be able to move while embroidering. Hoop
your project so that the narrowest opening is placed around
the free arm, otherwise the opening could get caught when
embroidering and cause misplacement of the stitches.
• Arrange your project around the free arm and in the well area
of the embroidery unit. Make sure it is not too bulky under the
embroidery hoop connector. The hoop is designed for some fabric
to fit under the connector, but for larger projects it is preferrable if
parts of the fabric could be placed at the back of the machine.
USE THE FREE ARM EMBROIDERY HOOP
Embroidery Hoop Connector