Do you have a question about the Hygger HG-016 and is the answer not in the manual?
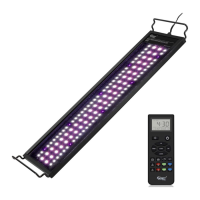
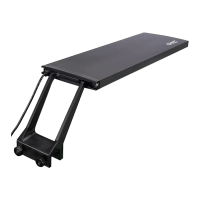
Instructions for installing the LED light fixture and its components.
Steps for installing batteries and preparing the remote controller.
Overview of the RF remote controller features and functions.
Guide on how to set the local time (12H/24H) on the remote control.
Procedure to set the ON and OFF times for daytime lighting.
Procedure to set the ON and OFF times for moonlight lighting.
Instructions to configure custom lighting scenes with 8 time sections.
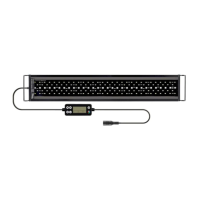
The Hygger HG016 is a remote-controlled LED aquarium light designed to provide advanced lighting solutions for aquarists. This sophisticated device offers a range of features, including multiple weather simulations and customizable lighting options, allowing users to create an optimal environment for their aquatic life.
The core function of the Hygger HG016 is to illuminate aquariums with LED light, offering both standard and advanced control capabilities. It operates via an RF remote controller, which can transmit signals up to 10 meters, even through walls, providing convenient control from a distance. The light supports two primary timer functions: DAY-L/MOON-L mode and DIY mode, along with a weather simulation mode.
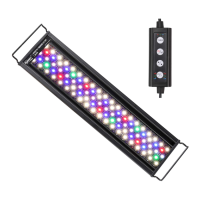
The DAY-L/MOON-L mode is designed for a gradual and natural lighting cycle, mimicking sunrise, daylight, sunset, and moonlight. This mode allows users to program daily ON/OFF times for both daylight and moonlight, with a smooth transition in light intensity and color spectrum. For instance, the default program includes a sunrise that slowly ramps up from 0% to 100% full spectrum over 15 minutes, followed by a daylight period, and then a sunset that gradually dims to orange lights before turning off. Moonlight then takes over, slowly ramping up faint blue light to 25% full blue over 15 minutes, providing a natural nocturnal environment.
The DIY mode offers extensive customization, allowing advanced aquarists to create a personalized lighting scene with up to eight distinct sections, each with its own ON/OFF time, selected light color, and brightness. This mode enables users to precisely control the light spectrum and intensity throughout the day, catering to specific plant growth requirements or aesthetic preferences. The default DIY program, for example, includes various color spectrums and intensities for different periods, simulating a dynamic natural light cycle from sunrise to night.
The Weather mode adds an immersive dimension to the aquarium environment by simulating natural weather phenomena. This includes sunrise, sunset, cloudy conditions, and lightning storms. These dynamic modes can be activated on-demand, providing a unique visual experience. For example, the sunrise simulation gradually transitions from orange lights to a full spectrum, while the sunset simulation slowly dims from full spectrum to orange. The cloudy mode offers a non-adjustable blue-dominant light, and the lightning storm mode features brief flashes of light followed by dark clouds, creating a realistic storm effect. It's important to note that weather modes, once activated, will continue until manually turned off or until the next programmed ON time of DAY-L, MOON-L, or L1 in DIY mode.
The device also incorporates a memory function, which ensures that if power is interrupted, the light will turn on at 100% full spectrum upon restoration and then revert to its previous mode within one hour. This prevents sudden changes in lighting that could stress aquatic inhabitants.
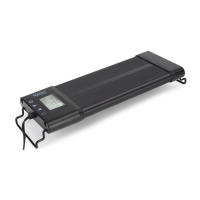
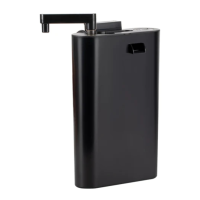
The Hygger HG016 is designed for ease of use, despite its advanced capabilities. Installation involves unpacking the light fixture and components, sliding the adjustable legs to match the aquarium length, and then setting the fixture on the aquarium, ensuring the metal brackets fit snugly. For rimless tanks, wire mounts slide into place until they snap. The remote controller requires two AAA batteries, which are installed after removing a plastic cover. It's crucial to plug in the light before mounting the controller.
The remote controller is the central interface for managing the light. It features a clear LCD screen displaying current time, DAY-L/MOON-L ON/OFF times, and brightness percentages.
Key buttons and their functions include:
Setting Local Time: Users can set the local time by long-pressing the CLOCK button until "12H" flashes, then using UP/DOWN to select 12H or 24H display, and pressing CLOCK to save. To set the hour, hold CLOCK until "12H" flashes, then press CLOCK once to make the hour flash, use UP/DOWN to adjust, and press CLOCK again to make the minute flash. Adjust minutes with UP/DOWN and press CLOCK to save.
DAY-L/MOON-L Mode Setting: To set the DAY-L ON time, press the TIMER button once. "DAY-L ON" will flash. Long press TIMER again to enter edit mode, where the hour number flashes. Use UP/DOWN to set the hour, press TIMER to move to minutes, adjust with UP/DOWN, and press TIMER to save. After setting the start time, the brightness will flash, allowing adjustment of individual WRGB color brightness using the corresponding color buttons and UP/DOWN. Press TIMER to save brightness. The process is similar for setting DAY-L OFF time and MOON-L ON/OFF times.
DIY Mode Setting: To enter DIY mode, press and hold the DIY button until "DIY" flashes. Press DIY again to enter setting mode. The screen will display "L1" and the hour of L1 ON will flash. Use UP/DOWN to adjust the hour, then press DIY to move to minutes, adjust with UP/DOWN, and press DIY to save. Repeat this for L1 OFF time. After setting the ON/OFF times, the brightness will flash, allowing individual adjustment of WRGB color brightness. This process is repeated for all eight sections (L1-L8), ensuring the total duration covers 24 hours.
Maintaining the Hygger HG016 is straightforward, focusing on ensuring optimal performance and longevity.
The Hygger HG016 is designed to be a durable and user-friendly lighting solution for aquariums, offering extensive control and customization options to enhance the aquatic environment.
| Model | HG-016 |
|---|---|
| Type | LED Aquarium Light |
| Wattage | 16W |
| Voltage | 100-240V |
| Control Method | Remote Control |
| Auto Shut Off | Yes |
| Color Temperature | 6500K |
| Light Spectrum | Full Spectrum |
| Adjustable Brightness | Yes |
| Timer Function | Yes |
| Material | Aluminum |