EasyManua.ls Logo

icetro IS-0700-AS - User Manual

icetro IS-0700-AS
32 pages
Print Icon
To Next Page IconTo Next Page
Loading...
MODEL : IS-0700-AS
SNOW ICE MAKER
USER MANUAL
This machine cannot be used in any other country where the electric
voltage for its power supply is not available.
This product is designed for indoor installation.
Please be sure to install it indoors.
The external appearance, design, color, and/or components of this machine
may be changed without prior notice for the sake of the Company's product
manufacture.
For maximum hygiene, be sure to clean and sterilize the product
on a daily basis.
Question and Answer IconNeed help?

Do you have a question about the icetro IS-0700-AS and is the answer not in the manual?

Overview

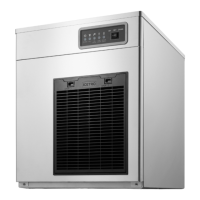
This document describes the ICETRO SNOW ICE MAKER, model IS-0700-AS, a device designed for indoor installation to produce snow ice.

Function Description

The SNOW ICE MAKER produces snow ice from water or diluted milk. It features a drum evaporator and blade system to create the snow ice, which is then stored in a bin. The machine offers both "Auto" operation, where it continuously produces ice until the storage bin is full, and "Timer" operation, allowing users to set a specific duration for ice production. It also includes functions for setting bin and mix hopper temperatures, adjusting motor speed, and a washing mode for cleaning.

Important Technical Specifications

  • Model: IS-0700-AS
  • Dimensions (WxHxD): 520 x 740 x 1,405 mm (20.5" x 29" x 55.3")
  • Weight: 140kg (309Lbs)
  • Ice Making Capacity:
    • Water: 320kg (705.5Lbs)/day
    • Milk: 500kg (1102.3Lbs)/day
  • Door: Tight PVC foam integration for insulation
  • Compressor:
    • Freezing (Drum): 1, 1/2 Hp
    • Cold storage (Bin, Hopper): 1/4 Hp
  • Cooler:
    • Freezing: Drum revolution type
    • Cold storage: Tube sensor-based direct cooling
  • Condenser: Fan-based forced air cooling
  • Power: AC 220~230V 60Hz / 1PH
  • Operation Temperature:
    • Freezing: -25℃ ~ -35℃ (-10°F ~ -31°F)
    • Cold storage: 10℃ (50°F) or lower
  • Drum Revolution Count:
    • Water: 1200rpm
    • Milk: 950 (750)rpm
    • Adjustable range: 500 ~ 1500 (1300)rpm
  • Refrigerant:
    • Freezer: R-404A
    • Cold storage: R-134a
  • Grounding: Must be connected to a GFCI receptacle or circuit.
  • Water Pressure: 1~5kg/cm² (20~80psi)
  • Water Temperature: 10~32℃ (50~90°F)
  • Ambient Temperature: 10~38℃ (50~100°F)

Usage Features

Installation:

  • Location: Must be installed indoors in a clean, hygienic place, away from heat sources, with good ventilation, and on an even surface (surface angle less than 1°). A minimum distance of 20cm (8") from walls is required for normal operation.
  • Water Supply: Requires proper water supply and draining facilities. Connects to a potable water supply.
  • Drainage: A drain hose must be inserted from the front for optimal draining. The floor should be waterproof and sloped for proper water drainage, with an overflow prevention wall.
  • Grounding: Essential to prevent electric shock. If no grounding terminal is available, connect the ground wire to a copper plate buried under the ground (over 75cm/30" deep). Do not ground to gas piping, water supply, lightning rod, or telephone lines. Plastic water piping or non-insulated materials will not provide grounding.
  • Tray Holder: The manual provides step-by-step instructions for installing the tray holder, including removing the front cover, pulling the tray holder forward, closing the cover, and inserting the support. Caution is advised against placing more than 5kg on the tray or sitting on it, and to avoid getting caught in the extruding part.

Operation:

  • Power On: Plug into a power supply. Wait at least 5 minutes after disconnection before reconnecting to prevent overload.
  • Water Supply: Open the faucet to supply water to the icemaker.
  • Mode Selection: Upon startup, select "Milk" or "Water" mode using INC/DEC buttons and confirm with SELECT. For milk mode, ensure sufficient milk in the ingredient container and stir every 20-30 minutes if insoluble ingredients precipitate.
  • Operation Select: Choose "Auto" for continuous operation until the bin is full, or "Timer" for a set duration.
  • Temperature Display: View current hopper and bin temperatures.
  • Bin Temperature Setting: Adjust the "On" (compressor starts) and "Off" (compressor stops) temperatures for the bin. Default values are 0℃ and -3℃, respectively. Changing these values is not recommended unless necessary, as incorrect settings can cause ice to melt or lump.
  • Mix Hopper Temperature Setting: Adjust the "On" and "Off" temperatures for the mix hopper. Default values are 7℃ and 4℃, respectively. Incorrect settings can lead to ingredient spoilage or freezing.
  • Touch Button Sensitivity Adjust: Set sensitivity (default is "1"). Do not change unless necessary.
  • Timer Run Setting: Set the operation time in minutes.
  • Program Version Display: Check the current program version.
  • Factory Reset Setting: Press SELECT and VALVE buttons simultaneously to reset all settings to factory defaults.
  • Motor Speed Control: Adjust motor speed (e.g., 1300 rpm) using MODE > MOTOR > INC./DEC. buttons while the product is in operation.
  • Ice Making: Press RUN/STOP to start. Snow ice production begins in about 60 seconds.
  • Stop Operation: Press RUN/STOP again to stop.
  • Pinch Valve: "Pinch Valve ON" opens the hose to supply milk to the drum gutter. "Pinch Valve OFF" plugs the milk supply hose. The pinch valve will not activate if the level sensor detects ingredients or water in the drum gutter.

Maintenance Features

Daily Cleaning and Sterilization:

  • Hygiene: For maximum hygiene, clean and sterilize the product daily.
  • Washing Mode: In wash mode, only the drum runs for 60 minutes. Use a washer and other tools. The cold storage function is disabled during this mode.
  • Disassembly and Washing (General):
    1. Drum Gutter: Remove the drum gutter, being careful of spills and the level sensor.
    2. Residue Removal: Remove milk residue by running water through the storage tank 2-3 times.
    3. Drain Plug: Remove the drain plug to empty water.
    4. Blade: Unscrew bolts and remove the blade. Wear protective gloves.
    5. Milk Supply Hose: Disassemble the milk supply hose and its joint.
    6. Water Supply Fittings: Remove water supply fittings.
    7. Drain Board: Remove the drain board from the inside of the storage tank.
    8. Door Rubber Seal: Remove the rubber seal of the door.
  • Sterilizing and Second Washing:
    1. Rubber Parts: Clean rubber parts in lukewarm water with cleaning agents. Hot water is not recommended. Dry thoroughly.
    2. Ingredient Tank & Storage Tank: Clean the inside of the ingredient tank, machinery compartment, and storage tank with cleaning agent and running water.
    3. Ingredient Inlet & Outlet: Clean thoroughly with a cleaning brush.
    4. Front Drain Hose: Clean with cleaning brushes.
    5. Reassembly: Assemble cleaned parts and rubber seals in reverse order.
    6. Blade Adjustment: Adjust the blade after assembly using the #10 wrench. Set the blade in position and tighten the bolt. Insert the gap gauge (Water: 0.5mm, Milk: 0.8mm) between the drum and blade, tightening bolts on each side. When the blade is secured, remove the gap gauge and fully tighten the bolts.
    7. Sanitizer Dilution: Pour sanitizer (K5, separately available) into the water basket and dilute it (10 liters/2.64 gal of water per bag).
    8. Drum Sanitization: Pour diluted sanitizer into the hopper basket and water gutter. Press WASH to operate the drum for 1 minute, coating the drum evenly.
    9. Drum Stop: Fill diluted sanitizer into the water gutter and press WASH. Press WASH again after 1 minute to stop the drum.
  • Washing and Cleaning (Final Steps):
    1. Drum Gutter Removal: Remove the drum gutter.
    2. Sanitizer Removal: Press the VALVE button to remove diluted sanitizer from the ingredient tank.
    3. Ingredient Tank & Storage Tank Rinse: Open the drain plug and pour running water into the ingredient tank to clean it. Use a shower for cleaning.
    4. Drum Gutter Assembly: Assemble the drum gutter, ensuring the ingredient hose is not stuck.
    5. Drying: Spray diluted sanitizer inside and outside the machinery and let it air dry.
  • Blade Maintenance: The blade may rust and should be dried after cleaning. It is a consumable part and should be replaced every 6 months or when it rusts. Blades are available from Icetro service centers or local dealers.

Important Notes:

  • This product senses ice with voltage (resistance); tap water is highly recommended as ice made of distilled water may not be recognized.
  • Factory default values may vary. Consult the manufacturer if using ingredients other than water or diluted milk to prevent malfunction.
  • In case of an ERROR, the issue needs to be resolved, and the product rebooted.

icetro IS-0700-AS Specifications

General IconGeneral
Brandicetro
ModelIS-0700-AS
CategoryIce Maker
LanguageEnglish

Related product manuals