Do you have a question about the Icom IC-7300M and is the answer not in the manual?
Turns the transceiver ON or OFF.
Toggles between transmit and receive.
Opens the MENU screen.
Changes the operating frequency.
Displays Multi-function menu for adjustments.
Accepts 13.8 V DC via power cable.
Connects to ground for safety and interference reduction.
Connects to a 50 Ohm PL-259 coax connector.
Connects to a PC.
Connect ground wire to secure ground point.
Connect 13.8VDC power supply to radio.
Connect antenna feed line via SWR meter.
Connect radio to PC using USB A/B cable.
Connect hand microphone to 'MIC' connector.
Connect antenna feed line to SWR meter.
Plug HF jumper into radio and SWR meter.
Connect SWR meter to power supply.
Connect ground lead to radio and ground point.
Turn on power supply and press radio's 'Power' button.
Select HF or Digital mode via Menu -> SET -> SD Card.
Adjust power output via Multi-Function Control.
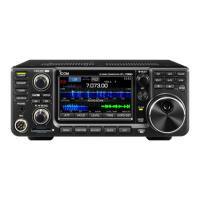
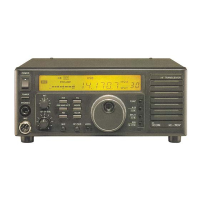
The Icom 7300 is a sophisticated HF/50/70MHz transceiver designed for amateur radio enthusiasts, offering a comprehensive suite of features for both seasoned operators and those new to the hobby. This quick guide provides an overview of its setup, operational features, and some maintenance considerations, ensuring users can get on the air efficiently.
At its core, the Icom 7300 is a high-performance amateur radio transceiver capable of transmitting and receiving across the HF, 50MHz, and 70MHz bands. It supports various modes including SSB (Single Sideband), CW (Continuous Wave), RTTY (Radio Teletype), AM (Amplitude Modulation), and FM (Frequency Modulation), making it versatile for different communication needs. The device is designed to output up to 100W, though it automatically restricts output to 10W during tuning to protect the transmitter.
A standout feature is its real-time spectrum scope and waterfall display, which provides a visual representation of band activity. This allows operators to quickly identify signals, monitor band conditions, and locate clear frequencies. The scope can be accessed via the "Scope" icon on the menu screen, offering an intuitive way to navigate the radio spectrum.
The transceiver incorporates an internal antenna tuner, which can be activated by pressing the "Tuner" key. This feature automatically matches the antenna's impedance to the radio, optimizing power transfer and reducing SWR (Standing Wave Ratio), which is crucial for efficient operation and protecting the final amplifier stage.
For ease of use, the IC-7300 includes a touch-screen interface, allowing for direct interaction with various functions and settings. The main dial provides precise frequency tuning, while dedicated keys and controls offer quick access to essential operations such as transmit/receive toggling, noise reduction, notch filtering, and preamplifier/attenuator adjustments.
Memory functions are extensive, allowing users to save frequently used frequencies and settings into "Memo Pads." These can be recalled sequentially, streamlining operation during contests or when switching between preferred bands and modes. The VFO/Memory key facilitates switching between Variable Frequency Oscillator (VFO) and Memory modes, and also allows copying memory channel contents to the VFO.
The radio also includes a range of audio processing features. The AF/RF/SQL control adjusts the audio output level, RF gain, and squelch threshold, enabling clear reception even in noisy conditions. Noise Reduction (NR) and Notch filter functions further enhance signal clarity by suppressing unwanted background noise and interfering signals. The Twin Passband Tuning (PBT) control allows for fine-tuning of the IF filter's passband width, providing excellent selectivity.
For digital modes and external control, the IC-7300 is equipped with USB and CI-V remote control jacks. The USB port allows connection to a PC for logging, digital mode operation, and firmware updates, while the CI-V jack enables control by external devices or other transceivers.
Setting up the IC-7300 involves a few key connections. First, connect the ground wire from the radio to an Andersen power pole connector and then to a reliable ground point to prevent electrical shocks and reduce interference. Power is supplied via a 13.8V DC source, typically a power supply like the MFJ-4230 MVP, which should be verified to output 13.8V DC before connecting to the radio. The power line connects to the DC 13.8V socket on the rear of the radio.
Antenna connection is critical. The 50-ohm feed line from the antenna should first connect to an SWR meter (e.g., Daiwa CN-501H), and then a jumper cable connects the SWR meter's output to the "ANT" connector on the rear of the IC-7300. This setup allows for continuous monitoring of SWR.
Once all connections are secure, turn on the power supply and then press the "POWER" button on the IC-7300 for one second to power on the radio. The initial setup involves navigating the menu screen, which is accessed by pressing the "Menu" button. From here, users can access various settings, including the "Scope" for the waterfall display.
Changing the operational mode (HF or Digital) involves going to the "Menu," selecting the "SET" icon, navigating to page 3, and tapping the "SD Card" icon. Users can then select a "Digital" or "HF" file, tap "ALL" to load, and confirm to cycle power. The radio will restart in the chosen mode.
Power output adjustment is done by pressing the "Multi-Function Control" (27), which brings up a window displaying options like Power, MIC GAIN, COMP, and Monitor. Tapping "Power" will backlight it blue, allowing the control knob to adjust the desired power output level.
Band selection is intuitive: simply touch the frequency readout on the screen, and a pop-up window will appear, allowing direct selection of the desired band. Frequency tuning is primarily done with the "Main Dial" (18). For antenna tuning, pressing the "Tuner" key (3) activates the internal tuner to match the antenna to the radio.
The IC-7300 also supports various accessories. A standard stereo headphone can be connected to the "PHONES" jack, and the supplied or an optional microphone connects to the "MIC" connector. For CW operation, a straight key, electronic keyer, or paddle can be connected to the "KEY" jack. External linear amplifiers can be connected via the "ALC" input jack, and an optional automatic antenna tuner (like the AH-4 or AH-740) can be controlled through the "TUNER CONTROL" socket.
The IC-7300 is designed for robust operation, but some maintenance aspects are important for longevity and optimal performance. The device includes a cooling fan, which automatically operates to cool the PA (Power Amplifier) unit when necessary, preventing overheating during extended transmissions.
The SD card slot is a crucial feature for maintenance and customization. Users can save their preferred settings to a unique file on an SD card. This allows for easy restoration of settings or transfer to another IC-7300. It is explicitly advised not to overwrite the two original files on the SD card, as these likely contain factory default settings or essential system configurations. This feature also supports firmware updates, which can be loaded from an SD card to enhance functionality or fix bugs.
The manual emphasizes reading the full manual, available online as a PDF, for comprehensive understanding. Additionally, numerous instructional videos on platforms like YouTube cover various modes and operational aspects of the IC-7300, serving as valuable resources for learning and troubleshooting.
The "SET" menu items, detailed in the manual, offer extensive customization options. Each menu choice typically has a "DEF" (Default) tab, allowing users to reset individual settings to their factory defaults if adjustments lead to undesirable performance. This provides a safety net for experimentation with settings.
Regular checks of connections, especially ground and antenna connections, are important to ensure stable and safe operation. Keeping the radio in a well-ventilated area will assist the cooling fan in maintaining optimal operating temperatures. The robust construction of the IC-7300, combined with these user-accessible maintenance and customization features, ensures a reliable and adaptable experience for amateur radio operators.
| Type | HF/50 MHz Transceiver |
|---|---|
| Modes | SSB, CW, RTTY, AM, FM |
| Receiver Type | Direct Sampling |
| Weight | 4.4 kg (9.7 lbs) |
| Antenna Impedance | 50 ohms |
| Supply Voltage | 13.8 V DC ±15% |
| Antenna Connector | SO-239 |
| Power Supply | 13.8V DC |
| Output Power | 50W |
| Display | 4.3 inch color TFT touch screen |
| Receiver Sensitivity | 0.13 μV (SSB, 10 dB S/N) |
| Dimensions | 240 x 95 x 240 mm (9.45 x 3.74 x 9.45 in) |
| Frequency Range | TX: 1.8 - 54 MHz RX: 0.030 - 74.800 MHz |