This document provides comprehensive installation and maintenance instructions for a split system, premium line AC & HP (Air Conditioner & Heat Pump) condenser. It's designed for qualified service technicians, emphasizing safety, proper setup, and operational procedures to ensure optimal performance and longevity of the unit.
Function Description:
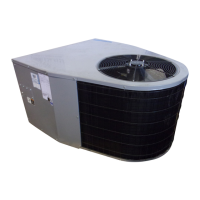
The split system AC & HP condenser is the outdoor component of a heating and cooling system. It works in conjunction with an indoor unit (furnace/air handler) to regulate indoor temperatures. In cooling mode, it expels heat from the indoor space to the outside, while in heating mode (for heat pumps), it extracts heat from the outside air and transfers it indoors. The "premium line" designation suggests enhanced features, efficiency, or durability compared to standard models. The unit is pre-charged with refrigerant to match an indoor unit and 25 feet of refrigerant line, with provisions for adjusting the charge for different line lengths.
Usage Features:
The manual details critical aspects of the unit's installation and initial startup.
- Location: Emphasizes careful placement to avoid noise issues (away from fresh air intakes, vents, bedrooms), ensure proper drainage, and prevent heat/lint/exhaust recirculation. Clearances are specified: 48 inches above the unit for discharge air, 18 inches around the coil for intake air on three sides (reducible to 6 inches on one side, typically between the unit and a structure). Special considerations are given for roof overhangs (minimum 48" vertical clearance) and inside corner locations to prevent air recirculation. For heat pumps, the platform must be above average winter snow levels to prevent coil blockage.
- Support: The unit must be level and supported above grade by permanent materials like concrete, bricks, blocks, steel, or pressure-treated timbers. This prevents shifting, settling, and minimizes vibration/noise transmission. Roof-top installations are acceptable if the roof can support the unit and provisions are made for water drainage and noise/vibration mitigation.
- Refrigerant Lines: Instructions cover the use of dehydrated or dry sealed deoxidized copper tubing, stressing that tubing should not be cut or seals broken until ready for connection. It warns against leaving lines open to the atmosphere and emphasizes careful handling to avoid kinks. The manual specifies the use of insulated hangers for suspension and recommends insulating the suction line, especially for long runs.
- Restrictor Orifice: For certain indoor matches, the restrictor orifice in the liquid line fitting at the indoor coil may need to be changed. The manual provides steps for removing the existing orifice and installing the correct one, ensuring the rounded end faces the feeder tubes.
- Brazing Connections: Detailed steps are provided for making braze connections, including cleaning joints, using suitable brazing alloy, inserting tubing, applying heat-absorbing paste to protect the service valve, brazing, and quenching the joint. A critical warning highlights the fire hazard of refrigerant and oil mixture igniting if exposed to a brazing torch, mandating proper refrigerant removal before brazing.
- Evacuation: A recommended method for evacuating the system is outlined, involving connecting a vacuum pump to the suction and liquid line gauge ports, evacuating to 300 microns, and holding the vacuum to ensure no leaks.
- Service Valves: Instructions for actuating both standard and ball-type service valves are provided, including proper torque for valve caps to prevent leaks.
- Electrical Wiring: Emphasizes grounding the unit according to national and local codes using copper conductors. It details routing line voltage wiring through the control box to the contactor and ground lug, and low voltage wiring to the pigtails. Wiring diagrams are included for both AC condenser and heat pump low voltage connections, with specific instructions for thermostat wiring and electric heat staging.
- Startup Procedure: A step-by-step guide for initial startup includes closing electrical disconnects, energizing the crankcase heater, setting the thermostat, operating the unit for 15-20 minutes, and checking/adjusting the refrigerant charge.
- Refrigerant Charge Adjustment (Cooling Only - Superheat Method): Provides a method for checking and adjusting the refrigerant charge based on superheat. This involves measuring suction line temperature and pressure, converting pressure to saturation temperature, and calculating superheat. A temperature/pressure chart and recommended superheat values (based on outdoor air temperature) are provided. The manual advises adding or removing charge in 4-6 ounce increments and allowing 15 minutes for the system to stabilize before rechecking.
- Heating Checkout (Heat Pump Only): A detailed procedure for checking the heat pump's heating function, including thermostat settings, blower operation, contactor closing, auxiliary heat energization, and ensuring proper operation without unusual noises.
- Defrost System (Heat Pump Only): Describes two types of defrost systems: time/temperature and demand-based. The time/temperature system has adjustable intervals (30, 60, or 90 minutes) and terminates based on coil temperature or time. The demand-based system adjusts frequency based on coil temperature and run time, with adjustable termination temperature. Instructions are provided for adjusting the time interval and temperature termination, as well as a functional check to force a defrost cycle.
Maintenance Features:
The manual includes several key maintenance guidelines to ensure the unit's efficiency and longevity.
- Condensate Drain: Recommends checking the condensate drain at least monthly during the cooling season for free flow and cleaning if necessary.
- Cleanliness: Emphasizes the importance of free airflow and keeping the outdoor coil clean and free of restrictions like fences, shrubs, snow drifts, grass clippings, weeds, and other debris. It specifically warns to turn off electricity before cleaning.
- Coil Cleaning: Advises cleaning the coil when it's cold, using an alkaline-based cleaner only. It warns against using acid-based cleaners or cleaning a hot coil, as this can remove paint from the fins or clog the coil.
- Weather Covers: Strongly advises against using non-ventilated weather covers, as they can trap moisture, leading to rust build-up and damage. Only ventilated or breathable fabric covers that allow rapid moisture evaporation are recommended.
- Shipping Bracket: Notes that a shipping bracket may be present for improved warehousing and can be left in place or removed by the installer. If removed, it's crucial to reinstall the screw(s) that secured the service valve.
Overall, the document serves as a critical resource for technicians, ensuring safe, compliant, and effective installation and maintenance of the split system AC & HP condenser.