9
FAILURE TO FOLLOW THESE INSTRUCTIONS
MAY RESULT IN AN EXPLOSION OR FIRE THAT
MAY CAUSE PROPERTY DAMAGE, SERIOUS
INJURY OR DEATH!
NEVER LEAVE THIS APPLIANCE UNATTENDED
WHILE IN USE! NOT TO BE USED BY
CHILDREN!
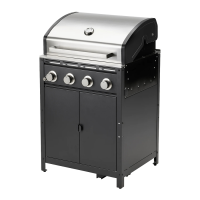
LIST OF FEATURES
The numbering of the product features
shown refers to the illustration of the
barbecue on the graphic page.
1. Handle
2. Hood
3. Cooking grill
4. Burners
5. Vaporizer bars
6. Grease tray
7. Control knobs
8. Barbecue body
USER INSTRUCTIONS
Before proceeding, make certain that you
understand the WARNING statements in this
manual.
• Preparation before cooking – To prevent
foods from sticking to the cooking grill,
please use a long handled brush to apply
a light coat of cooking or vegetable oil
before each barbecuing session.
• Note: When cooking with your barbecue
forthersttime,thepaintontheoutside
of the barbecue may change colour
slightly as a result of high temperatures.
This is normal and should be expected.
Lighting the Barbecue
• Openthebarbecuehood(2).
• Ensureallknobsareinthe‘OFF’position(7).
• Turn on the gas supply at the gas cylinder.
• Pushcontrolknob(7)downandturnto
ignition position.
• Hold control knob in for at least 10
secondstoensuretheburner(4)stayslit.
• If burner does not light after holding dial
in for 20 seconds, turn the control knob
to the ‘OFF’ position and wait for 1 minute
and try again. Do not continuously hold
the control knob in as you may cause a
build up of gas.
• In windy conditions shield from wind to
ensure easy lighting.
• Turncontrolknob(7)toalterburner
settingsasrequired.
• After ignition, the burners should be
burned at the high position for 3-5
minutes in order to preheat the barbecue.
This process should be done before every
cooking session. IMPORTANT - The hood
should be open during preheating.
• After completion of preheating, turn
burners to low position and cook with the
hood in the down position for best cooking
results.
Manual Lighting Instructions
• Removethecookinggrill(3)andvapour
bar(5)frombarbecue.
• Placealitmatchbesidetheburner(4)(at
the same location as the sparker shield).
• Push and turn the right most control knob
(7)anti-clockwisetothehighposition.
• After successful lighting, light each burner
from left to right as desired.
• If burner fails to ignite after repeated
attempts, contact the help line number
stated in this manual.
Grill Cooking
The vapour bar evenly distributes the burner
ameacrossthecookinggrillarea.The
natural food juices produced during cooking
fall onto the hot vapour bar below and
vaporise.