EasyManua.ls Logo

Inficon D-TEK Select User Manual

Inficon D-TEK Select
16 pages
To Next Page IconTo Next Page
To Previous Page IconTo Previous Page
Page #3 background image
3
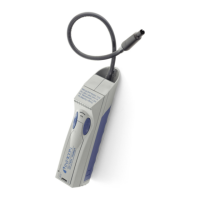
Thank you for buying the INFICON D-TEK Select
Refrigerant Leak Detector!
With normal use, your D-TEK Select from INFICON will give you years of
trouble-free service.
To get the best performance from your D-TEK Select, please read this manual
carefully before you start using the instrument. If you have any questions or need
additional assistance, please call 800-344-3304. We’ll be happy to help you.
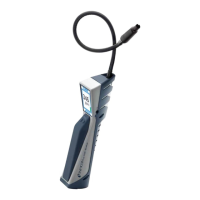
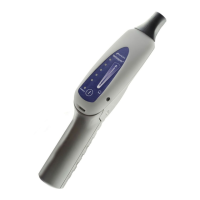
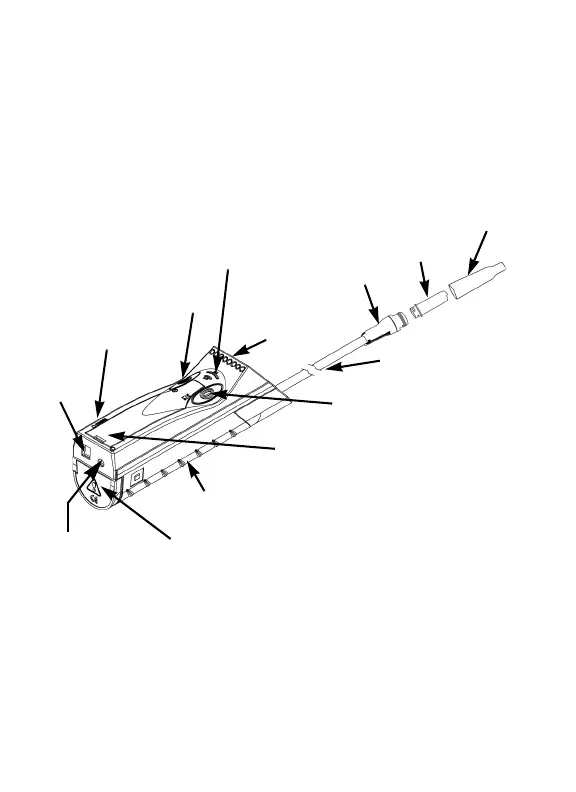
Green / Yellow
LEDs
High / Low
Sensitivity Switch
Power
Switch
Power Cell
Compartment
Filter
Cartridge
Flexible
Probe
Rubberized
Grip
Tip
Power
Jack
Headphone
Jack
High / Low
Indicators
Charge
Indicator
IR Cell
Access Door
Probe
Cap

Questions and Answers:

Inficon D-TEK Select Specifications

General IconGeneral
TypeRefrigerant Leak Detector
Operating Temperature32°F to 122°F (0°C to 50°C)
Weight1.2 lbs (0.54 kg)
Battery Life8 hours
Response TimeInstantaneous
Refrigerants SupportedCFCs, HFCs, HCFCs
Sensitivity0.1 oz/year (3 g/year)
Power SourceRechargeable battery
OutputAudible and visual alarms
CertificationsCE, RoHS

Summary

Declaration Of Conformity

Getting Started

Using Your INFICON D-TEK Select

Safety Warning: Combustible Atmospheres

Alerts users to avoid operating the instrument in presence of flammable gases.

Detector Warm-up and Status Indicators

Explains detector power-on, warm-up sequence, and indicators for readiness.

Refrigerant Compatibility and Limitations

Details the refrigerants the detector responds to, noting R-11 is not detected.

Finding Leaks

Leak Detection and Pinpointing

Step-by-step guide on how to locate and pinpoint refrigerant leaks using the probe.

Sensitivity Adjustment for Leaks

Instructions on adjusting sensitivity for different leak concentrations.

Headphone Usage and Safety Warning

Critical warning about potential hearing damage from using non-INFICON headphones.

Using the Manual Zero Mode

Initializing Manual Zero Mode

How to initialize manual zero mode by holding the HI/LO switch for five seconds.

Performing Manual Zero

Procedure to manually zero the detector, setting a new background base level.

Exiting Manual Zero Mode

Steps to exit manual zero mode and return to automatic zeroing.

Recharging the Power Stick

Power Stick Charging Indicators

Explains the battery charging indicator light states during the charging process.

Power Stick Charging Time and Operation

Details the full charge time and the ability to operate while charging.

Power Cord Usage Warning

Critical warning against using unauthorized power cords with the instrument.

Changing the Filter Cartridge

Filter Cartridge Replacement Criteria

Guidance on when to replace the filter cartridge based on its condition or performance.

Filter Cartridge Replacement Procedure

Step-by-step instructions for removing and installing a new filter cartridge.

Filter Cartridge Installation Requirement

Emphasizes the necessity of always operating the detector with a filter cartridge installed.

Changing the Infrared Cell

IR Cell Lifespan and Replacement Indicator

Information on the IR cell's operational life and how the unit indicates its end-of-life.

IR Cell Replacement Procedure

Detailed steps for safely removing and installing a new infrared cell.

IR Cell Installation Precautions

Important note ensuring proper alignment and seating of the IR cell connectors.

Removing/Replacing the Power Stick

Power Stick Removal

Instructions for safely removing the power stick from the instrument.

Power Stick Installation

Procedure for installing a new power stick and closing the battery compartment.

Power Stick Installation Troubleshooting

Guidance on troubleshooting power issues and checking correct power stick installation.

Replacement Parts and Accessories

Specifications

Troubleshooting Guide

Troubleshooting Common Problems

Provides solutions for common problems like unit not detecting, not powering up, or indicators flashing.

Warranty and Liability-Limitation

Return Materials Authorization Procedure

Related product manuals