4
3
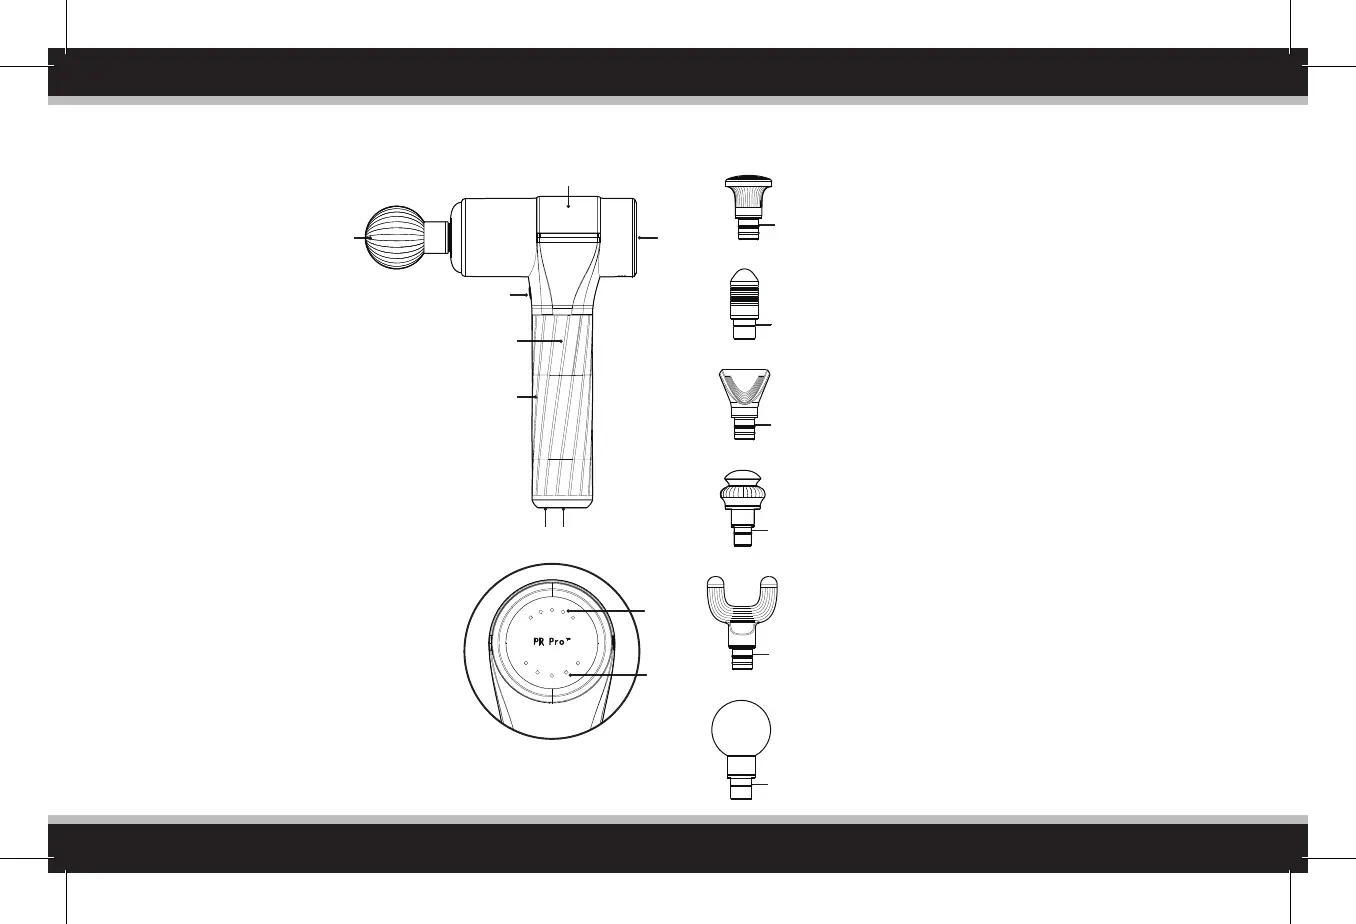
PRODUCT DESCRIPTION
10
9
Control Panel
Installation method: Rotate the massage head gently while
pulling/loading. Note: it may take some significant force
when pulling off the heads after prolonged use. Outward
force is more important than rotating.
11. Flat Head - Features a large, flat contact point. Great for
large muscle groups, such as the calves and hamstrings
allowing you to cover more surface area in less time.
12. Bullet Head - Features a more concentrated contact
point which re-inacts a thumb. Best for pinpointing
specific areas of the feet or around joints.
13. Wedge Head - Features a long, wide contact point.
Great for scraping along the upper arms, chest,
shoulders, and biceps.
14. Dampener Head - Features a cushioning effect for users
who are new to percussive therapy. Great for larger
muscle regions such as the glutes, adductors, or lower
back, and also more sensitive areas such as the knee.
15. Fork Head - Featuring a two-pronged shape, the fork
head is great for getting into smaller, slimmer muscle
regions such as the achilles, IT-band, forearms, or along
the spine.
16. Ball Head - The large round head is used for large
muscle groups such as the quads, hamstrings, traps, and
upper back.
SIX REPLACEABLE MASSAGE HEADS
2
4
3
1
5
6
7
8
13
11
12
15
16
14
1. 45W brushless high-torque motor.
2. Massage head connection point.
3. Control Panel.
4. Power Button: push button to
switch on device. Once device is
on, push the button to toggle
through 5 speed levels. To turn
device off, press and hold the
power button, or cycle through all
speed levels until the device stops.
5. Silica gel covered handle.
6. Rechargeable Lithium-ion battery.
7. Battery Pack LED Ring: When flashing Red, the
battery is below 20%; when flashing Orange,
the battery is at 20-40%; when flashing
Yellow, the battery is at 40-60%; when
flashing Green, the battery is at 60-80%; when
solid Green, the battery is at 80-100%.
8. Battery Power button located in the middle of
the charging ring. This button must be ON for
the Power Button (4.) to work.
9. Speed indicator light: from left to right is level
1-5, White LED.
10. Power indicator light: after switching on, 5
lights indicate 80-100% power; 4 lights
indicate 60%-80% power; 3 lights indicate
40%-60% power; 2 lights indicate 20-40%
power; 1 light indicate 5-20% power; 1 flashing
light indicates low power and the device must
be charged.