Do you have a question about the Ingenico DX8000 and is the answer not in the manual?
Steps to perform software upgrade on the terminal.
Instructions for processing a purchase transaction.
Steps to process a refund transaction on the terminal.
Procedure for performing a cash-out transaction.
How to change the merchant password for security.
Details about the DX8000 terminal's hardware and software capabilities.
Step-by-step guide to install a new receipt paper roll.
Instructions for installing the battery pack into the terminal.
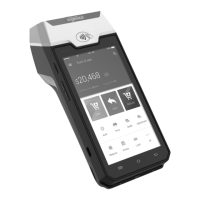
The DataMesh DX8000 is a versatile terminal designed to streamline payment processing and enhance the in-store digital experience. It arrives fully configured and ready for immediate use, simplifying setup for merchants.
The primary function of the DX8000 is to facilitate various payment transactions, including purchases, refunds, and cash-out operations. It integrates seamlessly with the Satellite Payment Application, which serves as the central interface for all payment-related activities. The device is equipped to accept all common payment methods, including EMV chip and PIN, contactless payments, and magnetic stripe cards, offering flexibility for customers.
Beyond payment processing, the DX8000 also supports essential operational functions. It features an integrated printer for generating receipts, ensuring a tangible record of transactions for both merchants and customers. The device's connectivity options, including Wi-Fi, enable it to operate in diverse retail environments and maintain continuous communication for transaction processing and software updates.
The DX8000 is designed for ease of use, starting with its initial setup. To begin, the device's battery needs to be charged by connecting the power adaptor to the USB-C connector on the left side of the terminal and then to a mains network. The charging status is visible on the screen. To power on the device, the power button on the left-hand side must be held for three seconds until the screen illuminates. After a brief start-up routine, the Satellite Payment Application icon will appear on the home screen, indicating readiness for use.
Connecting to Wi-Fi is straightforward: users can swipe down from the top of the screen, tap the Base Icon, select the desired network, enter the password, and tap "Connect." This ensures the terminal has the necessary internet access for transactions.
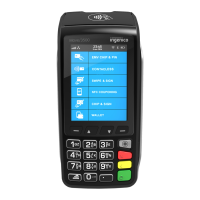
The Satellite Payment App is the core of the device's functionality. When the app is idle, enabled payment features are highlighted in white text. To initiate a payment, users simply touch anywhere on the idle screen. For a purchase transaction, the user taps the "Purchase" icon, enters the amount using the keypad, and confirms with the green tick. The customer is then prompted to insert, swipe, or pay-wave their card and may be asked to enter their PIN. The terminal will display "Approved/Declined," and depending on printer settings, will prompt to print merchant and customer receipts. Refund and cash-out transactions follow similar intuitive steps, with refunds requiring a merchant password for authorization.
The device's settings menu, accessible via the Gear icon on the Satellite Payment App homescreen, allows for customization and management. Here, merchants can update their password, perform software upgrades, and manage terminal navigation options. The default merchant password is "0000," and it is recommended to change this during installation for security. Software upgrades are initiated by tapping "Software Upgrade" and confirming with "Yes."
Terminal navigation features, such as the Navigation Bar and Status Bar, can be enabled or disabled through the settings menu by checking or unchecking the corresponding tick boxes. This allows merchants to tailor the interface to their preferences.
For support, the device provides easy access to terminal information, including the Terminal ID (TID) and Merchant ID (MID), which are crucial when contacting the DataMesh Group Help Desk. This information can be found by tapping the "i" icon on the Satellite Payment App homescreen.
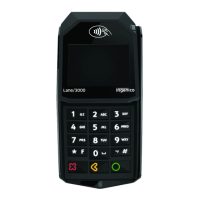
The physical design of the DX8000 includes several user-friendly elements. The left side of the terminal features a power button and volume keys. Virtual keys for Menu, Home, and Back are located at the bottom of the screen. Card readers are strategically placed: the magnetic stripe reader on the right-hand side, the EMV card reader at the bottom, and the contactless card reader above the front face of the device.
Installing the printer roll is a simple process: the paper cover is opened by lifting a catch at the top, the roll is inserted following the indicated direction, the paper is pulled out past the top, and the cover is pressed until it clips into position. It's advised to tear off the first length of a new roll to avoid printing on the adhesive area.
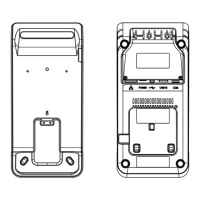
Battery installation is also straightforward. The device is turned over, the battery cover clips are pushed to unclip it, the battery pack is inserted into the compartment, and the cover is replaced, pushing until it clips into position.
Maintaining the DX8000 involves simple cleaning procedures to ensure its longevity and proper functioning. Before cleaning, all wires should be unplugged from the terminal. The exterior of the device can be cleaned with a soft cloth lightly soaked in soapy water. It is crucial to avoid cleaning the electrical connections directly.
To prevent damage, users should not use solvents, detergents, or abrasive products, as these can harm the plastic or electrical components. The terminal should also be protected from direct sunlight exposure. It is important never to insert anything into the smart card reader slot other than a smart card, and the device should not be immersed in water or any other liquid.
For any problems encountered during installation or operation, 24/7 support is available through the DataMesh Group Help Desk, which can be reached via phone or email. This ensures that any technical issues can be promptly addressed, minimizing downtime and ensuring continuous operation of the terminal.
| Security | PCI PTS 5.x certified |
|---|---|
| Connectivity | Wi-Fi |
| Battery | Li-ion 5000 mAh |
| Card Readers | Magstripe |
| Power Supply | 100-240V |
| Dimensions | 80 mm |
| Printer | Integrated thermal printer |
| Supported Cards | Visa, Mastercard, American Express, Discover, NFC |
| Memory | 512 MB RAM, 512 MB Flash |